Overview
Hello everyone! 👋,
I'm thrilled to share my experience creating a game using only built-in game objects in Unity. In this blog post, I'll walk you through my process, share the challenges I faced, and offer tips for anyone who wants to try creating their own game using Unity's built-in game objects. Mastering these basics will help you gain a deeper understanding of the game engine and build a solid foundation for more complex projects in the future. Let's dive in!🚀
Introducing Sphere Smasher
"Sphere Smasher" is an exhilarating game inspired by the popular Stack Ball game. In this Unity-created game, your goal is to smash multiple spheres. Some of these spheres pose a danger, while others are crucial for your success. our task is to navigate the game space, move the gun, and shoot at the spheres with precision. Be careful not to hit the dangerous spheres, as it will end the game. On the other hand, smashing all the saving spheres will lead you to victory.
Setting Up The Project
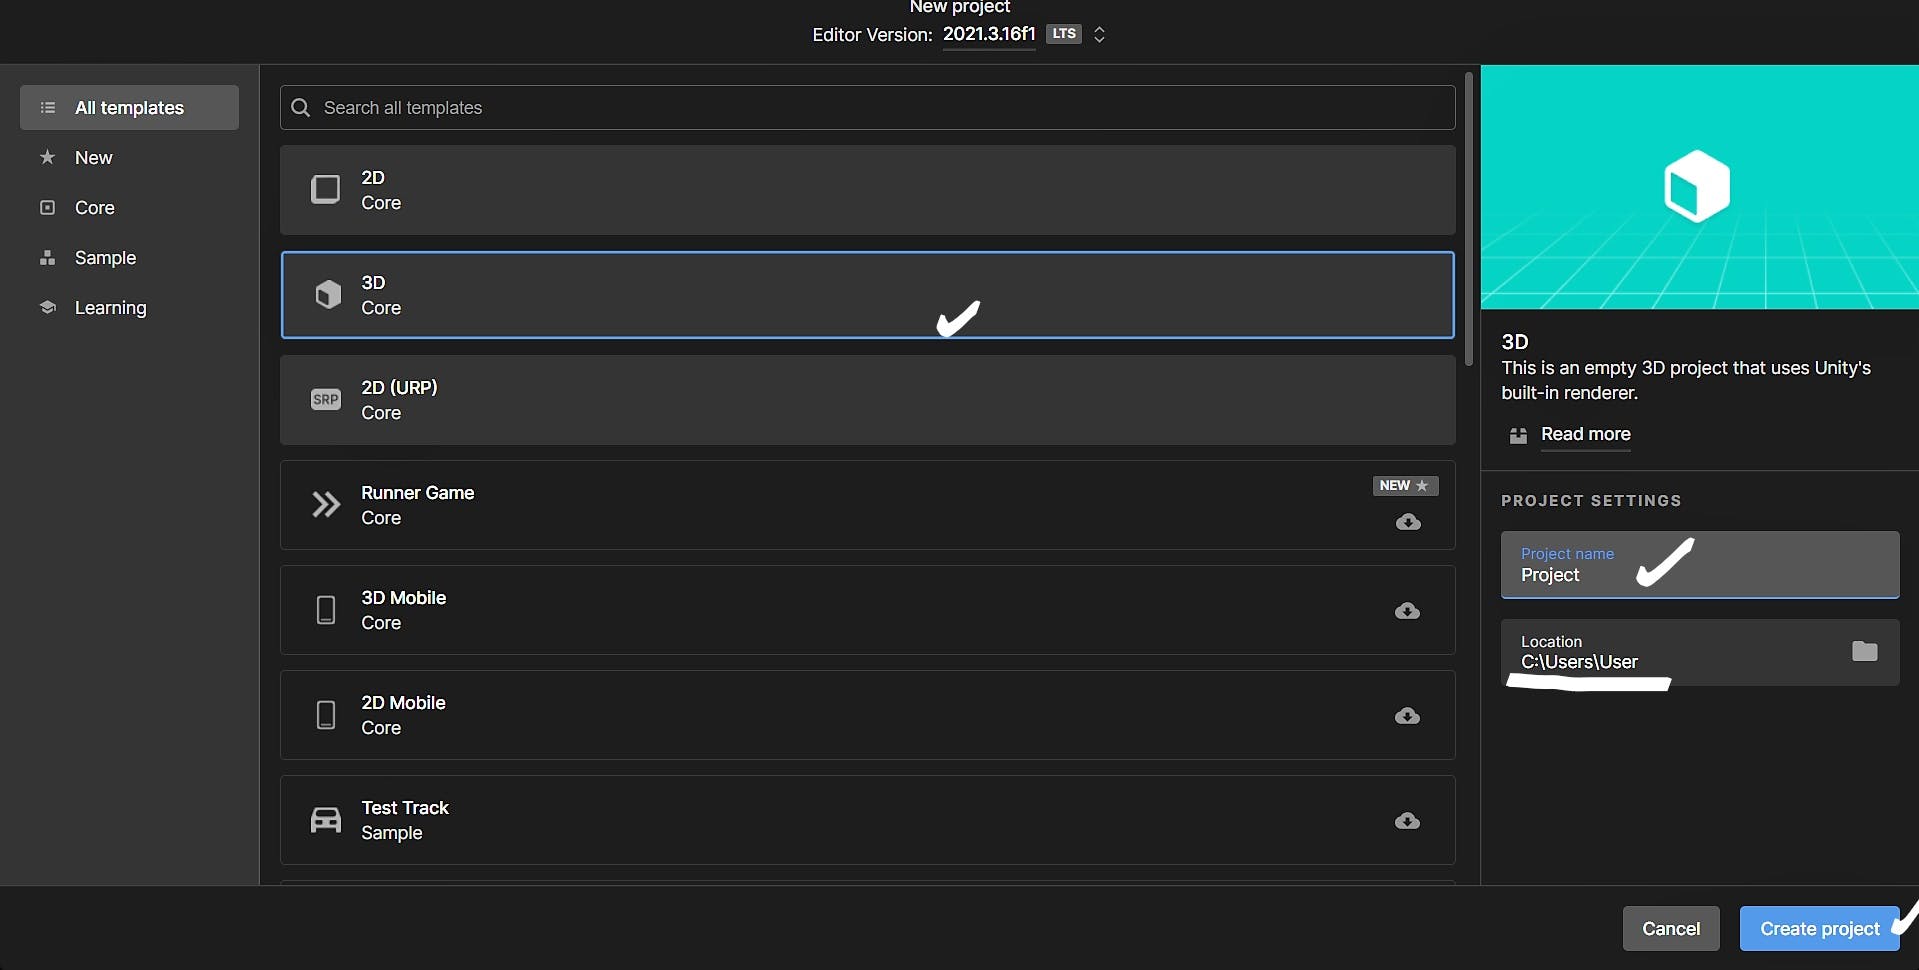
Creating a new project in Unity: Start by opening Unity and creating a new project with a chosen name and location. you can choose between creating a 3D or 2D project depending on the type of game you want to create.
Once you have made your selection and clicked on "Create Project", Unity will create a new project with the selected settings and open the Unity Editor interface. From here, you can start adding game objects and assets to your project.
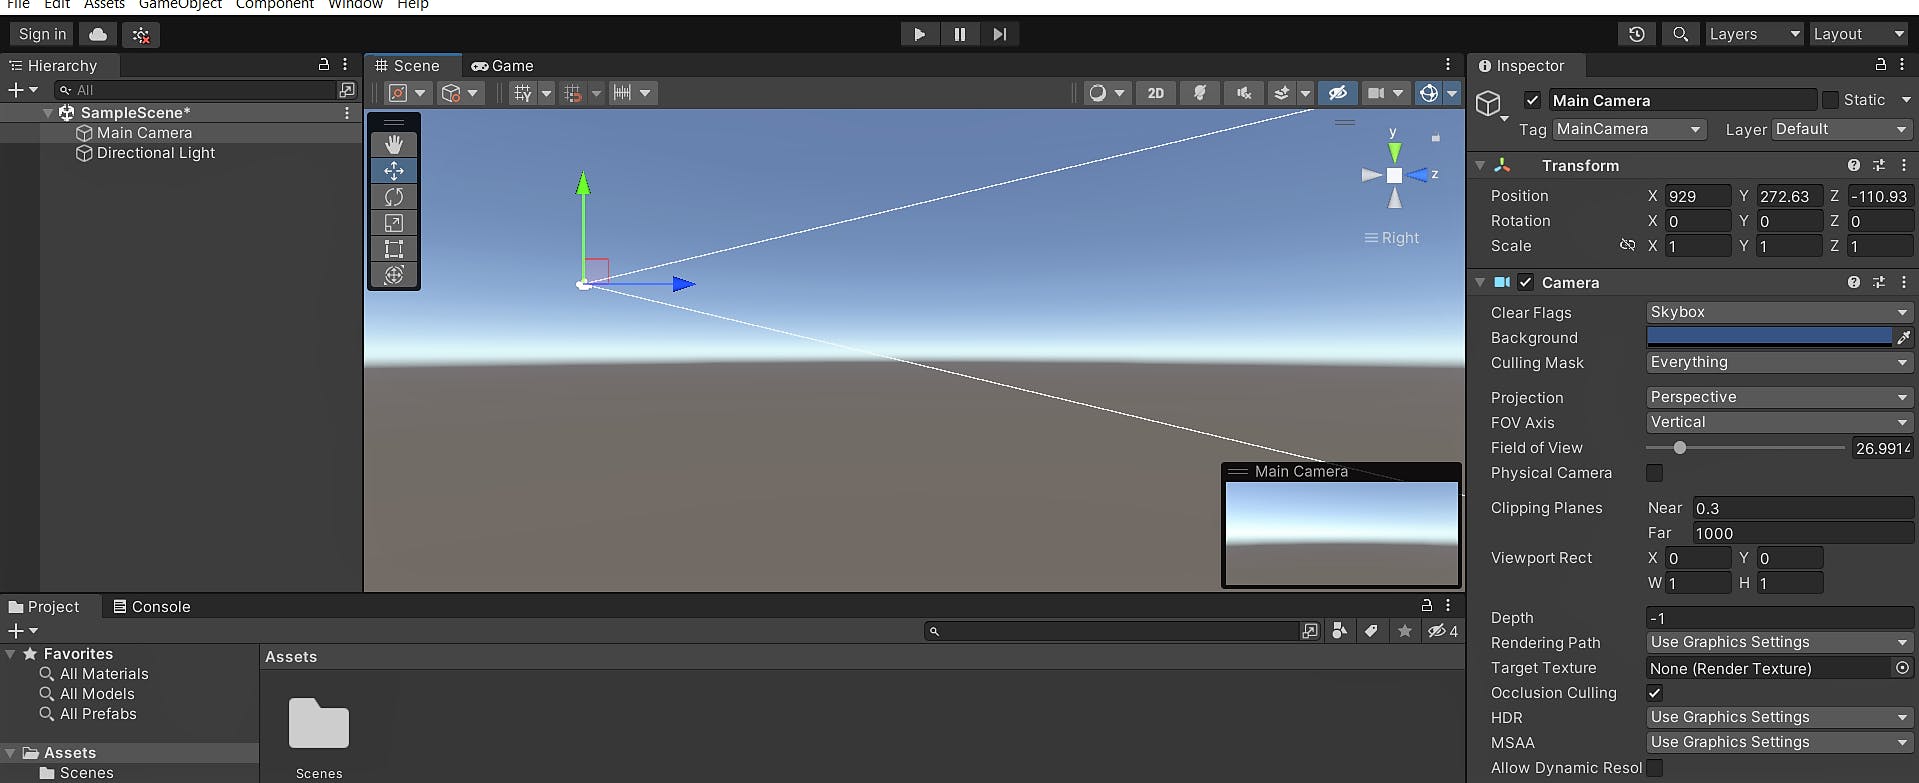
Setting up the game camera: The game camera determines the player's perspective within the game. Adjust the camera's position and settings to define the view and how the game will be seen by the player. Additionally, you have the option to customize the camera's background color, allowing you to create the desired visual atmosphere in your game.
Adding built-in game objects to the scene: Unity offers pre-built objects like
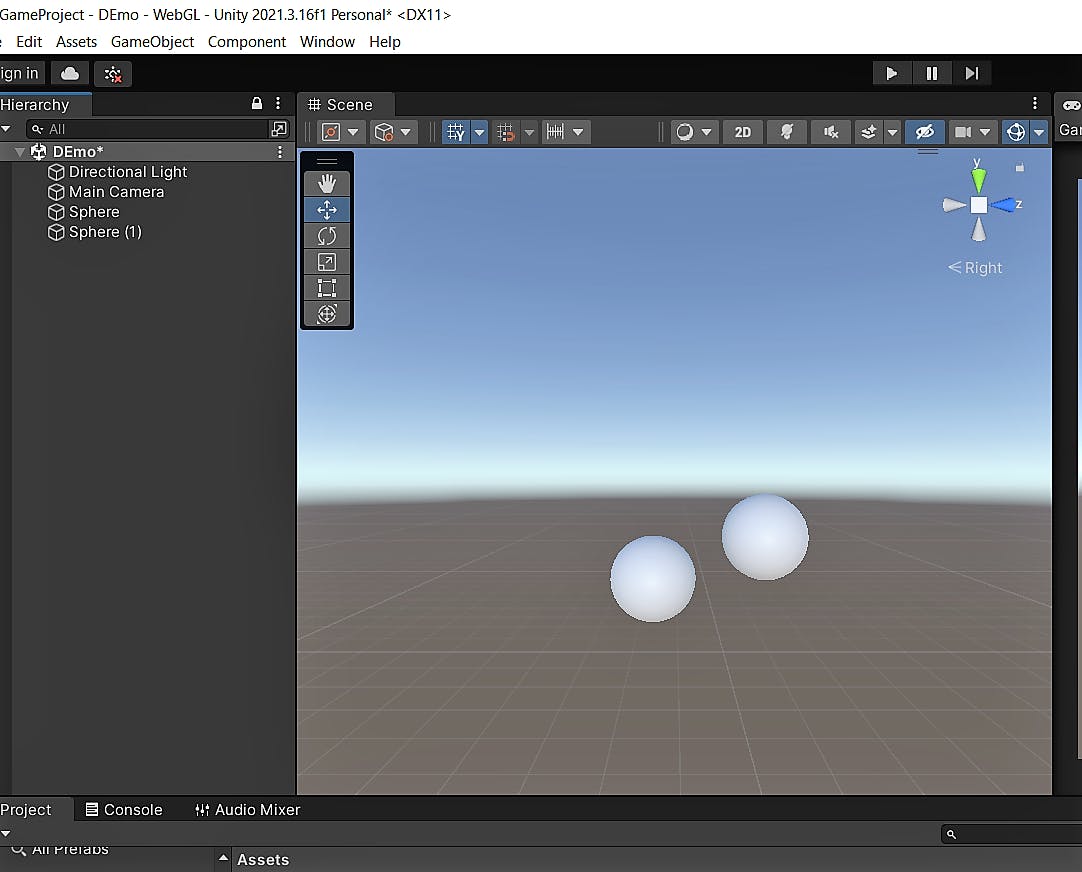
cubesandspheresthat you can easily place in your game scene. These objects act as the building blocks for your game's world.To add an object to the scene view in Unity, simply click on the 'GameObject' menu at the top of the Unity Editor(or Right Click on the Hierarchy view). From there, you can choose the type of object you want to add, such as a cube, sphere, or any other built-in shape. Selecting the desired object will automatically place it in the scene view, allowing you to further adjust its position, rotation, and scale to fit your game's requirements.
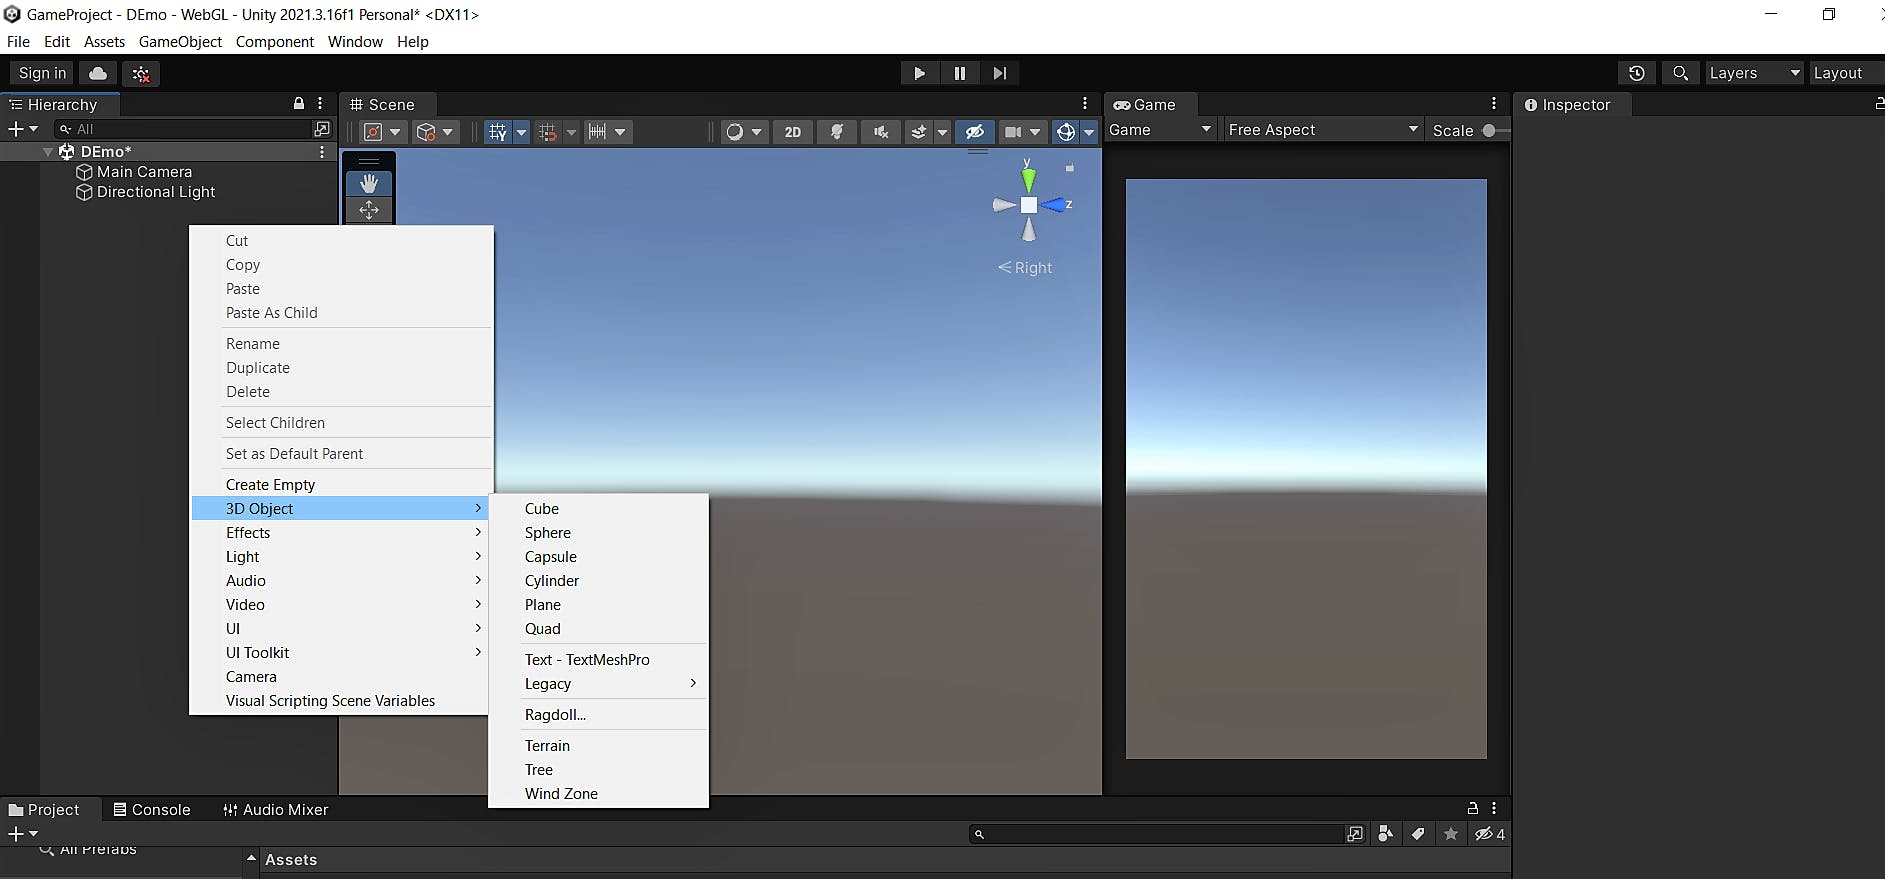
👉 For example I have used the Sphere object in the Scene View.
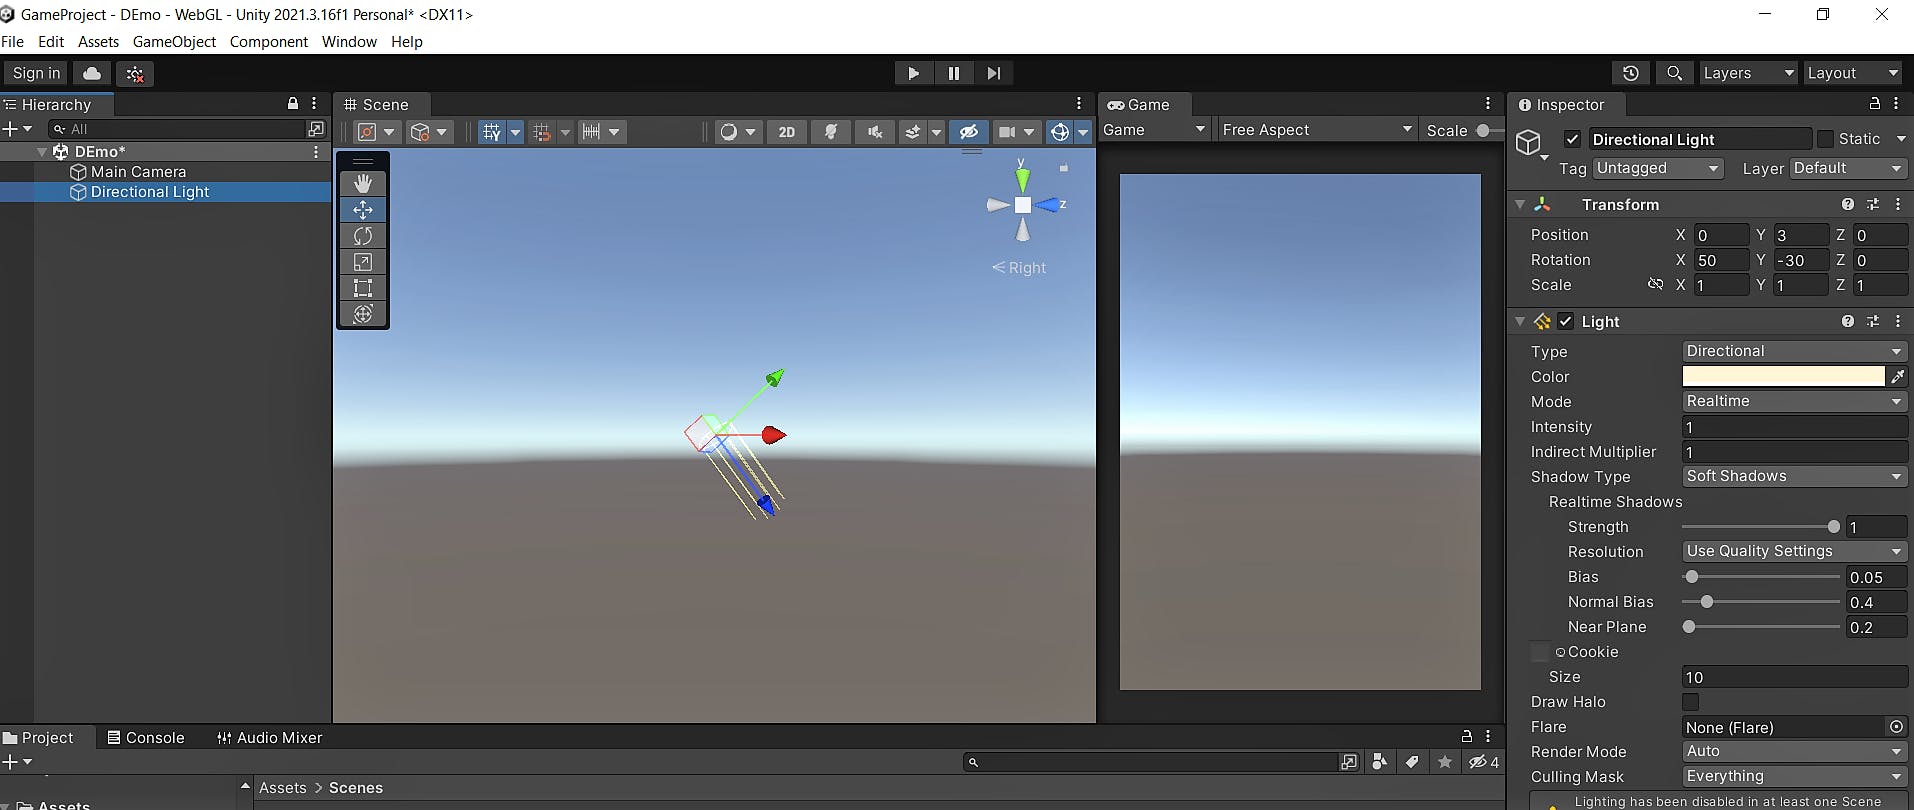
Configuring Lighting: Lighting plays a crucial role in setting the mood and visibility in your game. Customize the lighting properties to achieve the desired ambiance and visual effects.
Crafting Sphere Smasher And Testing
In this Phase, Discover the step-by-step process, techniques, and decisions behind developing this game. Join me as we explore the journey from concept to implementation, covering design, asset creation, scripting, and more🎯.
CREATING THE GROUND
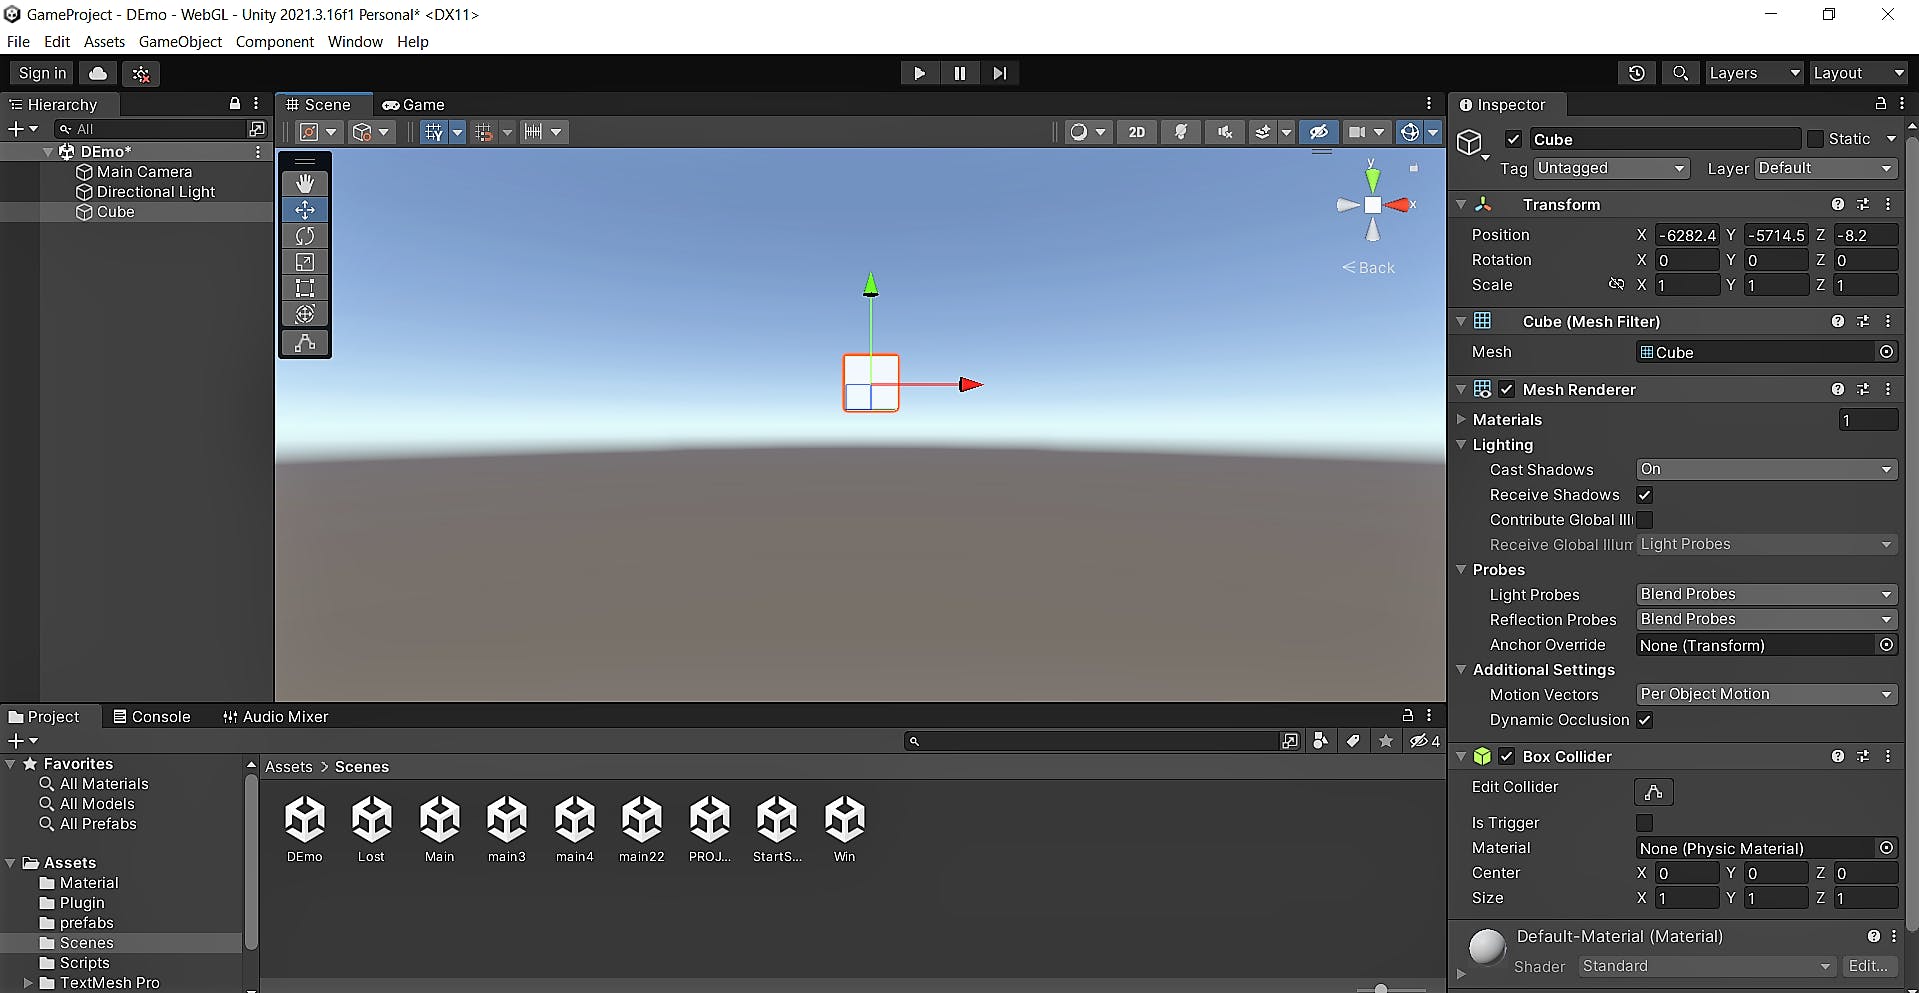
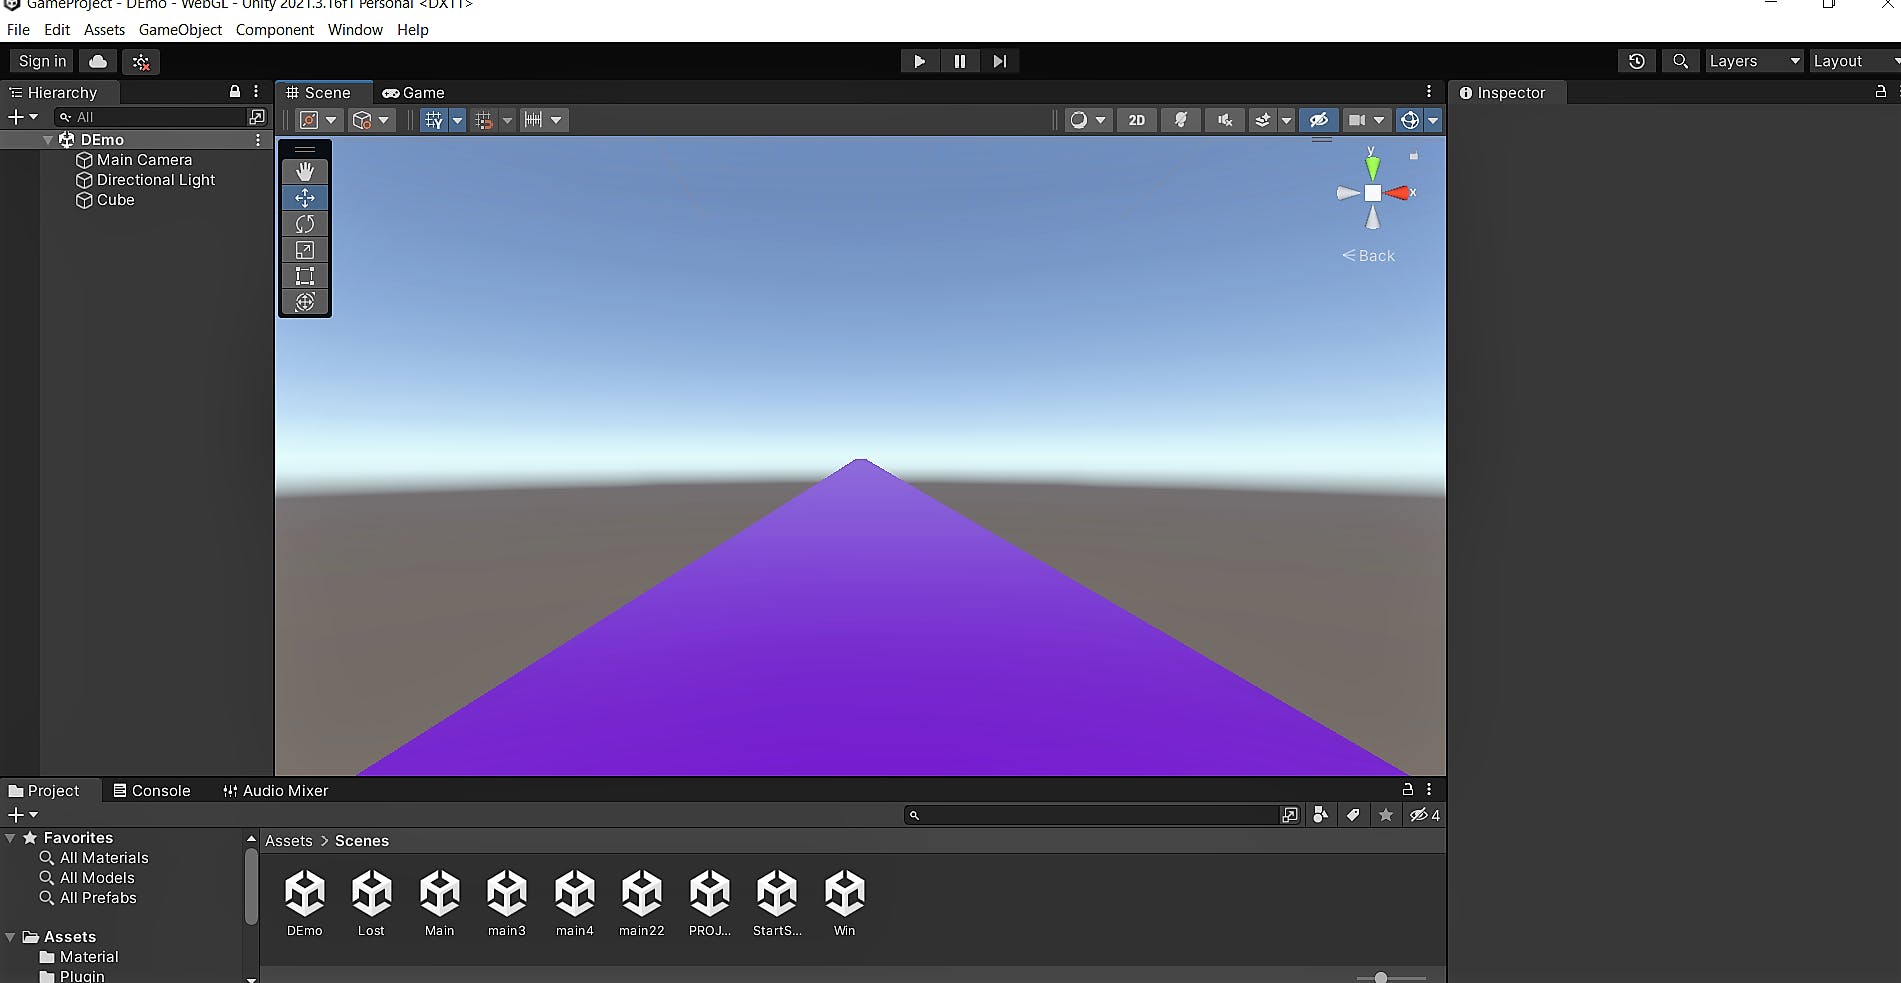
To create the ground, I utilized a simple cube game object provided by Unity. By adjusting its properties in the Inspector view, such as scale, position, and rotation, I shaped it to form a solid foundation for our game.
👉Instead of using generic names like "Cube" or "Sphere," we renamed them to names that align with our game's theme and mechanics. Here, I renamed Cube as Ground.
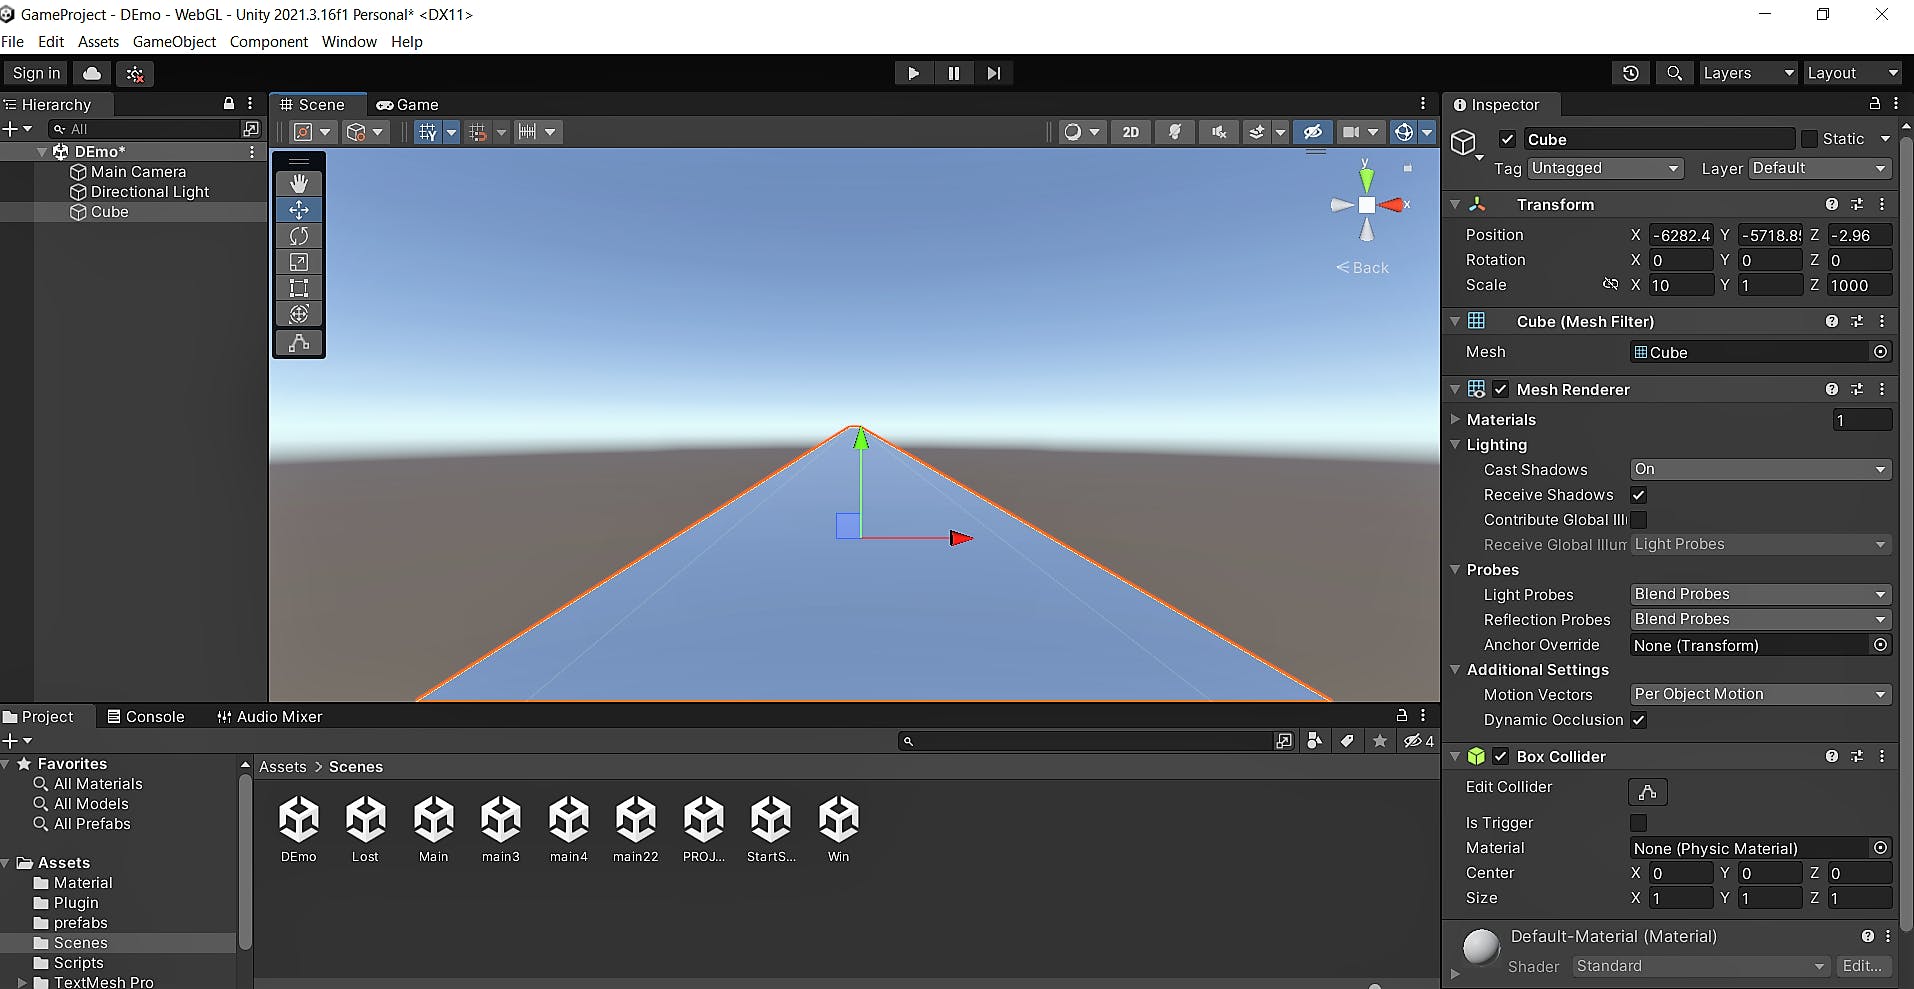
I adjusted the scale of the ground cube. By increasing the scale along the X-axis to 10 and along the Z-axis to 1000, I expanded the dimensions of the ground in Unity's Inspector view.
Next, add visual appeal to the ground.
✔To add color to objects in Unity, you can create materials. To create a material, right-click in the Project view, Choose 'Create' > 'Material'. Adjust its color properties in the Inspector view.
Materials define the visual properties of an object, such as color and texture.
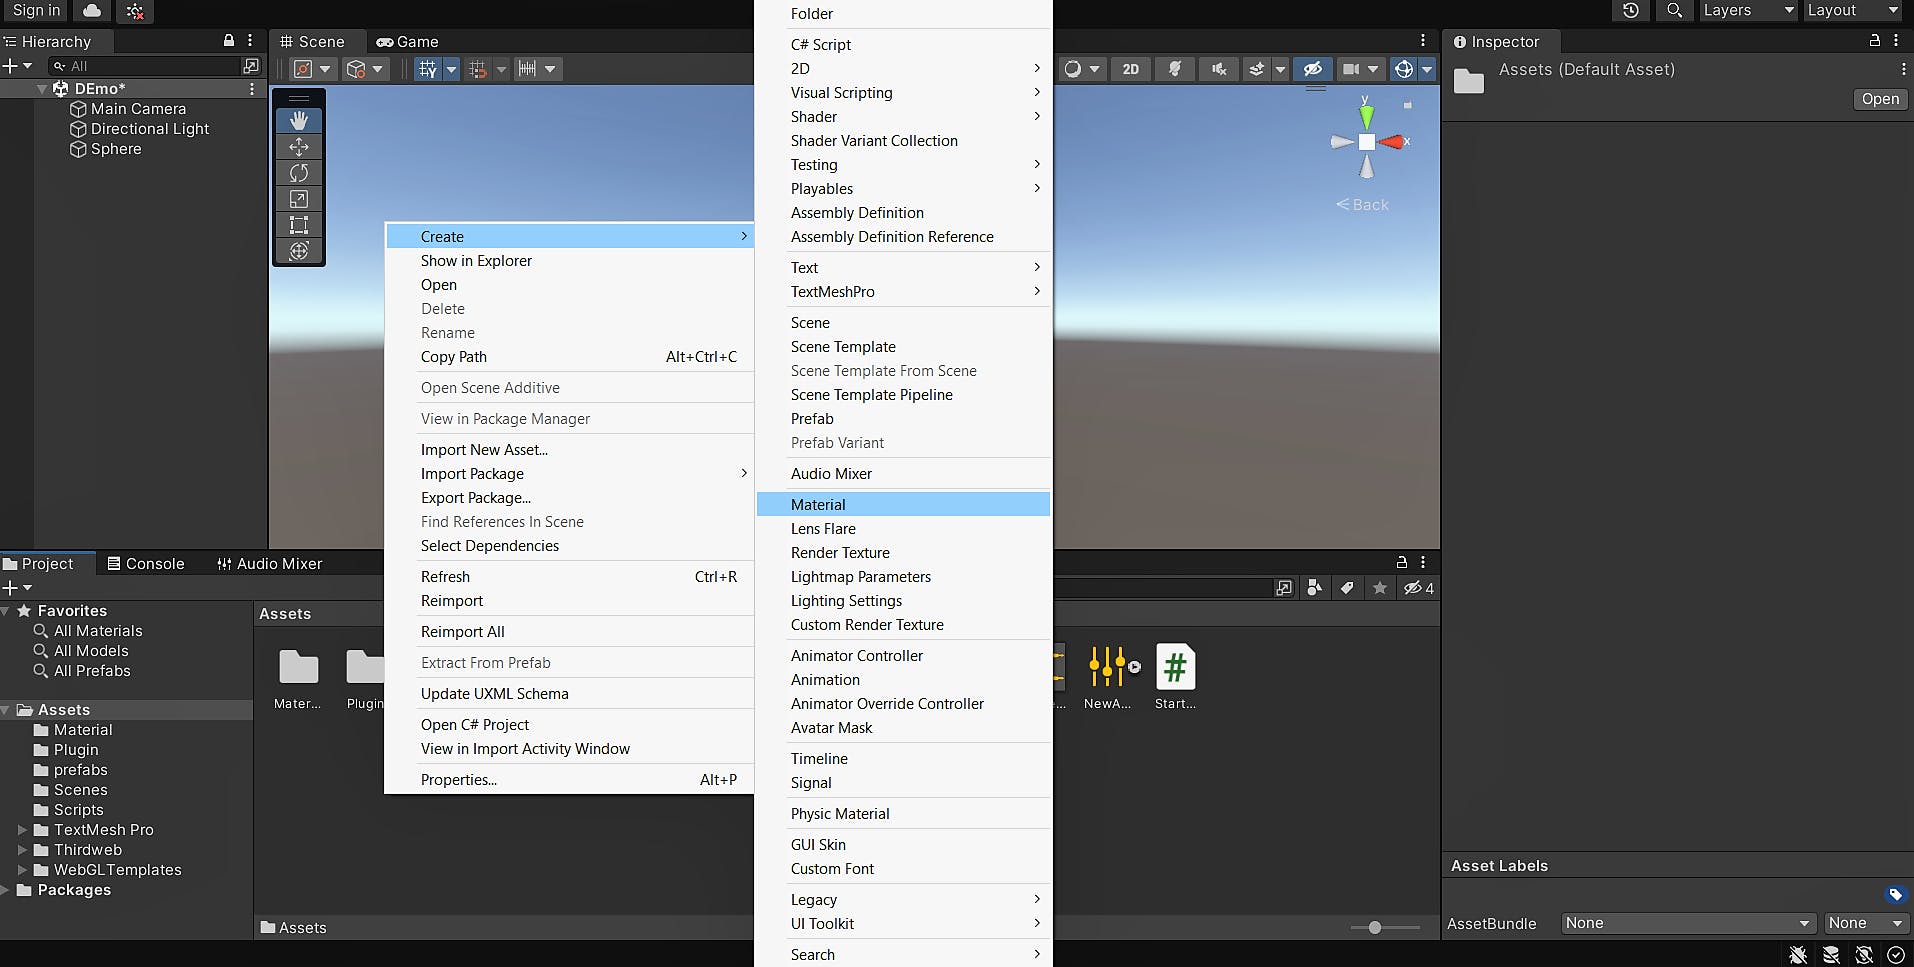
Adjust its color properties in the Inspector view. Then, drag and drop the material onto objects in the Hierarchy or Scene view to apply the chosen color.
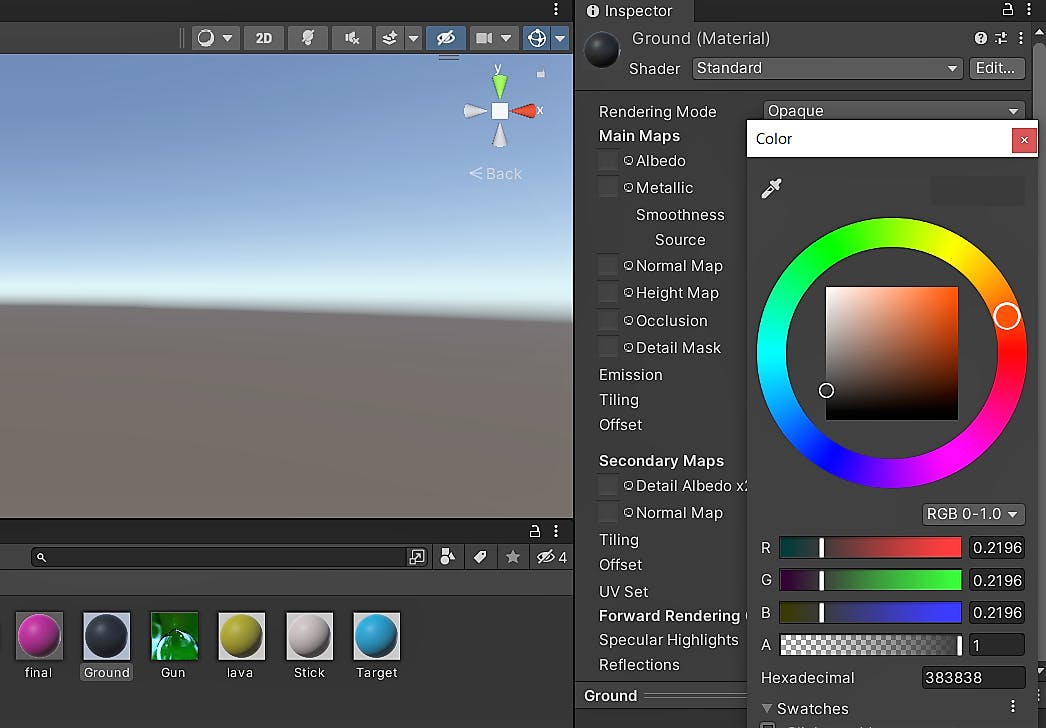
TIP: Utilize Prefabs for Consistency and Efficiency
Take advantage of prefabs in Unity to improve your game development workflow. Prefabs allow you to save and reuse objects with their defined properties, ensuring consistency across your project. By using prefabs, you can save time and effort by making changes to multiple instances at once. Embrace the efficiency and convenience of prefabs to streamline your game development process.
✔Creating a prefab in Unity is a simple process. First, select the game object you want to turn into a prefab in the Hierarchy or Scene view. Then, drag and drop the selected game object into the Project view. Unity will create a new prefab asset representing the game object. You can give it a descriptive name if you like. Now, any changes you make to the prefab asset will be applied to all instances of that prefab in your project.
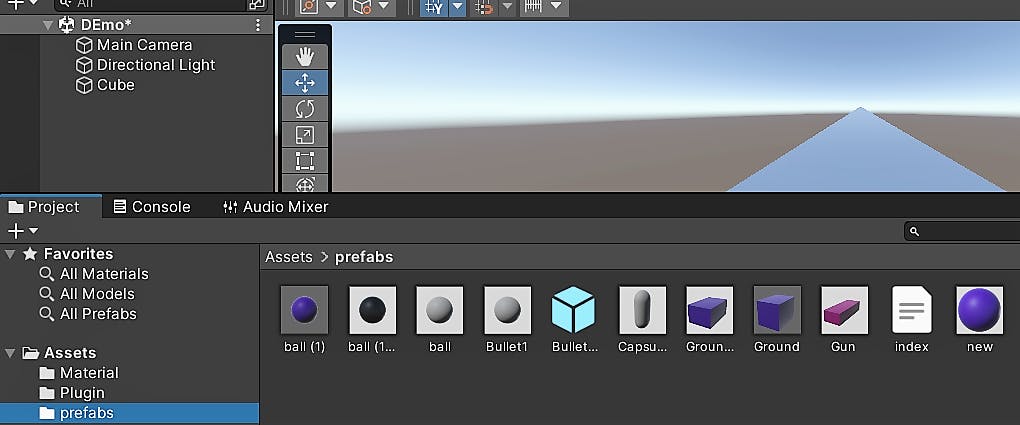
I added visual appeal to the ground👇.
CREATING THE GUN
Let's create the gun. To do this I have used a cube as the shooter for launching the balls. First, create a cube game object in Unity and adjust its position and scale to determine the size and position of the gun in the game and you can add the color.
You can adjust its position and rotation. In Unity's Hierarchy or Scene view, select the cube gun and use the rotation handles to rotate it in the desired direction. This allows you to control the angle at which the balls will be shot.
TIP: Enhance Aim Precision with Camera Perspective
For a better perspective on the aiming direction, switch to the camera view by selecting the camera in the Hierarchy or Scene view. From there, you can adjust the camera's position and rotation to get a clearer view of the game scene. By watching through the camera, you can fine-tune the aim of the cube gun, aligning it with the intended target.
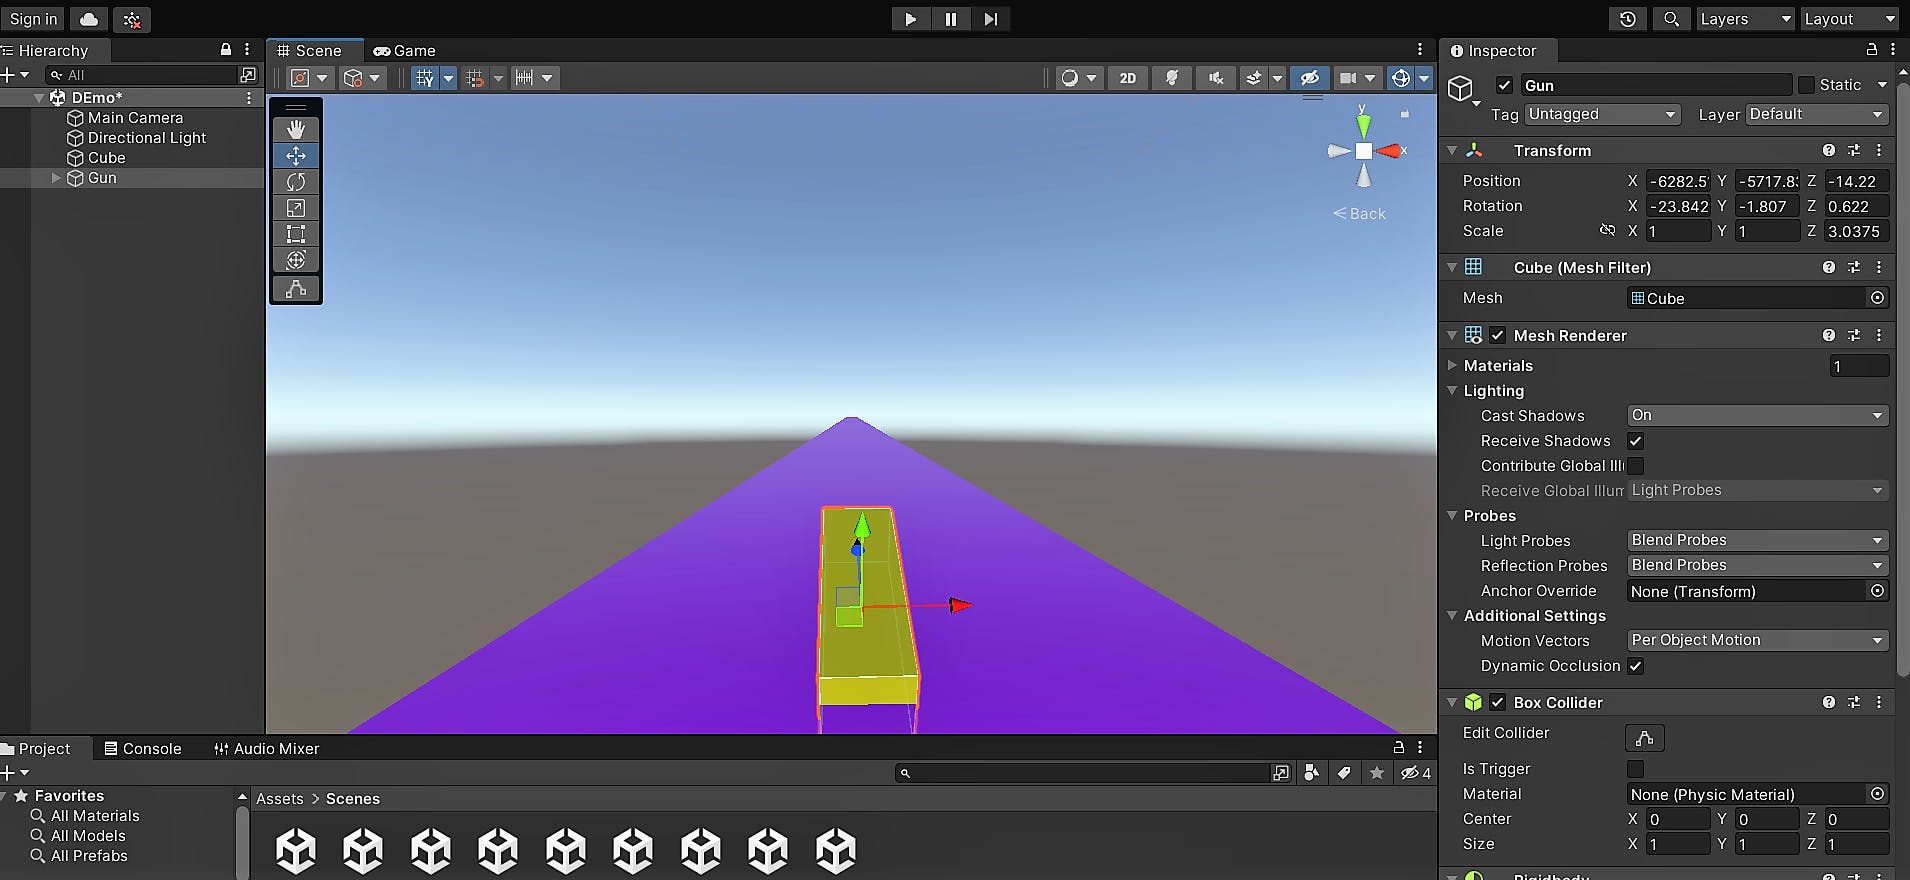
To ensure that the balls are shot straight from the gun in Sphere Smasher, you can use the Rotate tool in Unity. Select the cube gun in Unity's Hierarchy or Scene view, and locate the Rotate tool in the toolbar or press the shortcut key E. Click and drag the Rotate tool handle along the desired axis to rotate the gun.
Align the gun's rotation in a way that it faces directly forward or upwards, depending on the shooting direction you want.
CREATING A HOLDER
✔Firstly, I created an empty game object in Unity by right-clicking in the Hierarchy and selecting "Create Empty" Renamed it to BulletHolder. Next, I carefully positioned the empty object near the gun's barrel, ensuring it accurately represented the point of bullet release. Using Unity's rotation and orientation tools in the Inspector view, I meticulously adjusted the position and rotation of the empty object, aligning it precisely with the gun's barrel.
👇Here, I carefully rotated the gun in all directions, using orientation to fix the bullet holder in place.
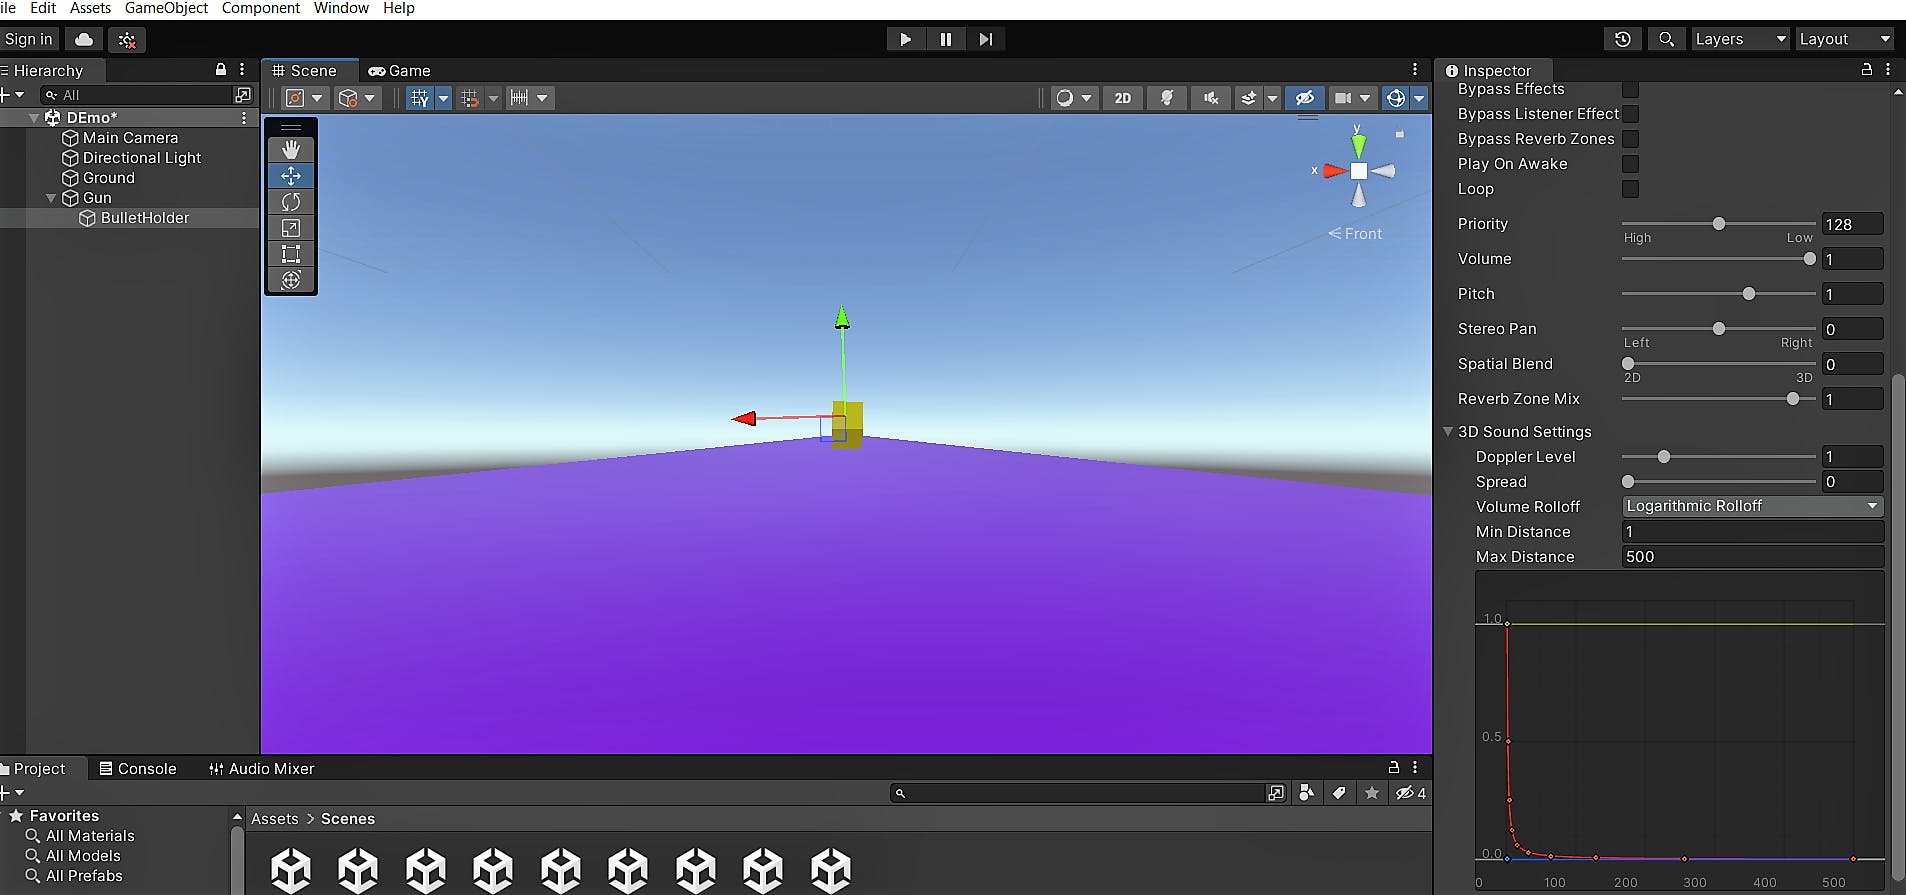
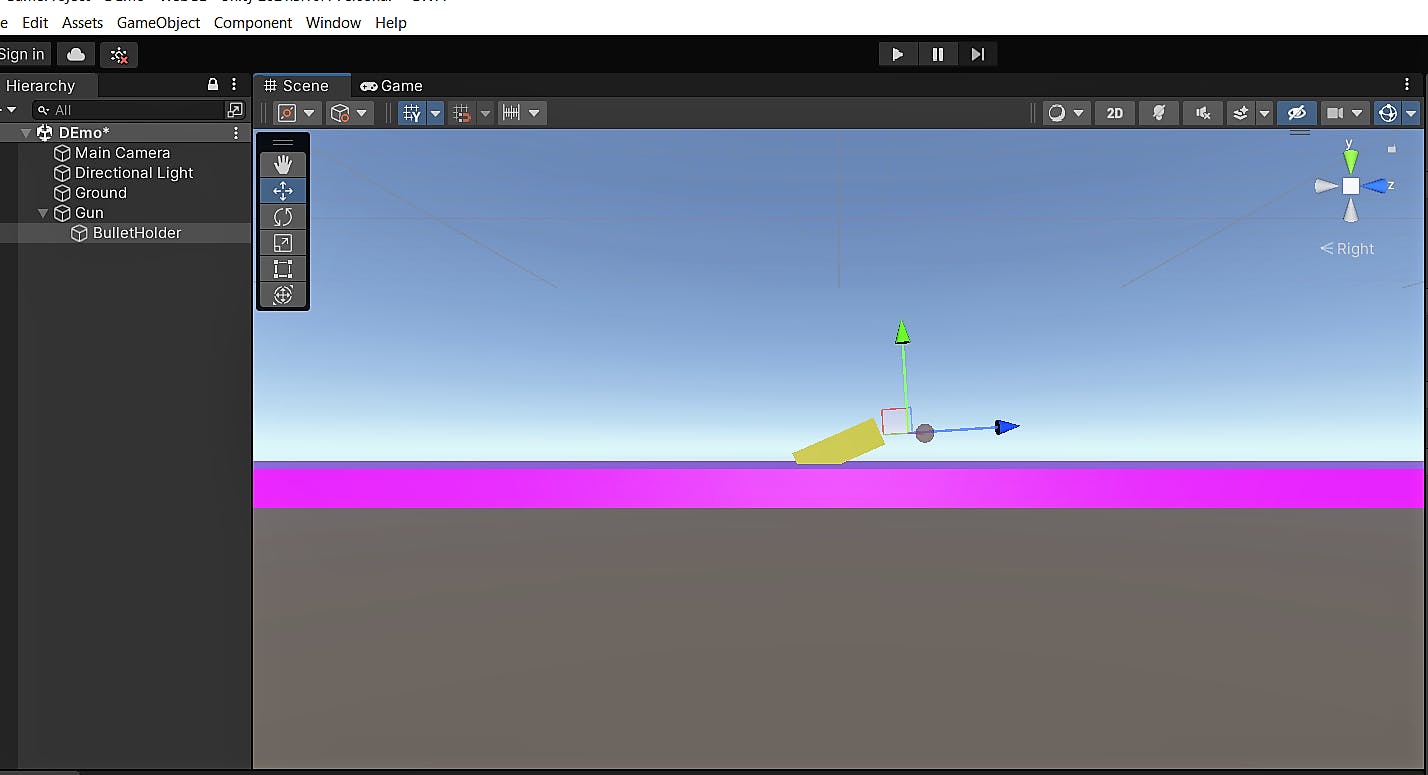
✔To establish a clear relationship between the gun and the bullet holder in Sphere Smasher, I implemented a parent-child hierarchy. By making the bullet holder a child of the gun, it became seamlessly connected to it(You can see in the above image, The relationship between the Gun and Bullet holder in the Hierarchy view).
Here's how I accomplished this:
I selected the bullet holder object and simply dragged it onto the gun object in the Hierarchy view. This action automatically assigned the gun to the parent and the bullet holder to the child. As a result, any movements or adjustments made to the gun would also affect the bullet holder.
ADDING THE BULLET
To implement the bullet functionality in Sphere Smasher, I used a sphere object Rename it to "Bullet" and positioned it accurately within the gun. After ensuring the correct placement, I converted the bullet into a prefab and deleted it in the Hierarchy view.
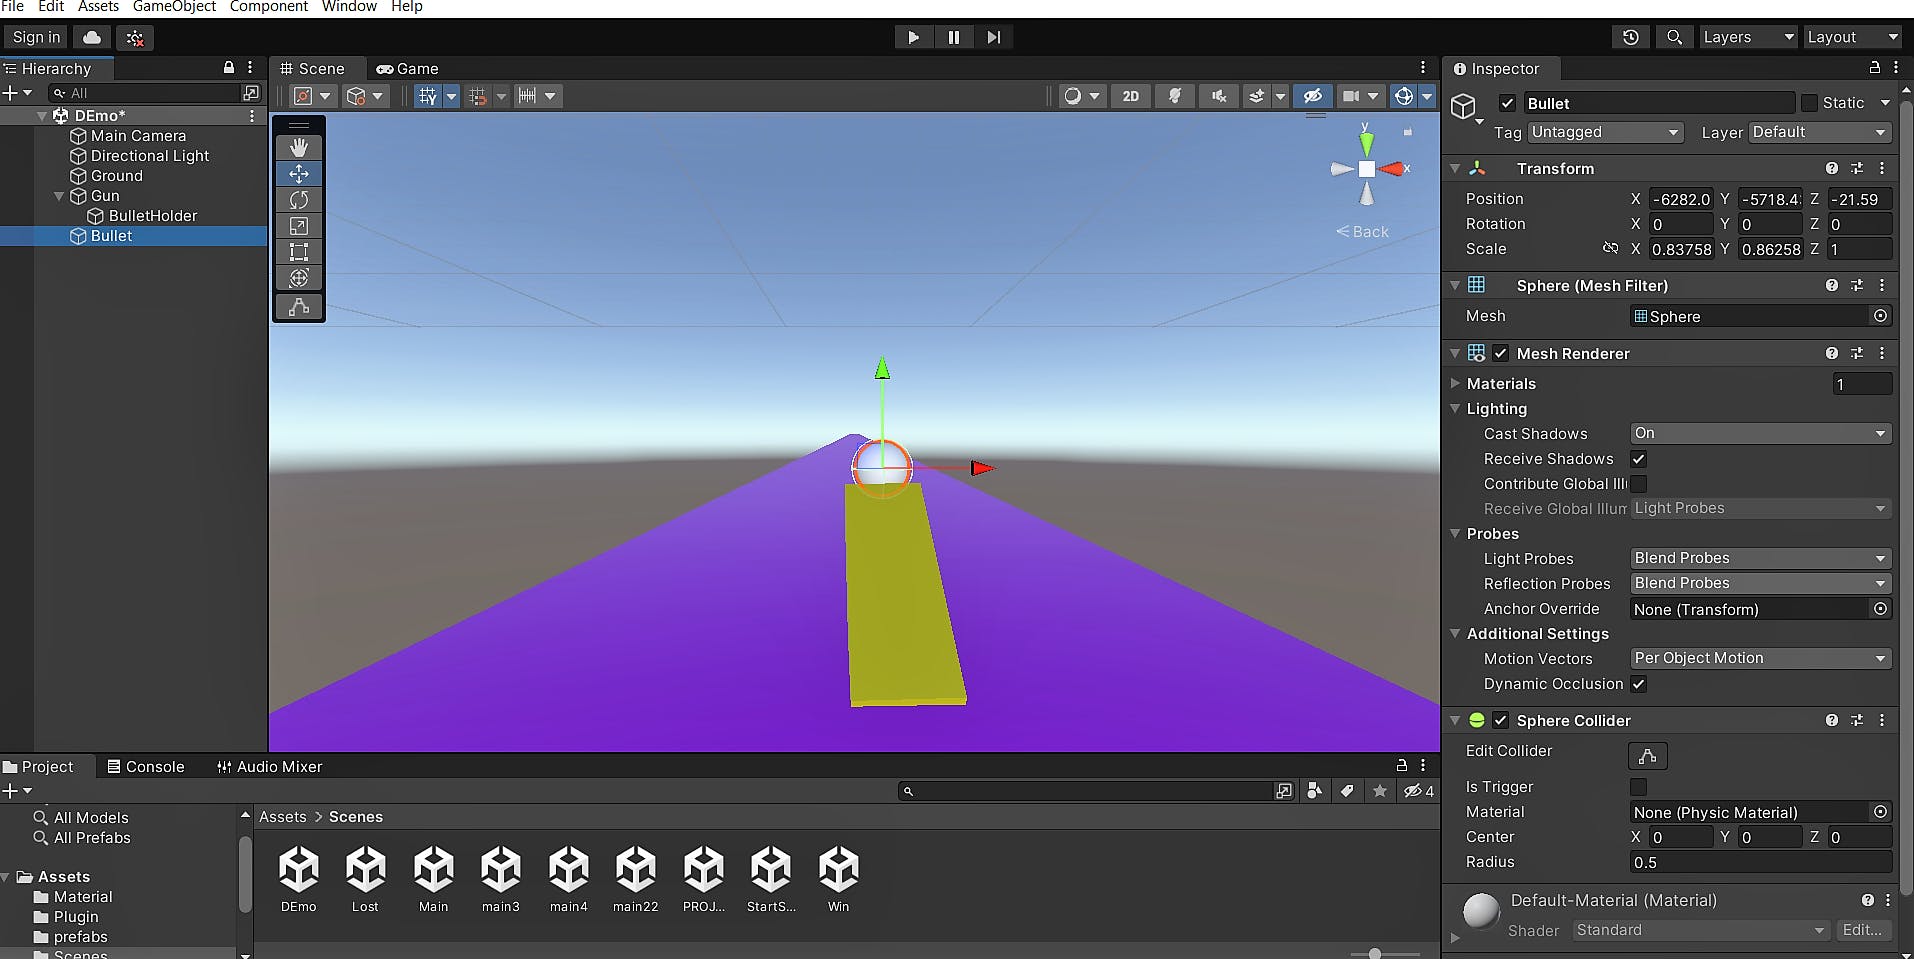
👉Creating a prefab allowed for easy reuse of the bullet object throughout the game, saving time and effort in the development process.
✔Adding the Script :
To create a script in Unity, you can start by navigating to the "Assets" folder in your project within the Unity Editor. Right-click in the "Assets" folder and select "Create > C# Script." Give the script a descriptive name, such as "Shooting." Double-click on the script to open it in your preferred code editor.
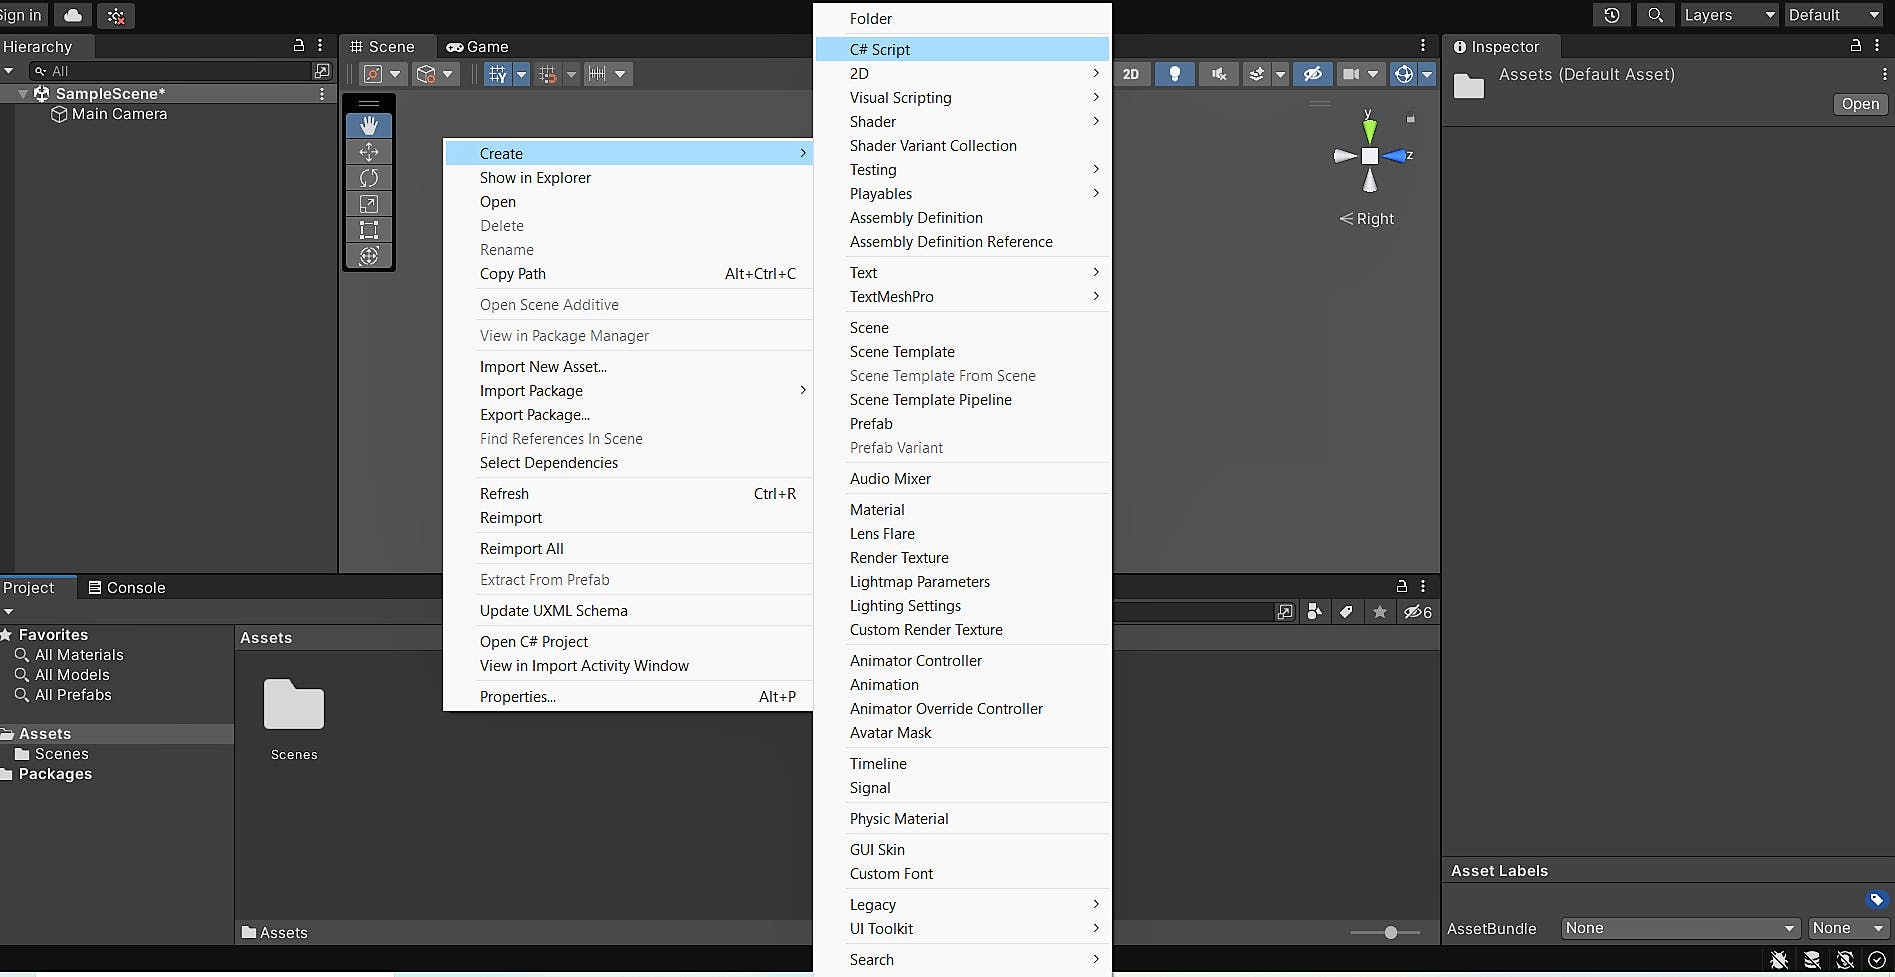
Inside the script, you'll find two important functions: "
Start" and "Update." The "Start" function is called once when the script is first initialized, while the "Update" function is called repeatedly every frame.using System.Collections; using System.Collections.Generic; using UnityEngine; public class Shooting : MonoBehaviour { // Start is called before the first frame update void Start() { } // Update is called once per frame void Update() { } }In the "Start" function, you can perform any necessary setup or initialization tasks, such as accessing other objects, setting variables, or configuring components.
The "Update" function is where the main game logic resides. It is called every frame, allowing you to update the game state, handle input, perform calculations, and execute actions. This function is crucial for creating interactive and dynamic gameplay.
The first line,
using System.Collections;, imports theSystem.Collectionsnamespace, which provides access to various collection types such as lists and arrays.The second line,
Using System.Collections.Generic;, imports theSystem.Collections.Genericnamespace, which extends the collection types with generic versions for type safety and performance.The third line,
using UnityEngine;imports theUnityEnginenamespace, which contains the Unity-specific classes and functions needed for game development.
Here, To control the bullet's behavior, I added a shooting script to the bullet holder object. This script dictated the bullet's speed, trajectory, and collision detection, enabling it to be propelled forward when triggered.
using System.Collections;
using System.Collections.Generic;
using UnityEngine;
public class Shooting : MonoBehaviour
{
    float bulletSpeed = 1300;
    public GameObject bullet;
    //AudioSource Bullet1Audio;
    // Start is called before the first frame update
    void Start()
    {
      // Bullet1Audio = GetComponent<AudioSource>();
    }
    void fire()
    {
        GameObject tempBullet = Instantiate(bullet, transform.position, transform.rotation);
        Rigidbody rb = tempBullet.GetComponent<Rigidbody>();
        rb.AddForce(rb.transform.forward * bulletSpeed);

        Destroy(tempBullet,0.5f);
     // Bullet1Audio.Play();
    }
    // Update is called once per frame
    void Update()
    {
        if(Input.GetKeyDown(KeyCode.Space))
        {
            fire();
        }
    }
}
In the above script, a public GameObject variable is to store the bullet prefab, and a float variable is to define the bullet speed. The fire() function instantiates a bullet at the gun's position and applies a force to propel it forward.
The balls would continue to exist in the game indefinitely, potentially causing performance issues and cluttering the scene. However, by invoking the Destroy function with a delay of 0.5 seconds, You ensured that each ball is automatically disabled and removed from the game after that time.The Update() function checks for the spacebar key press and calls the fire() function when triggered.
👉To add a script to a game object in Unity. First, select the game object you want to attach the script to from the Hierarchy window. Then, navigate to the Inspector window and locate the Add Component button. Click on it to open the component menu. In the search bar within the menu, type the name of the script you want to add. Once you find the desired script, click on it to attach it to the selected game object. This will associate the script's functionality with the game object, allowing it to execute the defined behaviors and interactions.
After adding the shooting script to the game, you may notice that the "Bullet" field in the script's inspector appears as "None" by default. To make the script work correctly, I assigned the actual bullet game object to this field. Selected the bullet game object by dragging and dropping it onto the "Bullet" field in the script's inspector. This connects the script to the bullet object, enabling it to control its behavior during gameplay.

✔Adding the Rigidbody Component:
To enable realistic physics interactions, I included the Rigidbody component in the bullet object. The Rigidbody component simulated the bullet's movement, allowing it to respond to forces and collisions in the game world.
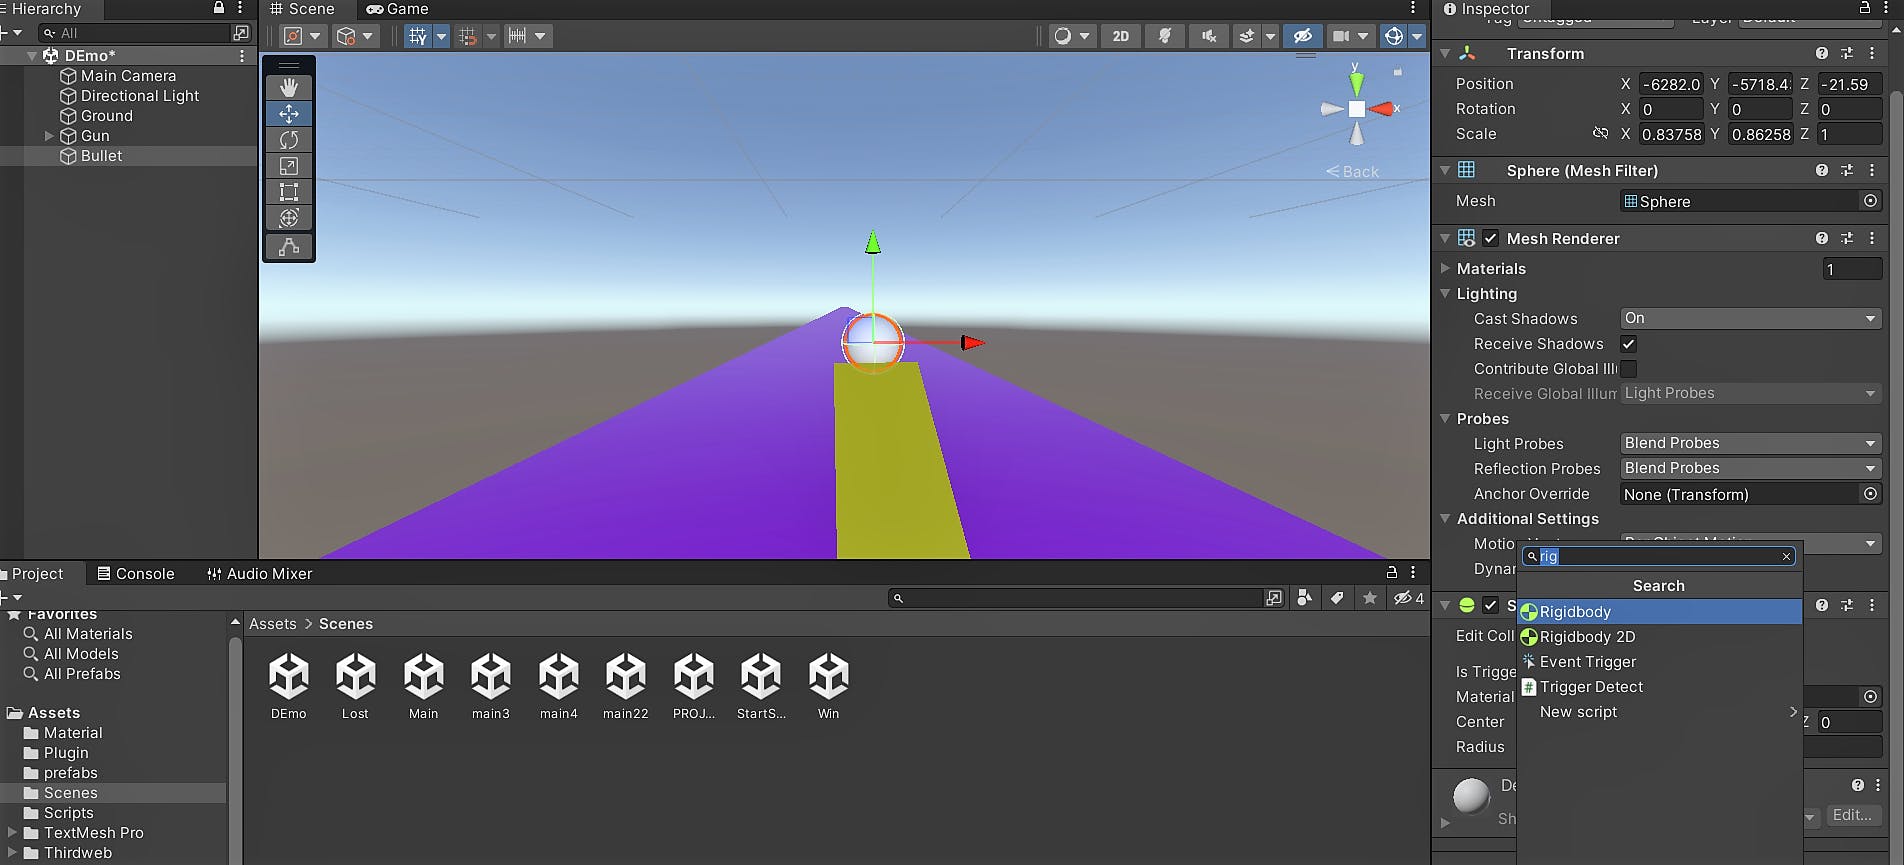
To maintain a stable flight path and prevent unwanted rotations, I froze the bullet's rotation within the Rigidbody settings.

TIP: Adjusting Gravity for Unique Gameplay
If you're facing the problem of balls falling continuously to the ground in your game, you can try disabling the "Use Gravity" option in the Rigidbody component attached to the ball objects. By disabling gravity, the balls will no longer be affected by the downward force and will remain suspended in the air after being shot. This can create an interesting effect or allow for different gameplay mechanics, such as floating or bouncing balls.
✔Adding Gun Movement Script:
To add functionality for moving the gun, I created a script and attach it to the gun object. This script can handle the input from the player and apply the appropriate movement to the gun.
- Use the left arrow key to move the gun toward the left, the right arrow key to move it toward the right, and the space bar to move it upward.
using System.Collections;
using System.Collections.Generic;
using UnityEngine;
public class Move : MonoBehaviour
{
    public float speed = 25.0f;
    void Start()
   {

   }
   void Update()
    {
        transform.position += new Vector3(Input.GetAxis("Horizontal"), Input.GetAxis("Vertical"), 0) * speed * Time.deltaTime;
    }
}
The speed variable determines the movement speed. The Update() function continuously updates the position of the game object based on the user's input from the horizontal and vertical axes. It multiplies the input values by the speed variable and the time since the last frame (Time.deltaTime) to achieve smooth movement.
Testing and Playing the Game:
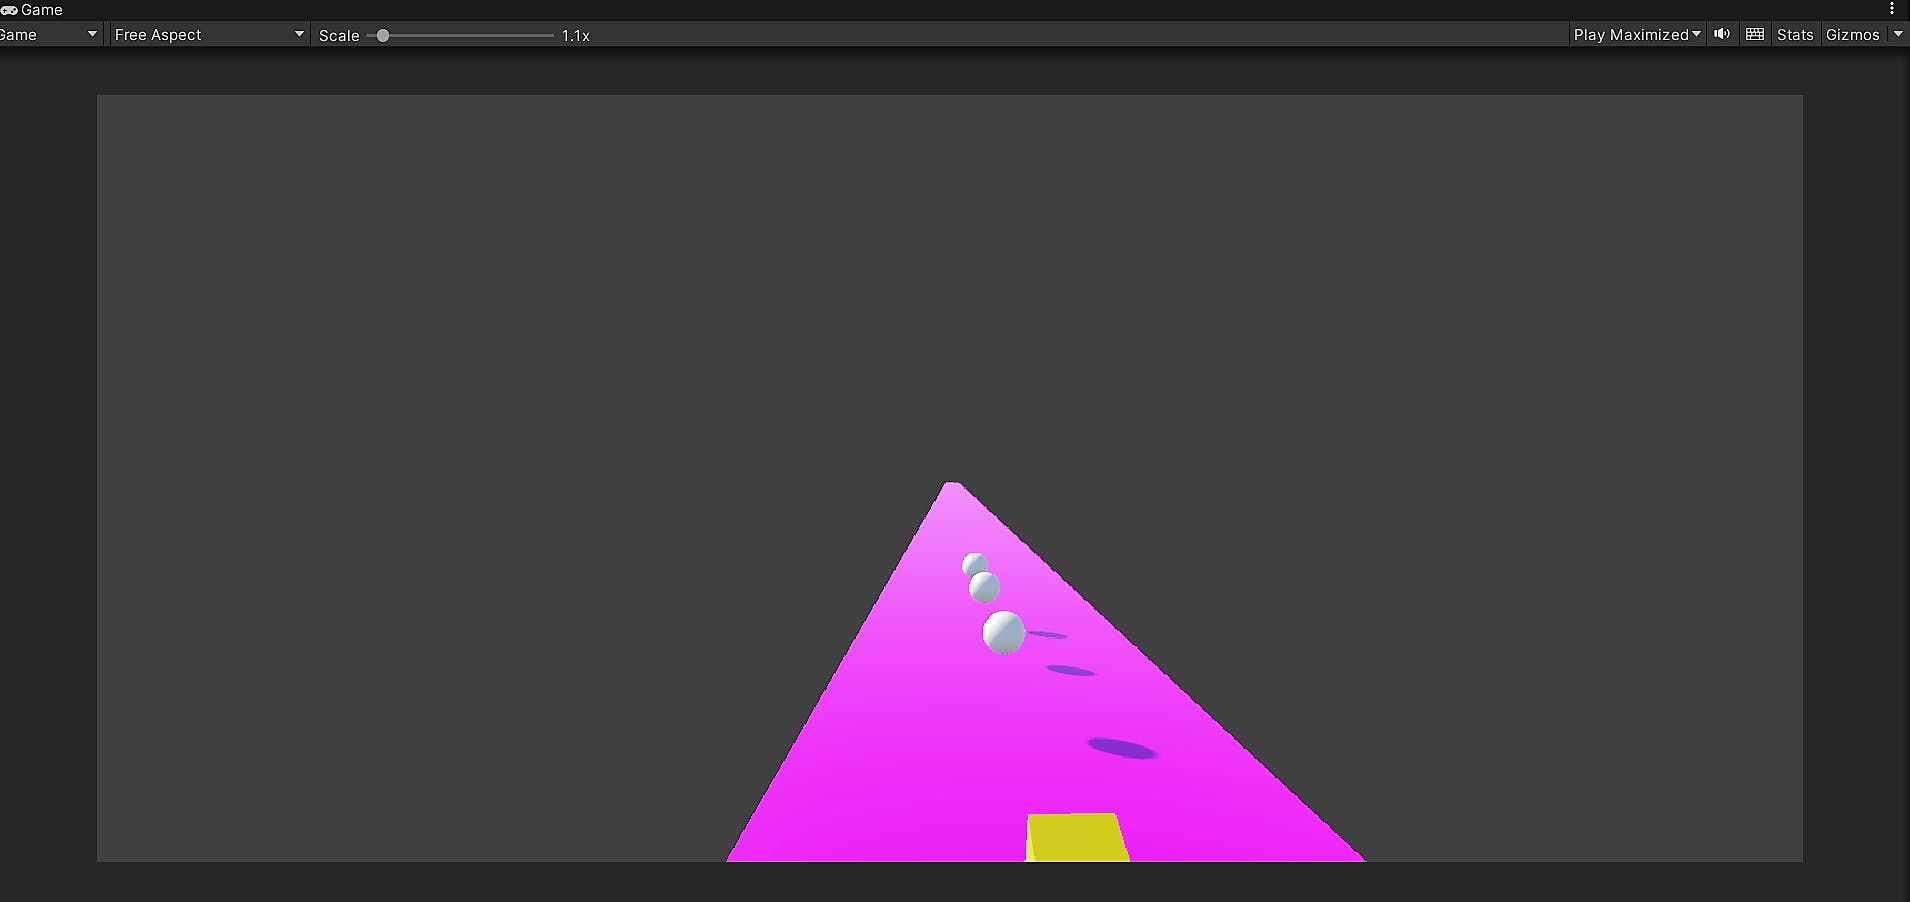
To test your game in Unity, simply click the "Play" button▶ in the Unity Editor. This will allow you to interact with your game and test its functionality. Monitor the Unity Console for any errors or warnings that may occur during testing.
When testing in the game view, you will get a real-time experience of how the scenes transition and the messages are displayed. It gives you a preview of how the game will look and feel to the player.
CREATING THE SUPPORT STRUCTURE
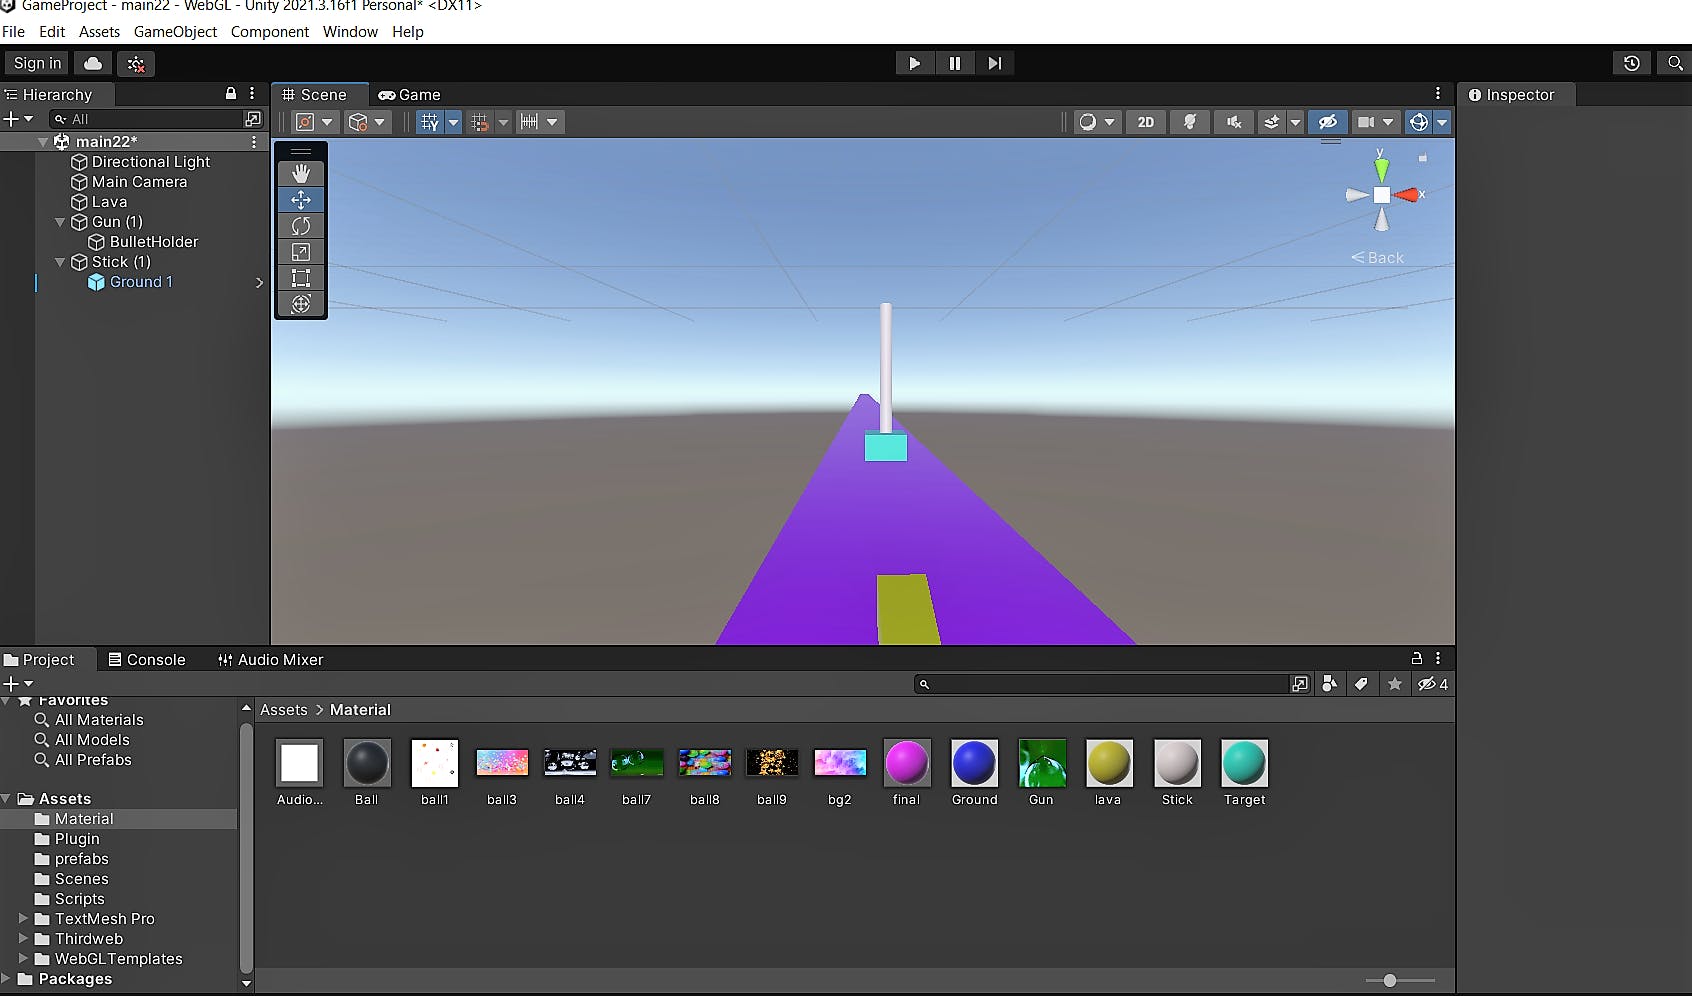
I introduced a Stick or you can say pole (renamed cylinder object) to serve as a platform for the game. By adjusting its rotation, scale, and position, I ensured that it aligned perfectly with the game environment.
To provide stability and support for the Stick, I created a support ground using a cube object. This ground was carefully positioned near the Stick, creating a visually appealing setup.
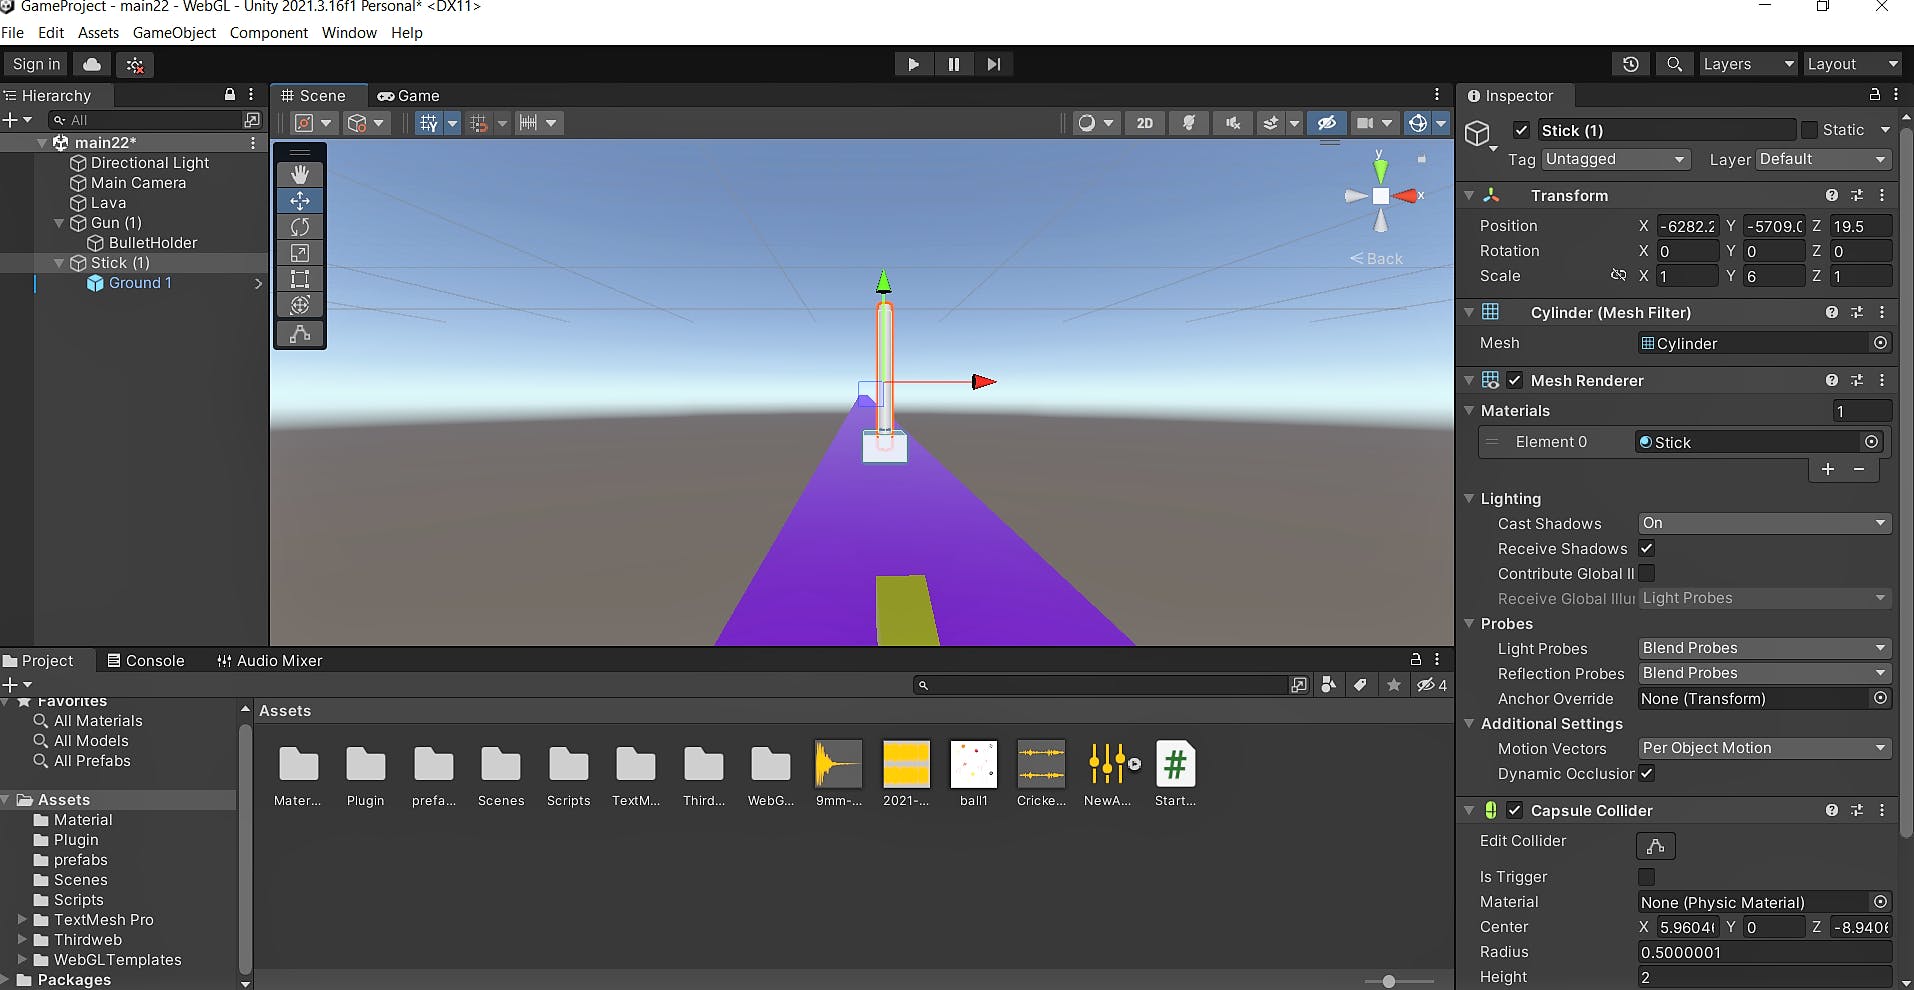
You have the flexibility to use any material of your choice to change the color and appearance of the Stick and ground objects.
CREATING THE SPHERES
In this step, I added two types of balls using the Sphere object: the "Danger Ball" and the "Saving Ball." The Danger Ball is represented by a black color, while the Saving Ball is represented by a blue color.
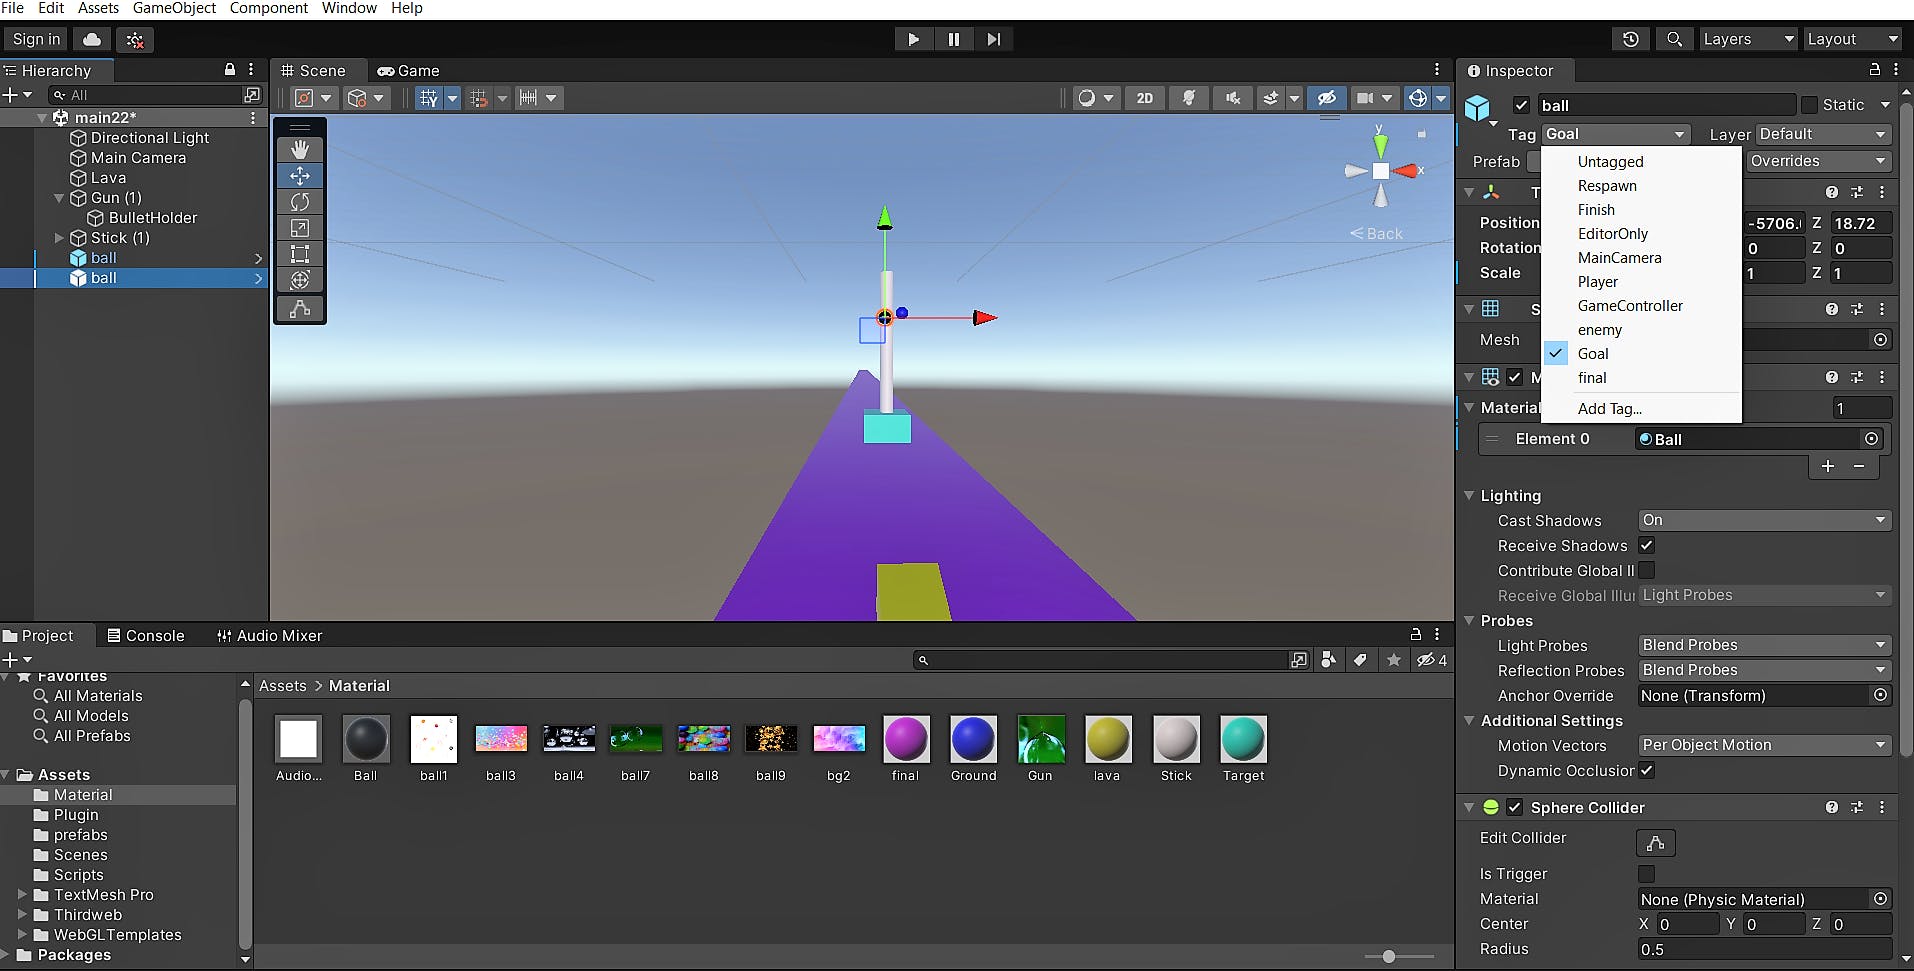
✔To keep track of these balls, it's important to assign tags to them with custom names. Tags in Unity allow you to categorize and identify objects in your game. By tagging the balls, you can easily refer to them in scripts or apply specific behaviors based on their tag.
👉To tag an object in Unity, select the object in the Unity Editor and locate the "Tag" field in the Inspector panel. Choose an existing tag or create a new one by entering the desired name.
I assigned different tags to each of them. The blue ball was tagged with "enemy," On the other hand, the black ball was tagged with "goal".
✔This reverse assignment may seem unconventional😶, but it serves as a reminder that you can assign any names you prefer based on the game's context and mechanics. Just keep in mind that if you decide to change the tag names, you'll need to update the corresponding names in the game scripts as well.
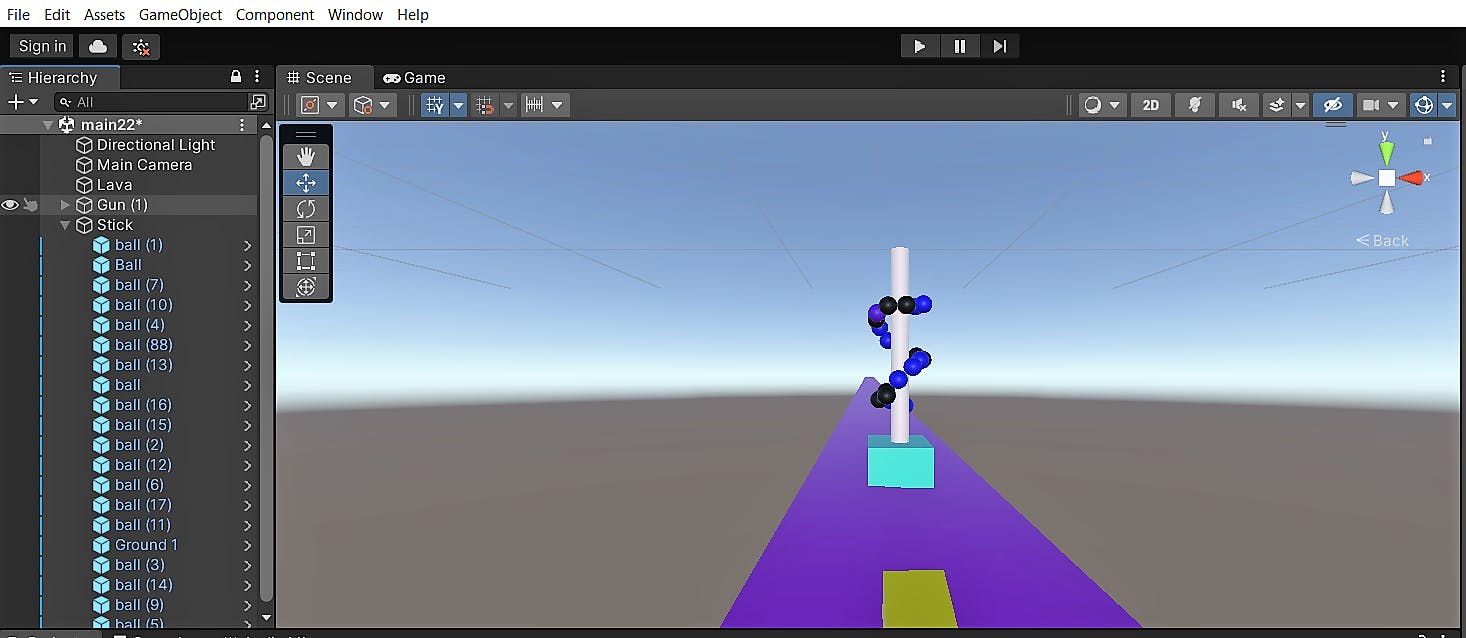
✔By utilizing prefabs in Unity, I streamlined the process of creating multiple balls. Instead of manually adding each ball individually, I created a prefab object that represents a single ball and then placed several instances of the prefab around the Stick. This approach saves time and effort, allowing for easy replication and adjustment of the ball arrangement. You have the flexibility to arrange the balls in any desired shape by rotating and adjusting their orientation.
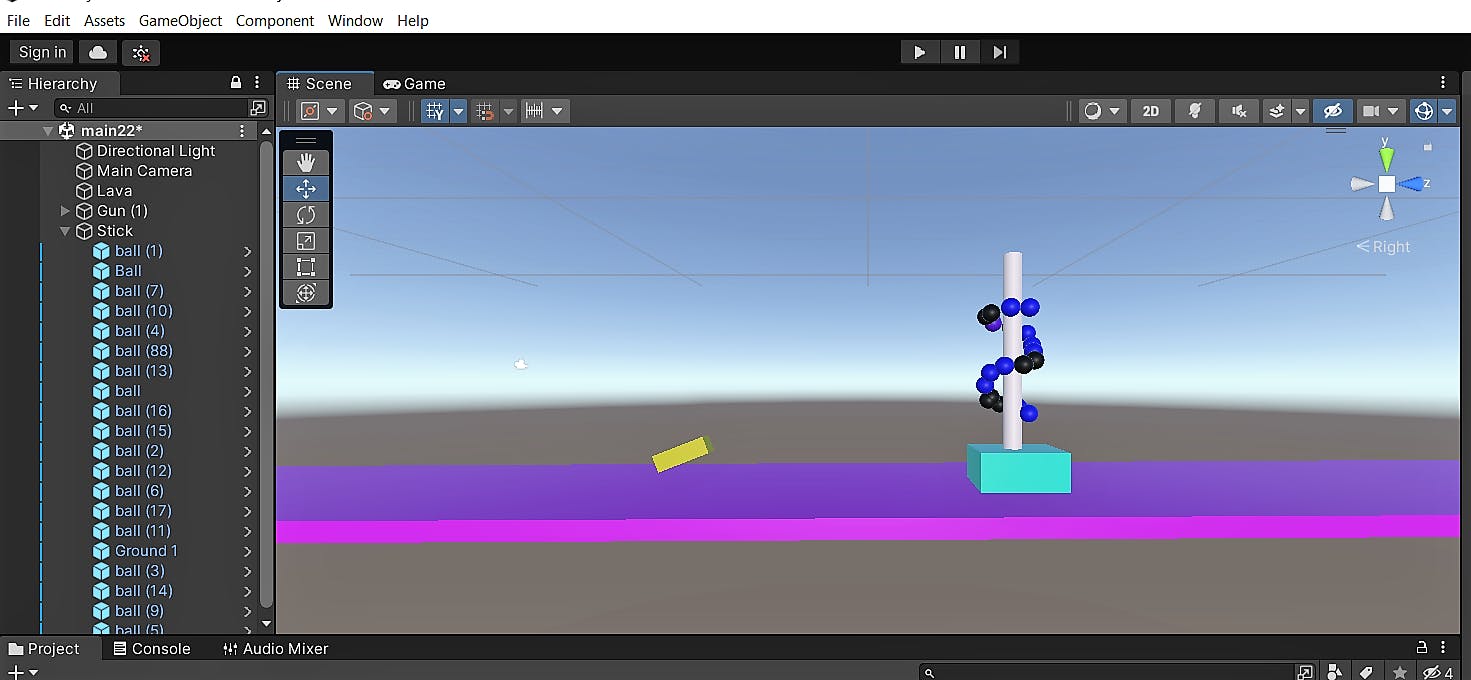
To provide a better visual representation, I have included the image showcasing them from another perspective. This allows you to get a comprehensive view of how the balls are positioned and aligned in the game scene👇.
✔Adding the Script :
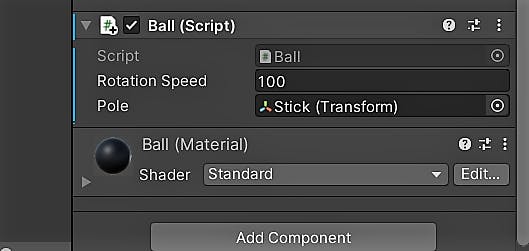
To enable the balls to rotate around the Stick, I have added a script to each ball object. This script applies a rotational force to the balls, causing them to spin in a circular motion around the stick.
using System.Collections;
using System.Collections.Generic;
using UnityEngine;
public class Ball : MonoBehaviour
{
    public float rotationSpeed = 200f;
    public Transform pole;
    void Start()
    {

    }// Update is called once per frame
    void Update()
    {
        transform.RotateAround(pole.position, pole.up, Time.deltaTime * rotationSpeed);
    } }
👆This script enables the balls to rotate around the pole using the RotateAround function, which takes the pole's position, up direction, and rotation speed as parameters.
Select the Stick object and assign it to the pole field. This ensures that the balls rotate around the specified pole object.
HANDLING BALL COLLISIONS AND DESTRUCTION
To manage the collision and destruction of the spheres when shot, I attached a script to the bullet object. By adding the collision script specifically to the enemy-tagged balls, I ensured that only these balls collide with other objects and trigger the necessary collision logic for their destruction.
using System.Collections;
using System.Collections.Generic;
using UnityEngine;
public class CollisionDetect : MonoBehaviour
{
    private void OnTriggerEnter(Collider other)
    {
        if (other.CompareTag("enemy"))
        {
            Destroy(other.gameObject);
        }
    }
}
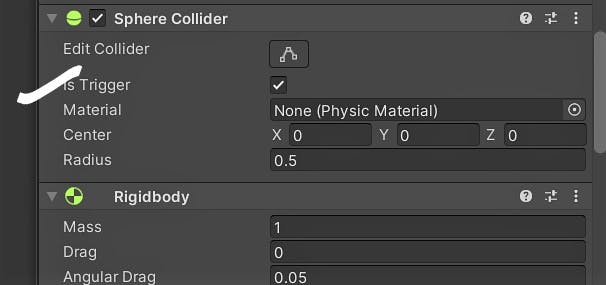
To enable the "isTrigger" functionality, you need to make sure that the collider component attached to your object has the "isTrigger" property enabled. This can be done by selecting the collider component in the Unity Inspector and checking the "Is Trigger" checkbox. Enabling "isTrigger" allows the collider to detect collisions without physically interacting with other objects.
Testing and Playing the Game:
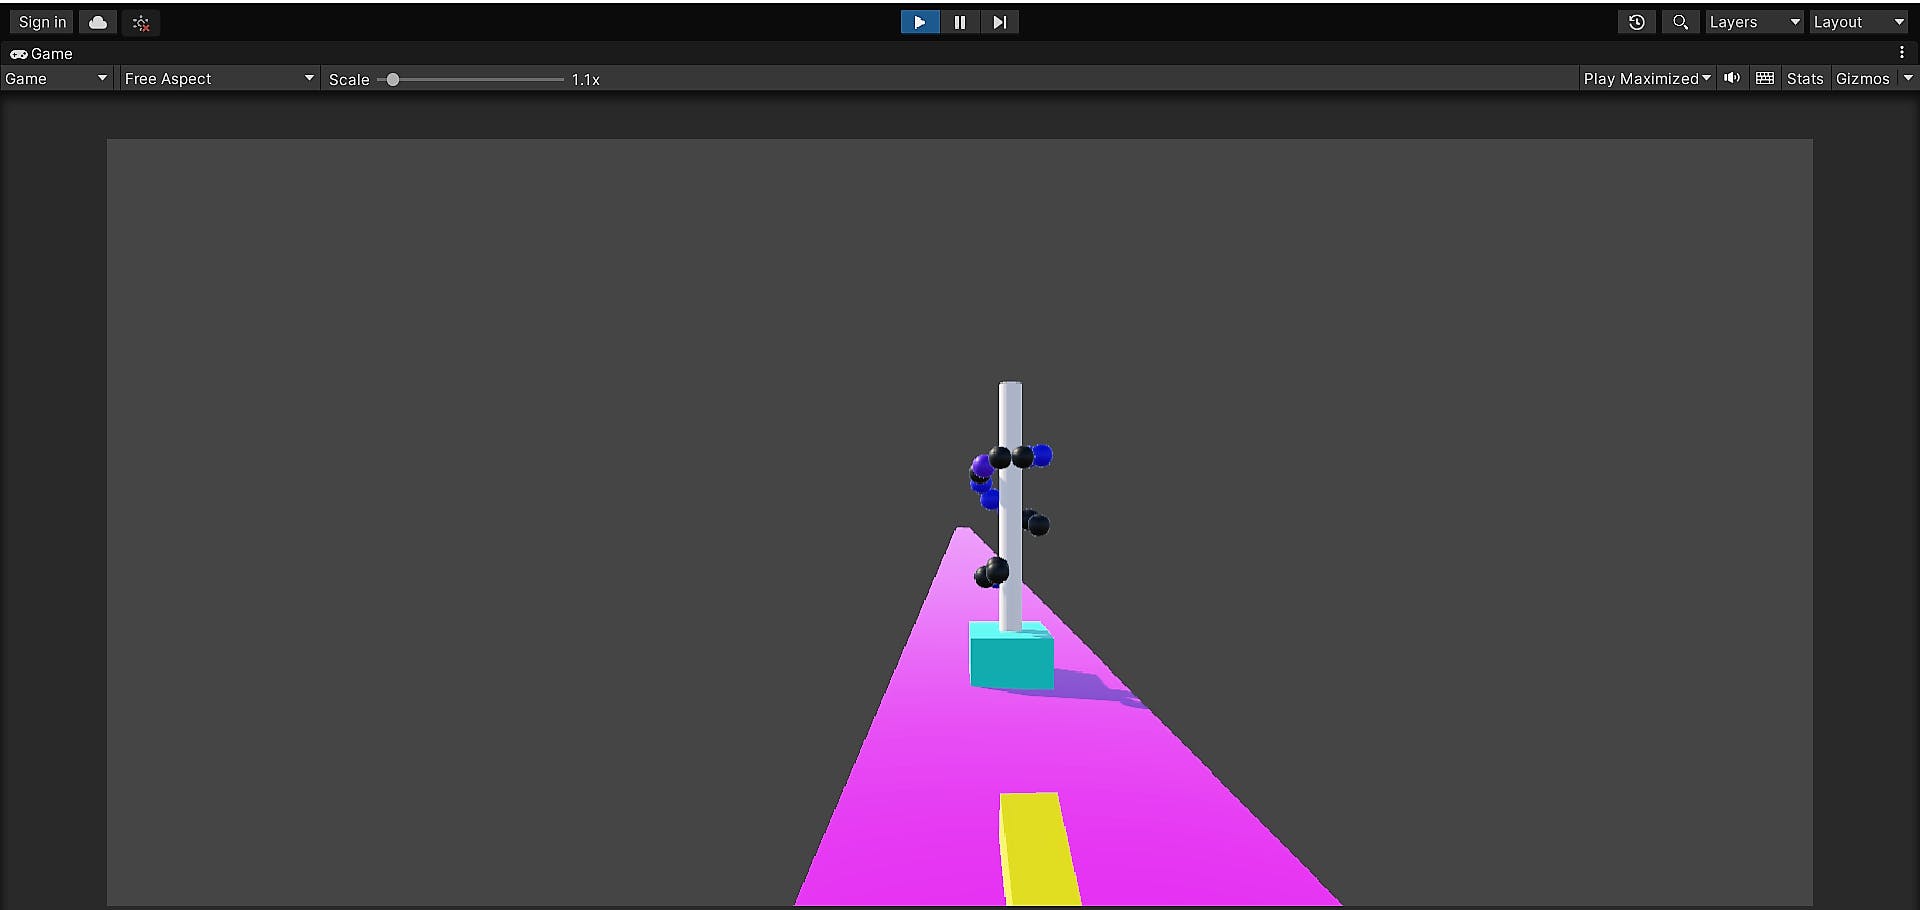
- During gameplay, you can observe the changes in the Game View. When you shoot the balls, they will be destroyed👇.
HANDLING WIN AND LOSE CONDITIONS
To implement the win condition in the game, I added a script that checks for the "enemy" tag on the balls. When all the balls with the "enemy" tag are destroyed, and the win condition is met. In the winning script, I included logic to load a new scene designated as the Win scene. On the other hand, if any ball with a tag other than "enemy" is triggered, indicating that the player shot the wrong ball, the game will load a separate scene designated as the lost scene.
And I added this script to the bullet object.
using System.Collections.Generic;
using UnityEngine.SceneManagement; // Make sure to include this namespace
using UnityEngine;
public class WinManager : MonoBehaviour
{
   public int totalCollectibles;
   private int numDestroyed = 0;
   // initialize the counter variable
   void Start()
   {
       // Find all game objects with the "enemy" tag and count them
       GameObject[] enemies = GameObject.FindGameObjectsWithTag("enemy");
       totalCollectibles = enemies.Length;
       //numDestroyedOnStart = numDestroyed;
       //Debug.Log("Destroyed ball count: " + numDestroyedOnStart + "/" + totalCollectibles);
   }
    void OnTriggerEnter(Collider other)
      {
       if (other.gameObject.CompareTag("enemy"))
       {
           numDestroyed++;
           if (numDestroyed == totalCollectibles)
           {
               // Load the winning scene
               SceneManager.LoadScene("Win");
           }
           Destroy(other.gameObject); // Destroy the collected object
       }
       else if (other.gameObject.CompareTag("Goal"))
       {
           // Load the losing scene
           SceneManager.LoadScene("Lost");
       }
   }
}
GAME OUTCOME SCENES
When you play a game, you want to know when you've won or lost😉, right? Well, the way we do that is by creating separate scenes that are designed to display either a "You Win!" message or a "You Lose!" message when certain conditions are met in the game. Let's dive right into creating those exciting win-and-lose scenes for our game.
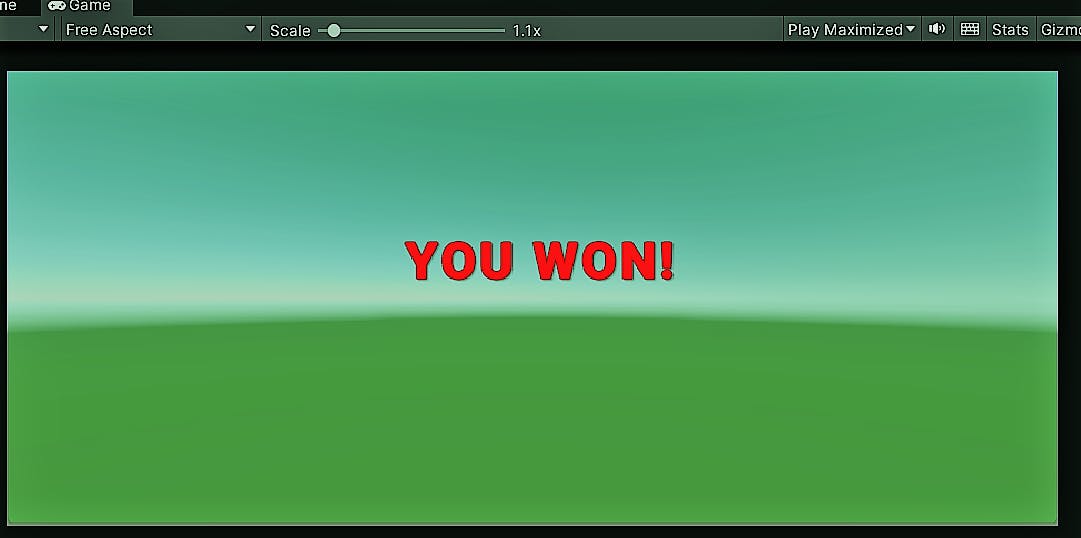
✔Creating the "You Won!" Scene: Adding UI Elements
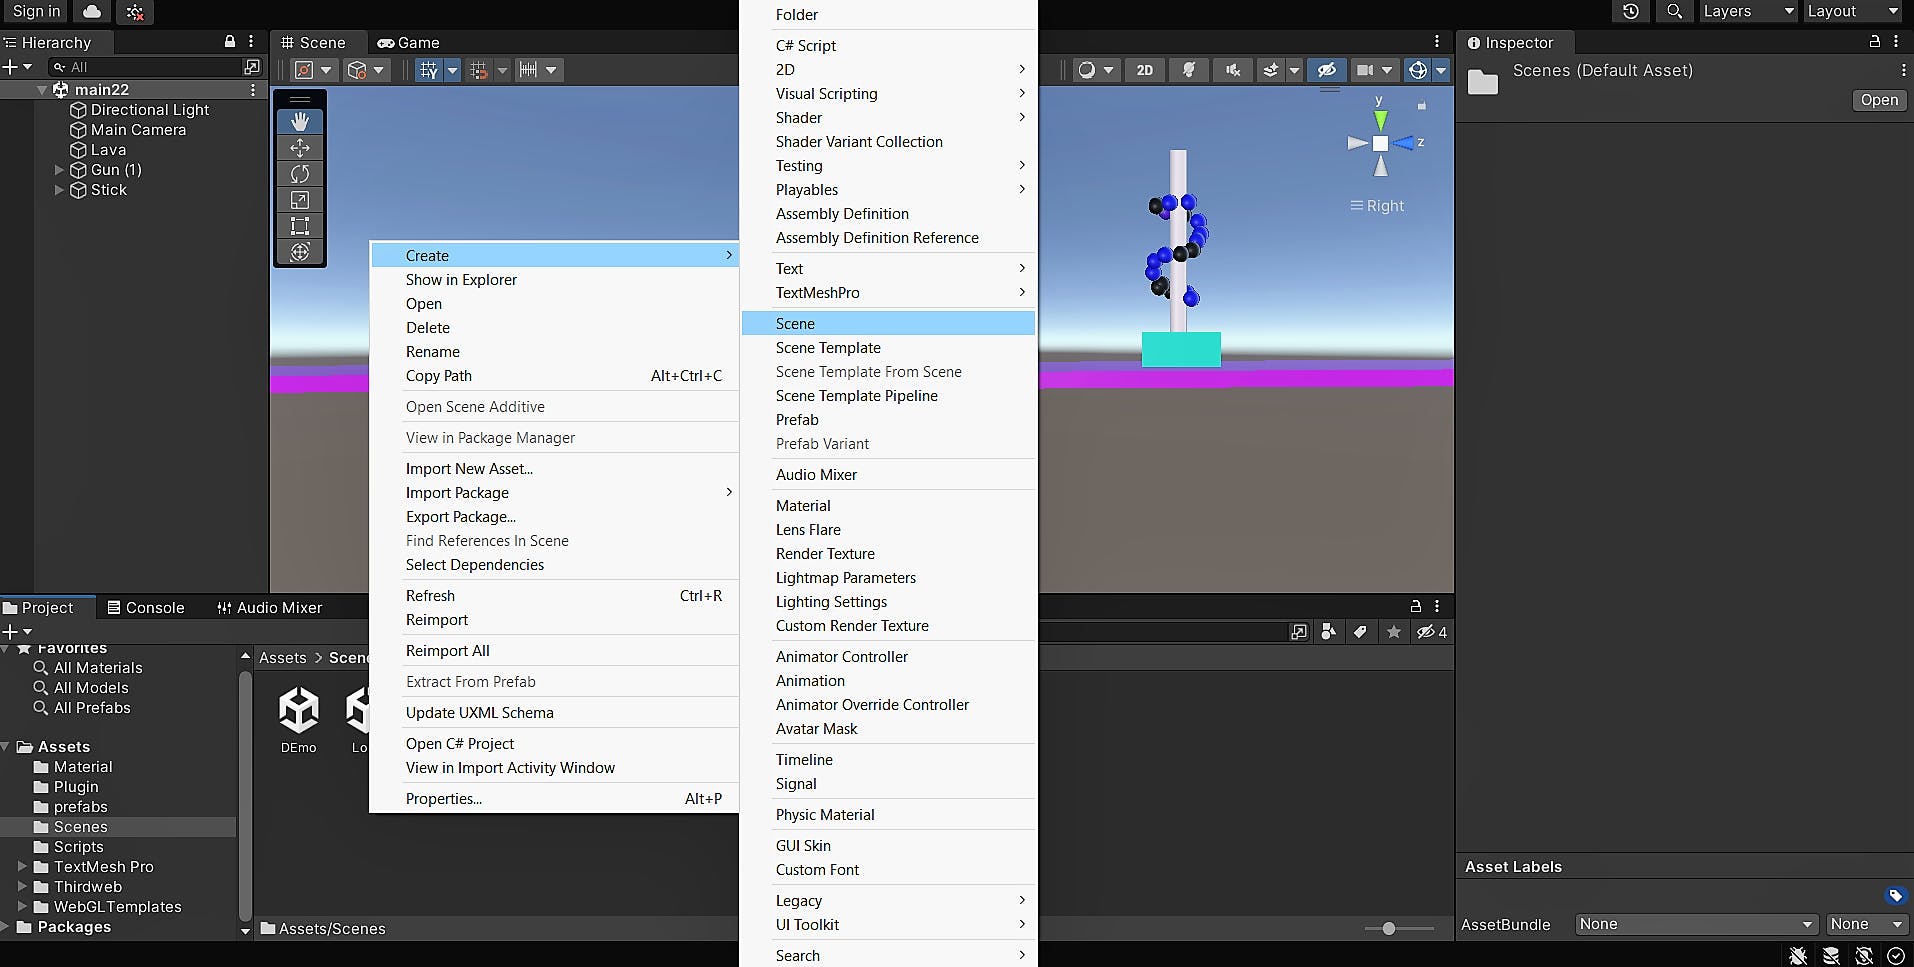
To create a new scene in Unity, you can simply go to the "Project" view and right-click anywhere within the "Assets" folder. From there, select "Create" and then "Scene". This will create a new empty scene, which you can then name and save by clicking "File" and then "Save Scene".
Next, you can add the necessary UI elements to display the "You Won!" message in the scene. To do this, you can create a panel and a text object within the Canvas component. By adding a panel, you can create a visually distinct area to contain the text message.
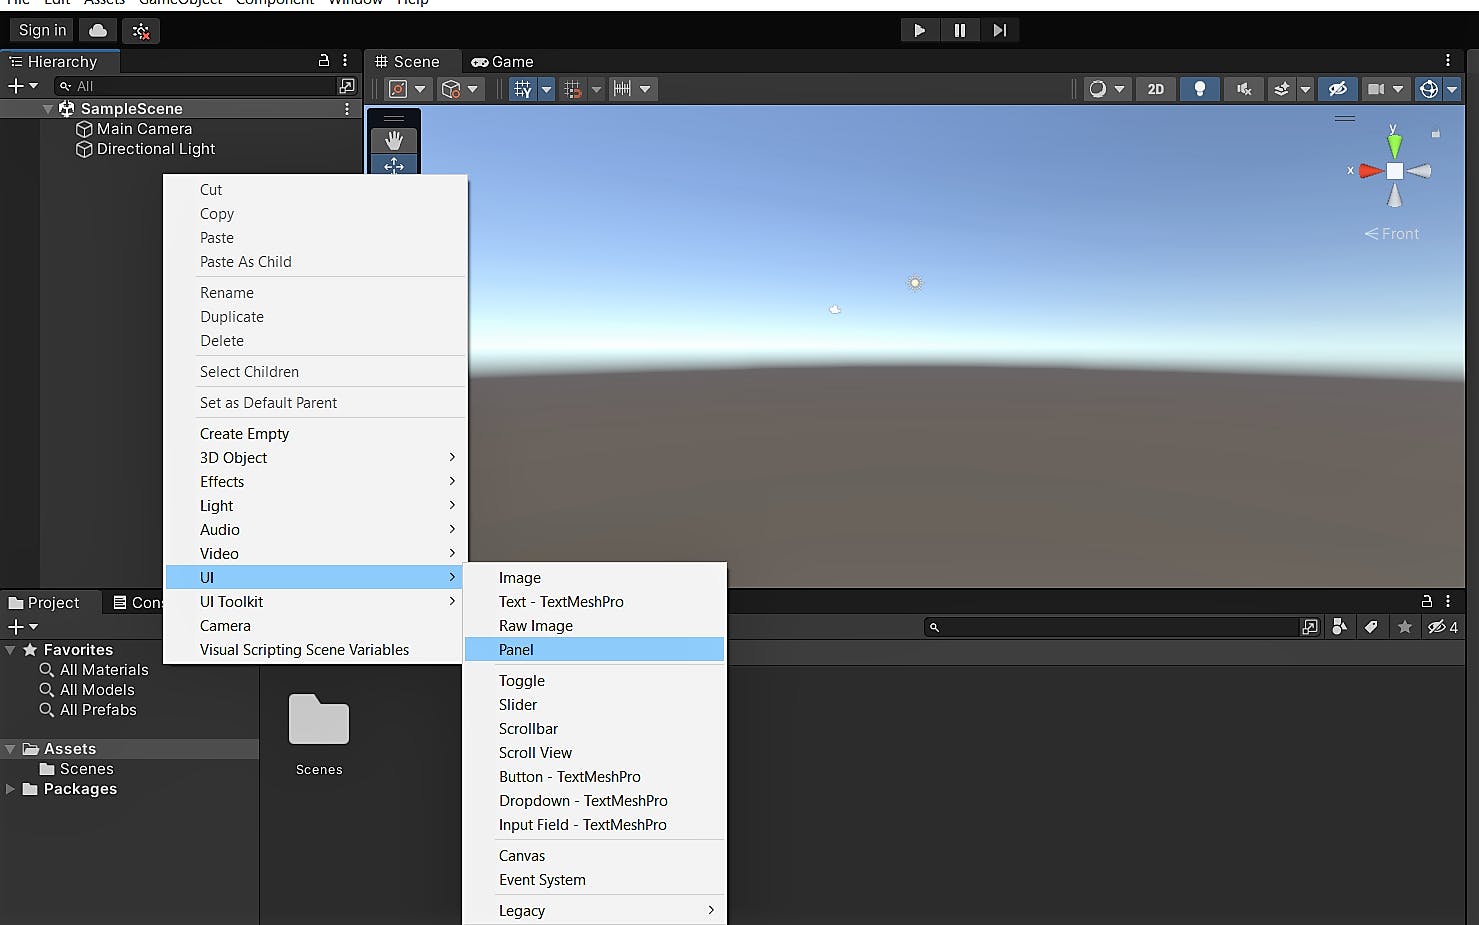
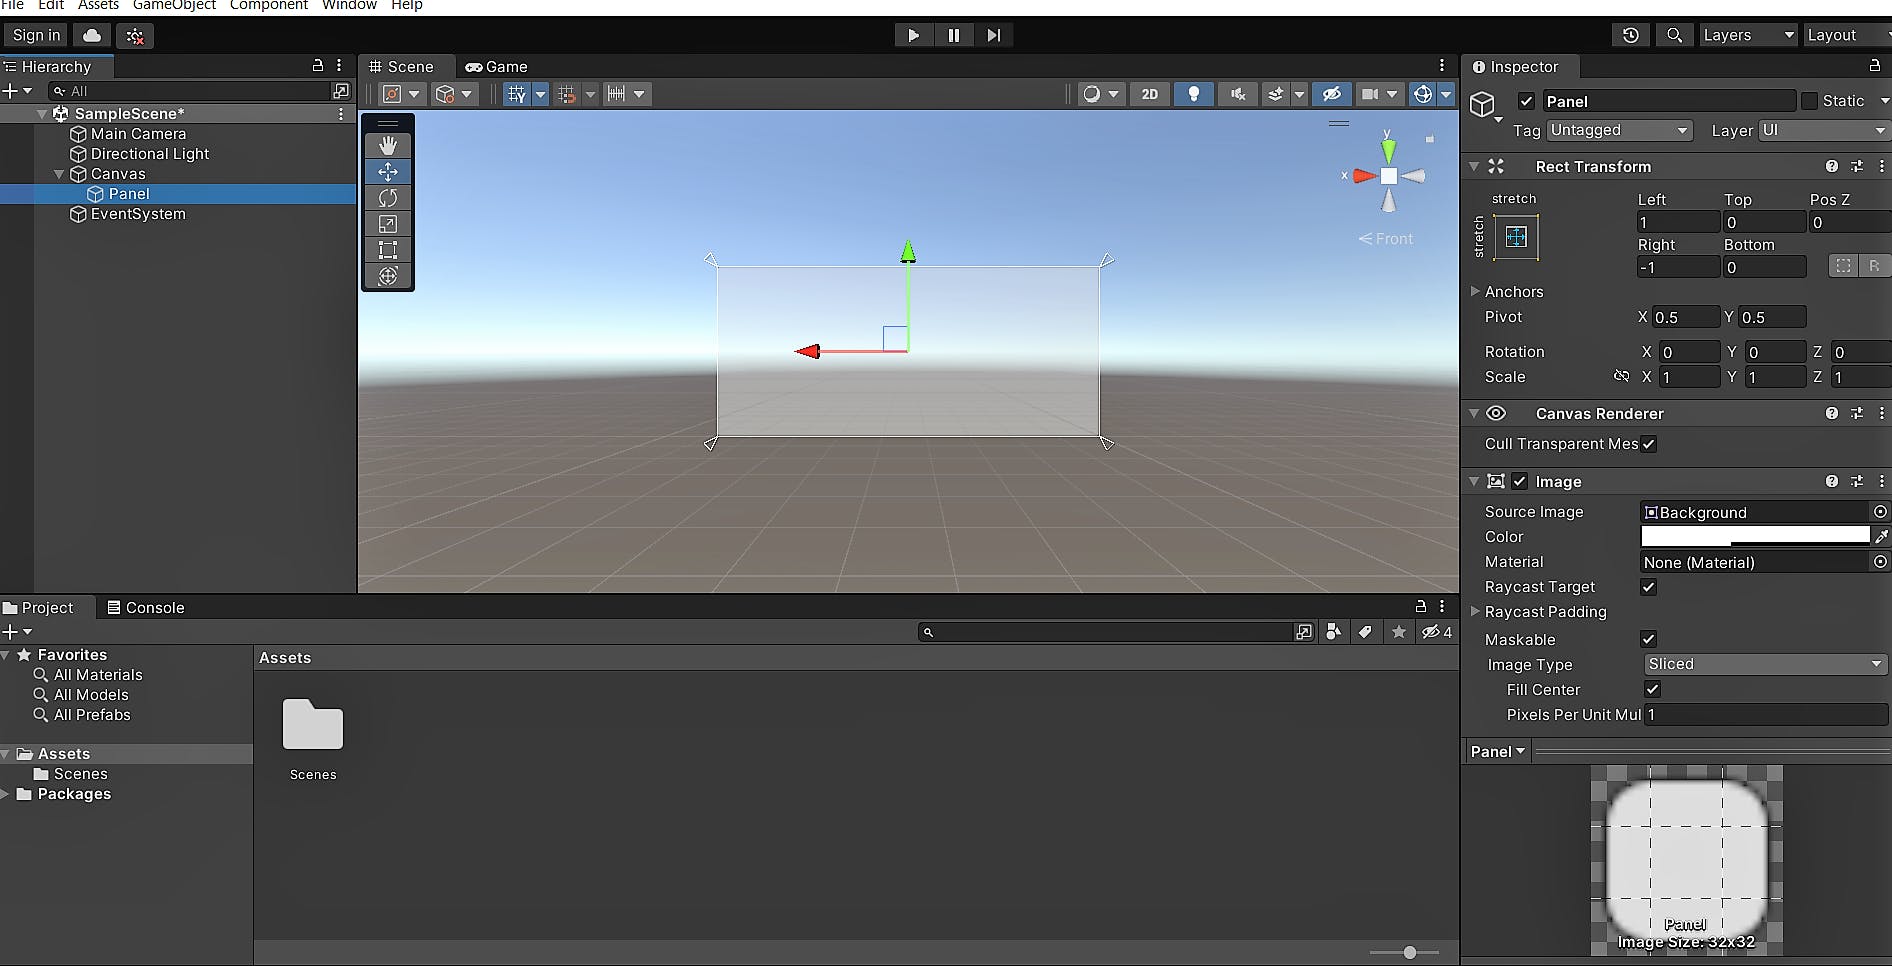
Then, by creating a text object, you can input the "You Won!" message and customize its appearance, such as adjusting the font, size, and color. Additionally, by opening Canvas, you can position and arrange the panel and text elements to achieve the desired visual layout.
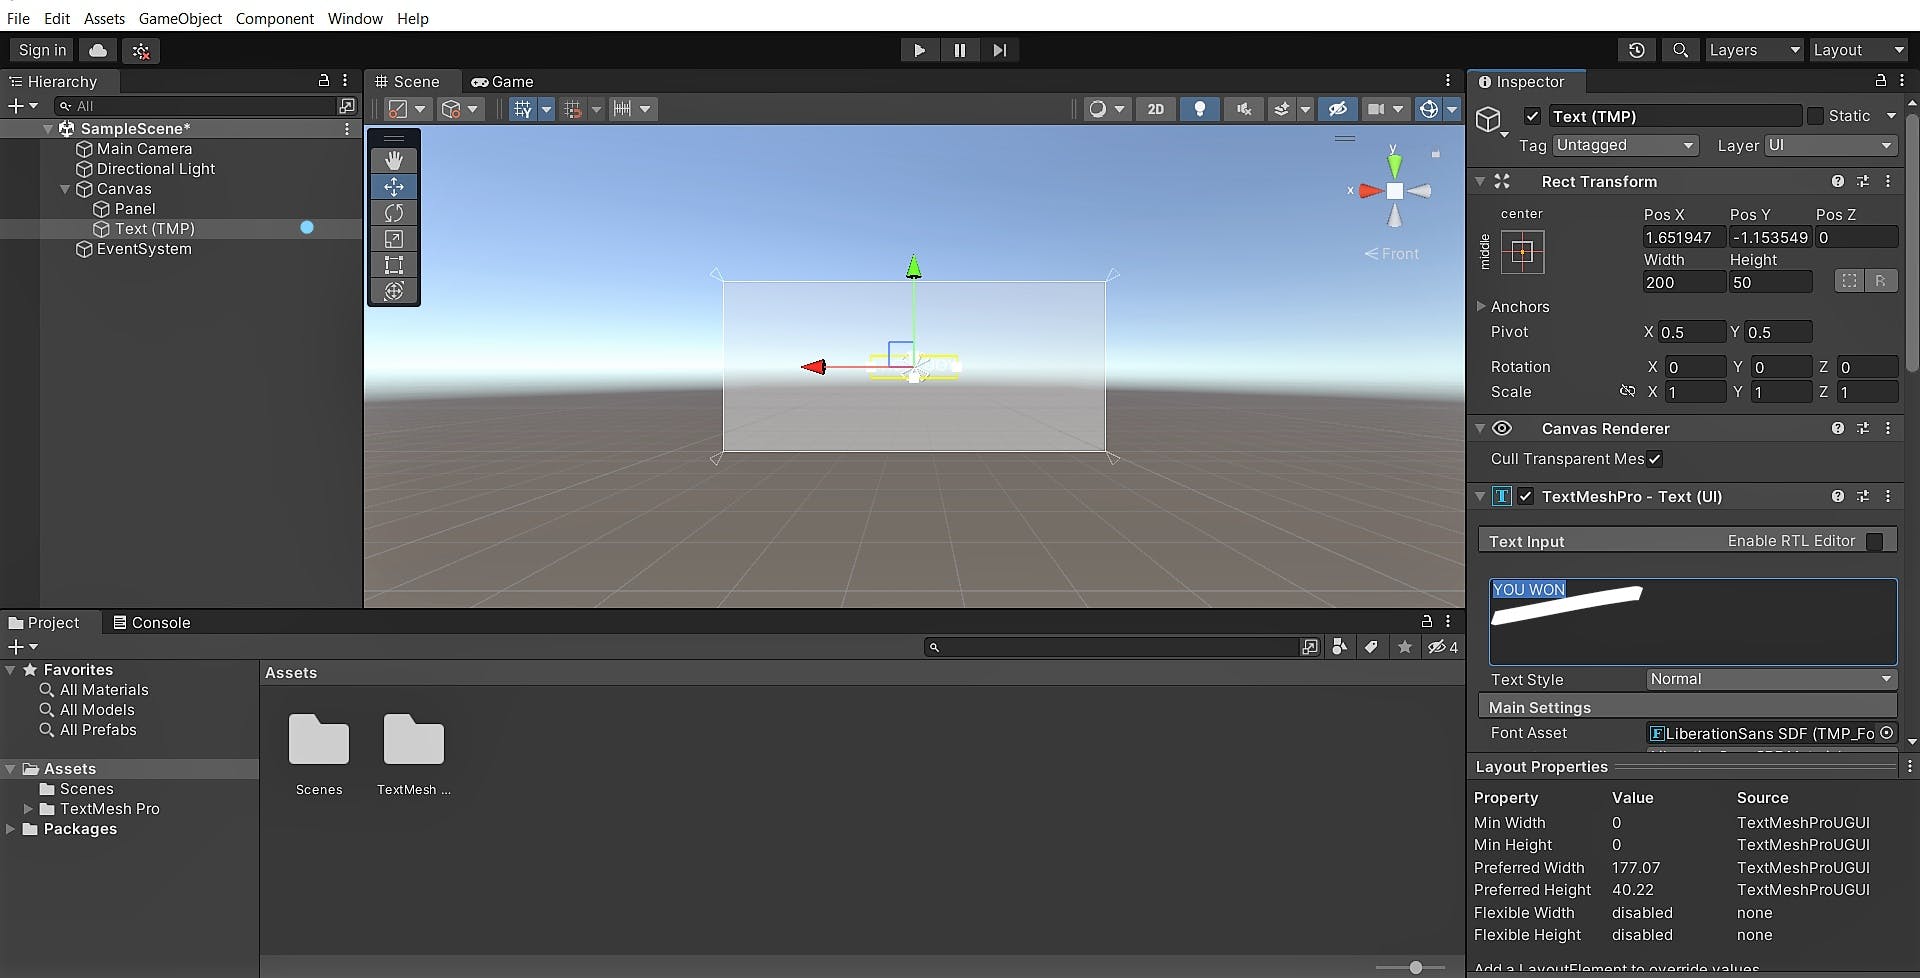
To change the background color, locate the "Color" property in the material inspector. Adjust the RGB values or use the color picker to select a desired color. After adjusting the font, size, and color 👇.
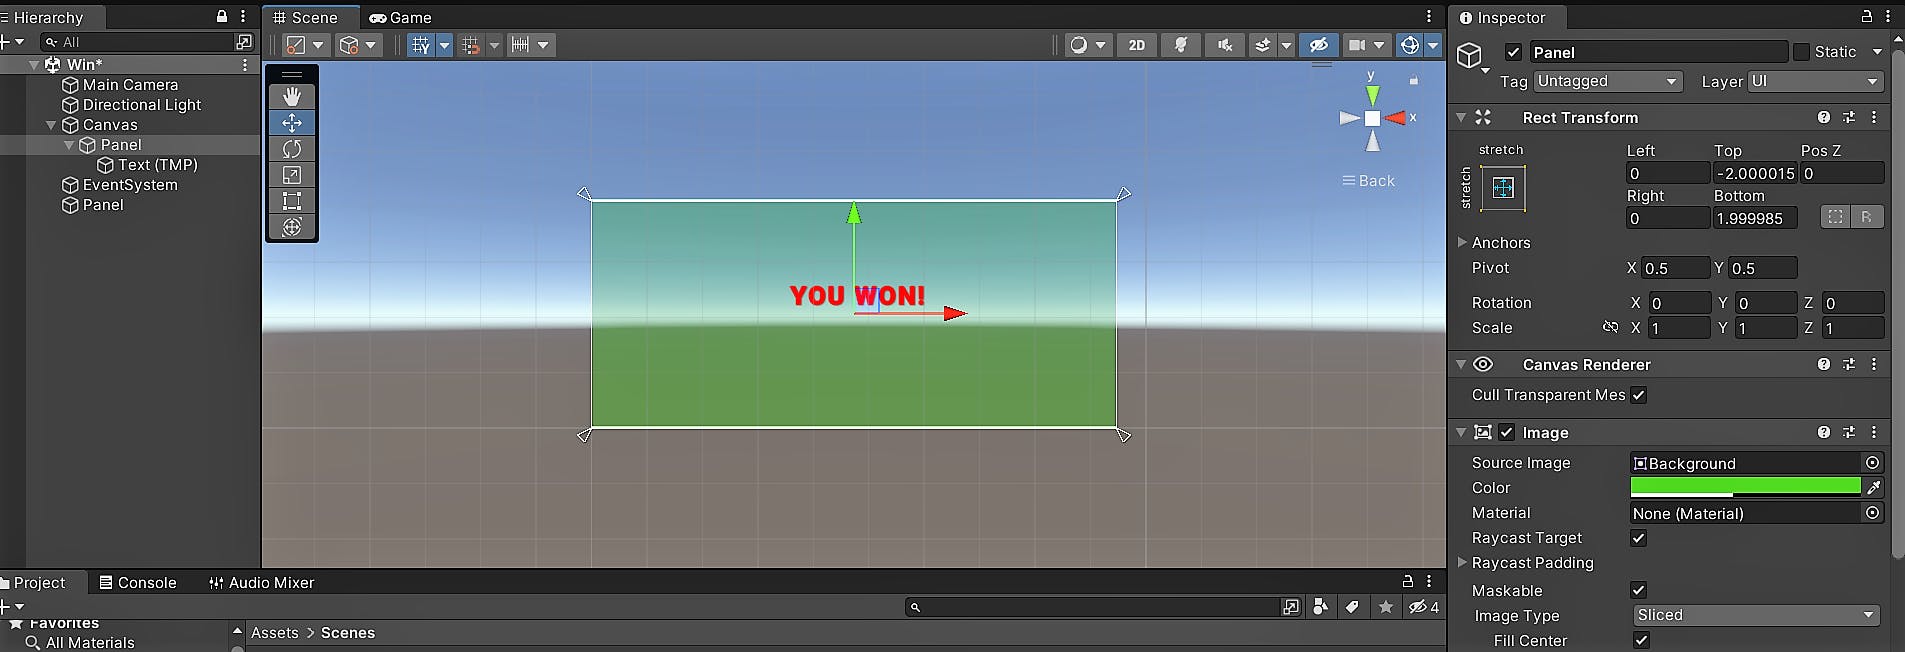
Testing and Playing the Game:
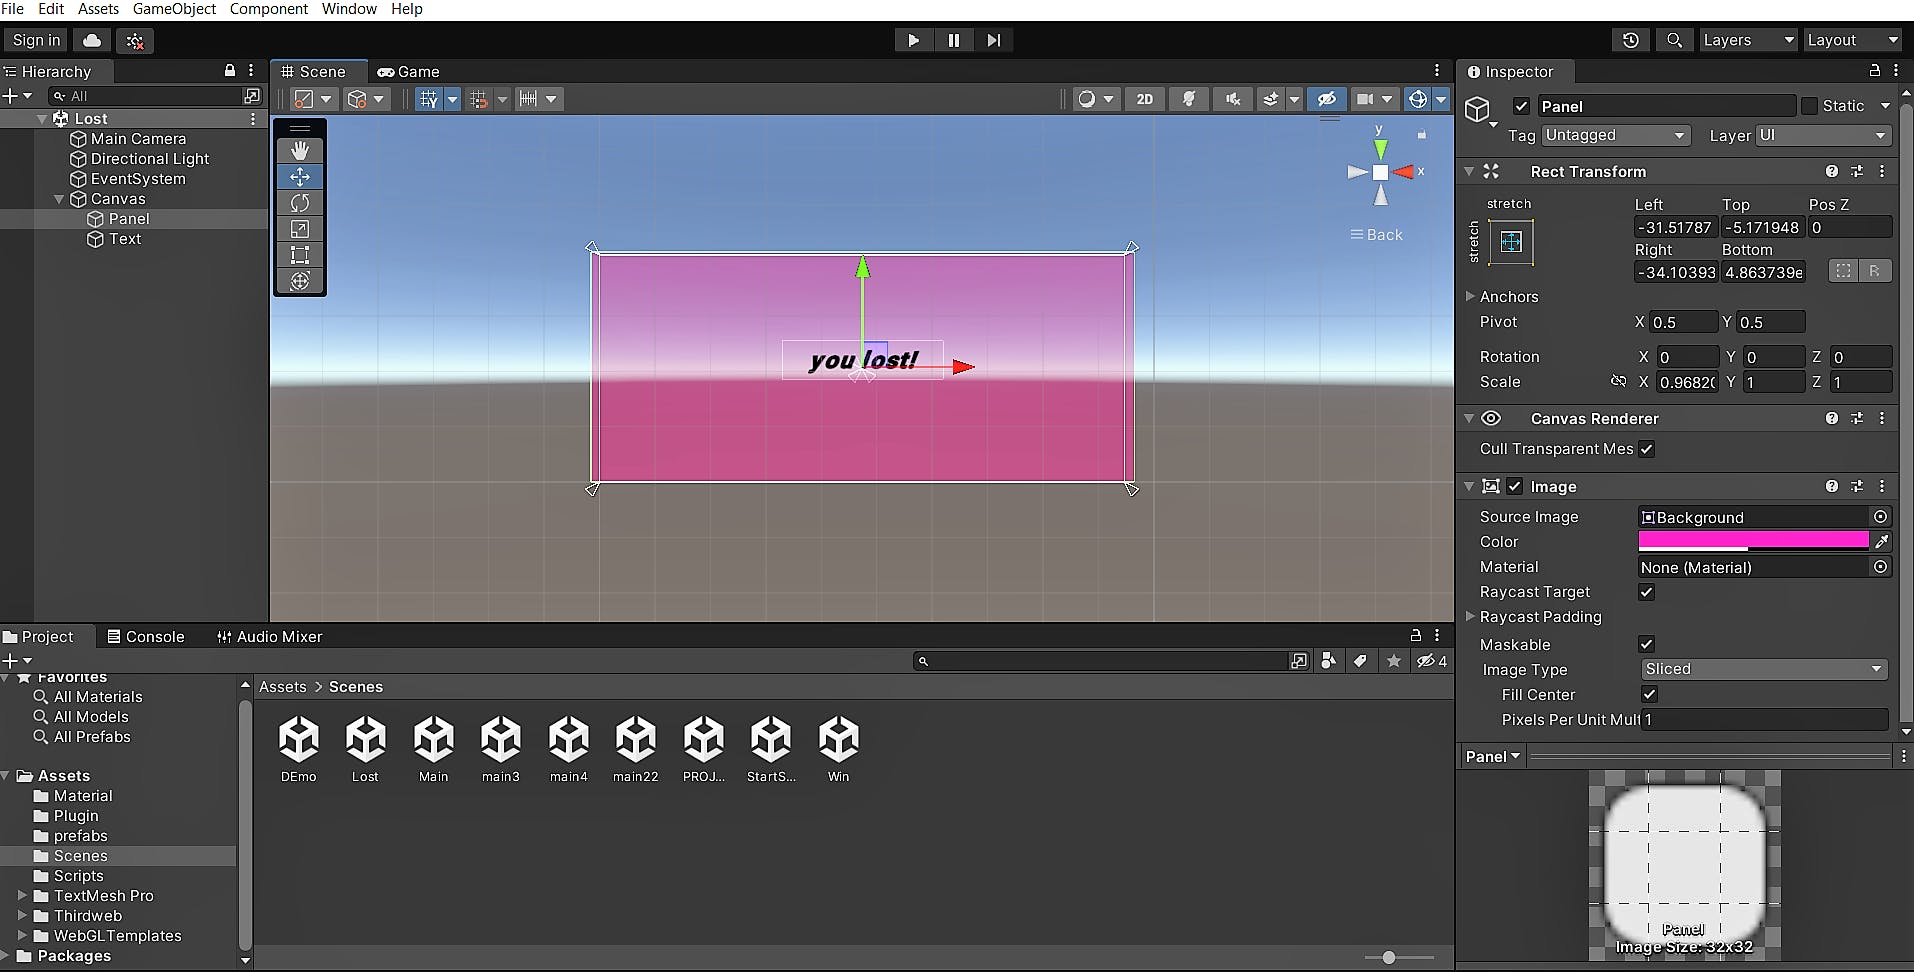
✔Creating the "You Lost!" Scene: Adding UI Elements
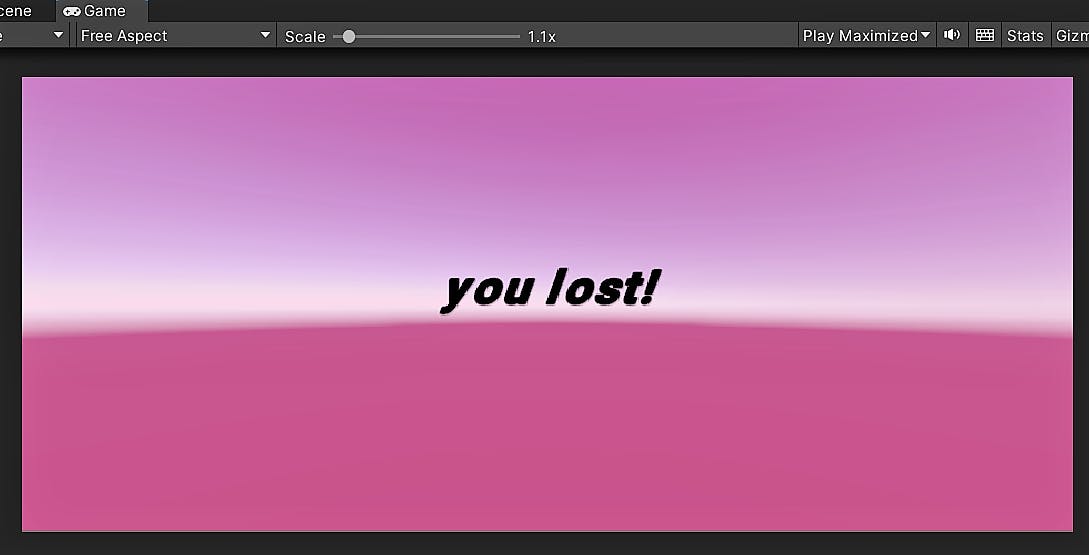
To create the "You Lost!" scene, follow a similar process as before.
Testing and Playing the Game:
TIP: Maintaining Visibility of the Game Preview in Unity
Switching between Scenes in Unity may temporarily hide the game preview. To bring the game back into view, click on the "2D" button at the top of the Unity Editor or select any object in the Scene Hierarchy or Scene view. This will activate the Game view and allow you to see and interact with the game while editing the scene.
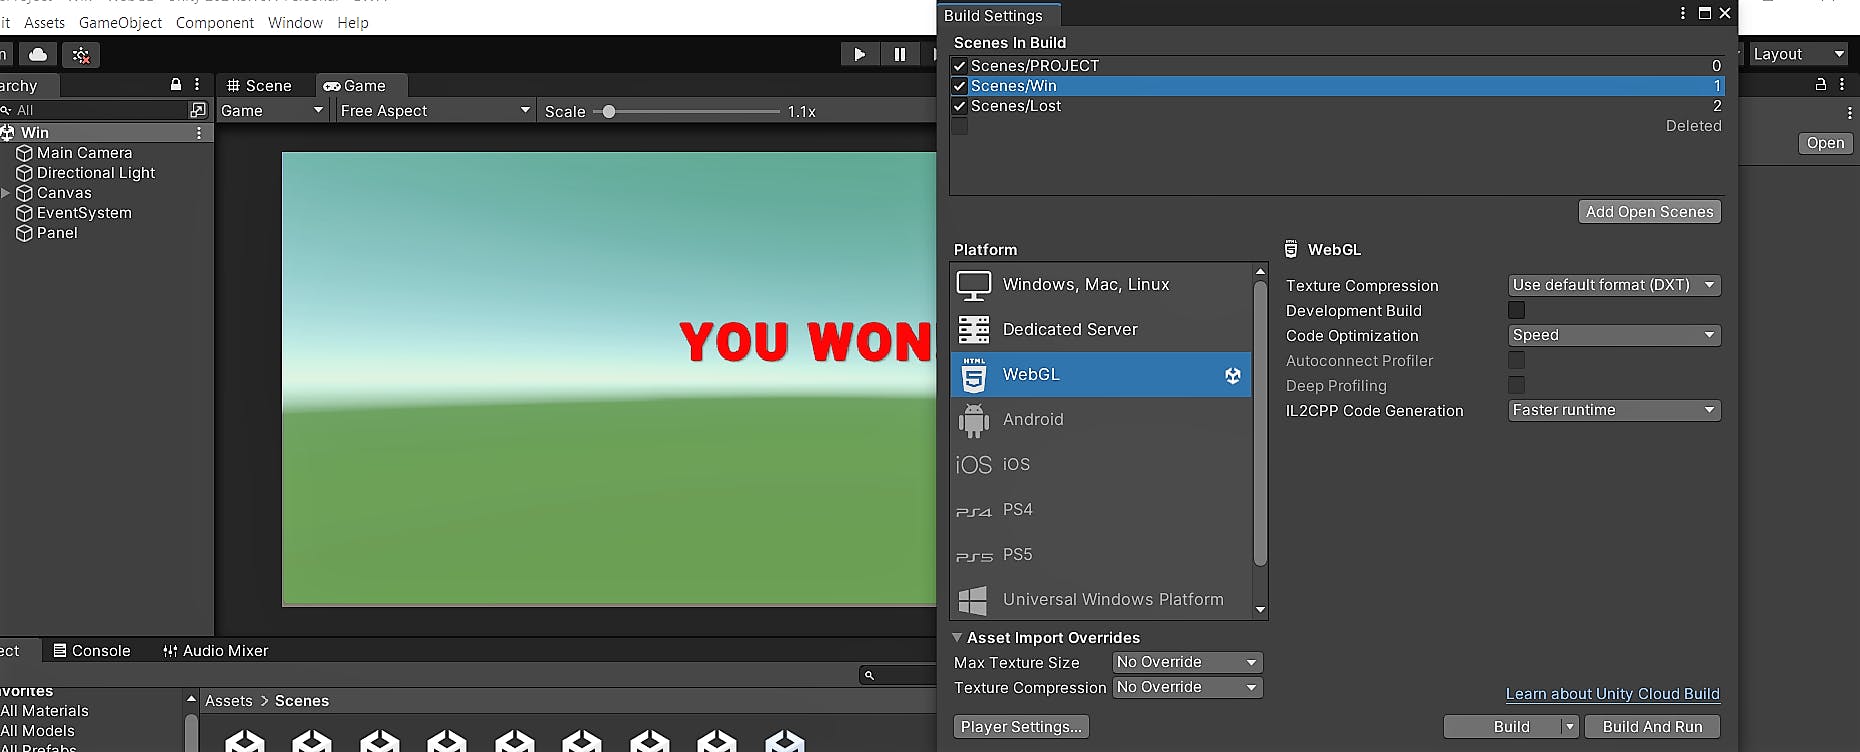
✔To load scenes dynamically in Unity, you need to add them to the build settings. You need to open the Build Settings window by navigating to File > Build Settings or use the shortcut Ctrl + Shift + B click "Add Open Scenes" if the scenes are already open, or navigate to your project's Assets folder and select the scenes you want to include. Arrange them in the desired order. Then, you can use code to load the scenes based on your logic.
📝It's important to note that when adding scenes to the build settings, you need to have the scenes open in the Unity Editor. If you don't have the scenes open in the Unity Editor, you won't be able to add specific scenes to the build settings. Additionally, if you add a scene to the build settings but then later rename or move the scene, Unity won't be able to find it and you'll need to remove it from the build settings and add it again.
✔Creating the "Start!" Scene
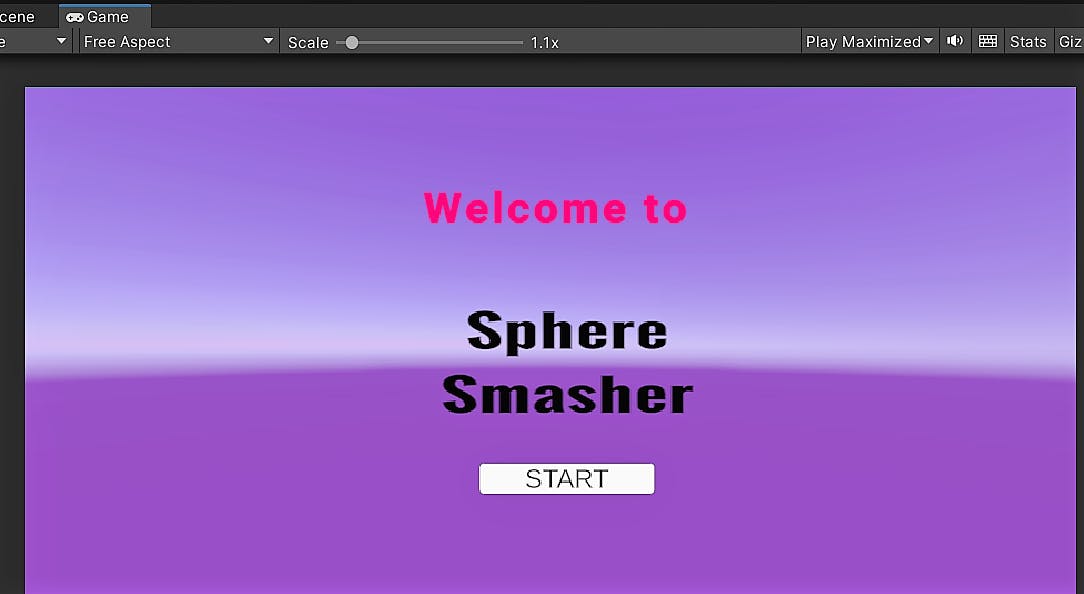
Before we jump into the game, let's create the start scene, which will be the first thing players see when they launch the game. This scene will display the game's name and include a button to start the gameplay. We want to make a great first impression, so let's get started with creating an engaging start scene🚀!
To add the start scene, follow the same process we used to create the won-and-lost scenes. Create a new scene and add the necessary objects and elements, such as text and a button, to display the game's name and give the player the option to start the game.
✔Adding Script:
To make the button functional, attach a script to it that will load the gameplay scene when the button is clicked. Create a new script and attach it to the button object. In the script, use the SceneManager.LoadScene() function to load the gameplay scene.
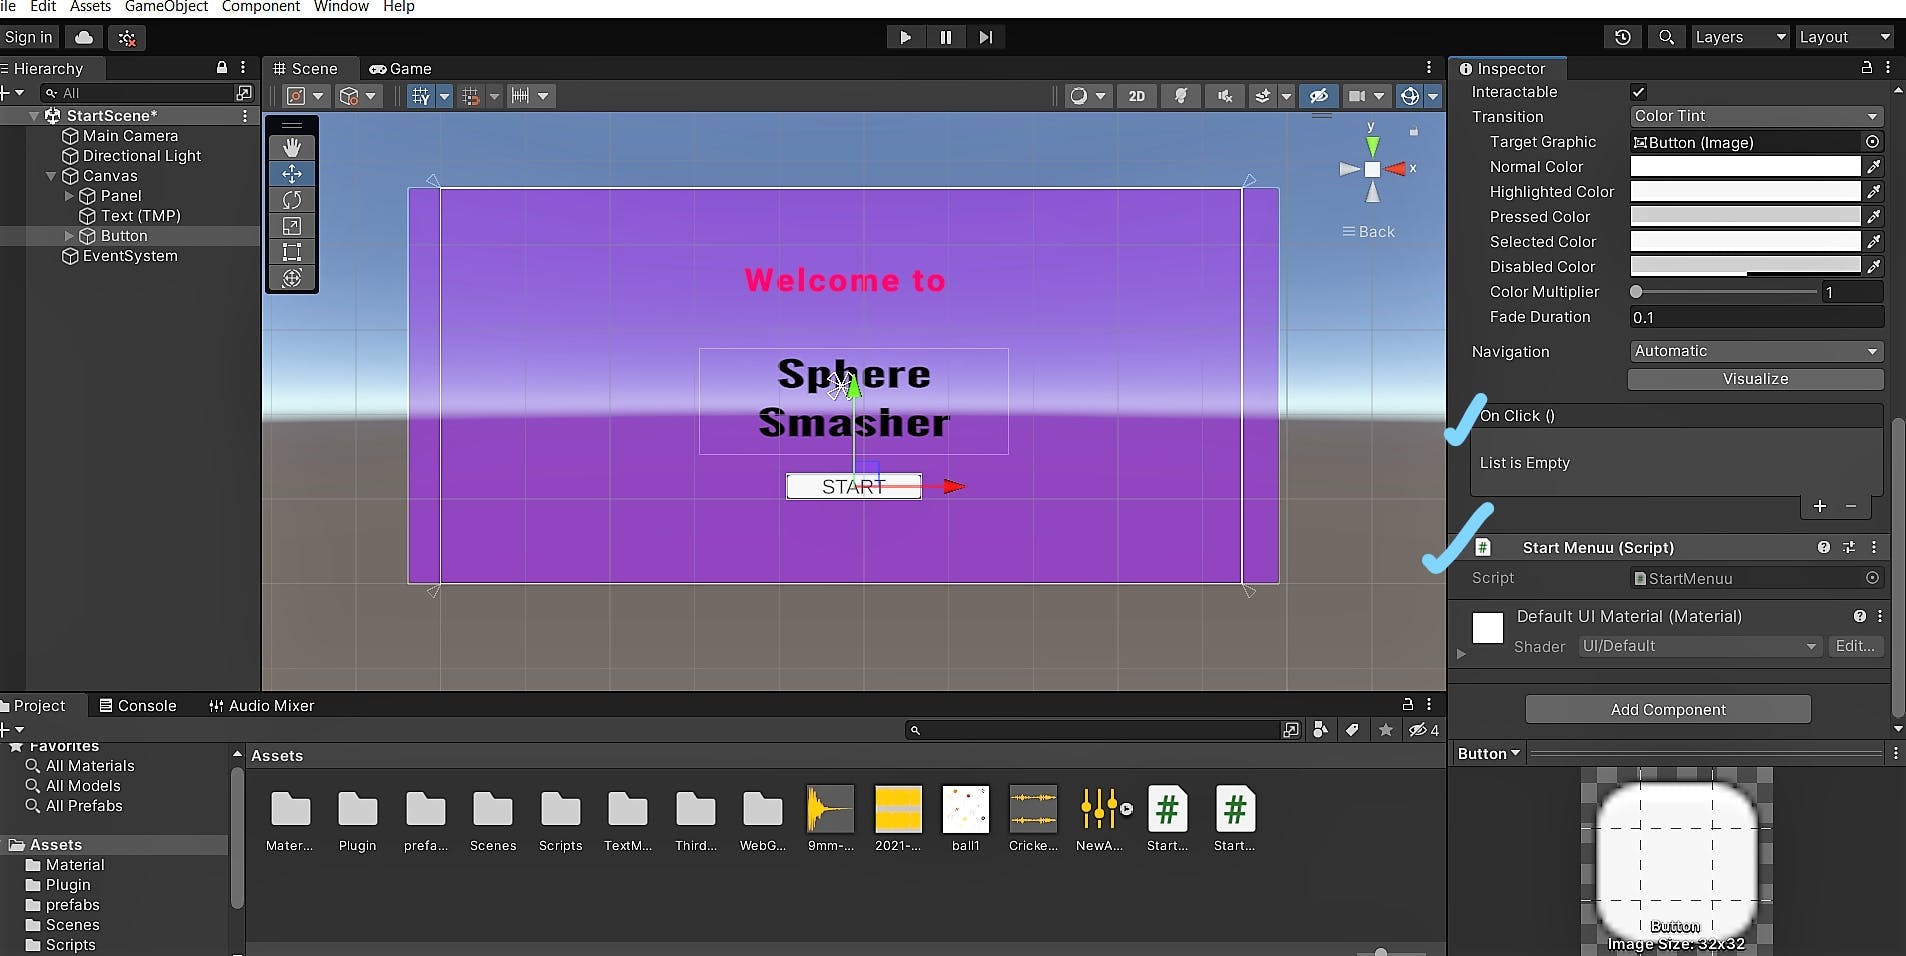
using System.Collections;
using System.Collections.Generic;
using UnityEngine.SceneManagement;
using UnityEngine;
public class StartMenuu : MonoBehaviour
{
    public void StartGame()
    {
      SceneManager.LoadScene(SceneManager.GetActiveScene().buildIndex + 1);
    } }
👉In the StartGame() function, use the SceneManager.LoadScene() function with the build index of the gameplay scene. You can get the build index by using SceneManager.GetActiveScene().buildIndex and add 1 to it, since the start scene will have a build index of 0 and the gameplay scene will have a build index of 1.
Attach the script to the button object by dragging and dropping the script onto the "OnClick()" event in the Button component of the object. Then, select the object that has the attached script and enter the name of the function that you want to call in the "On Click()" section of the Button component. In this case, it will be the StartGame() function that you just created.
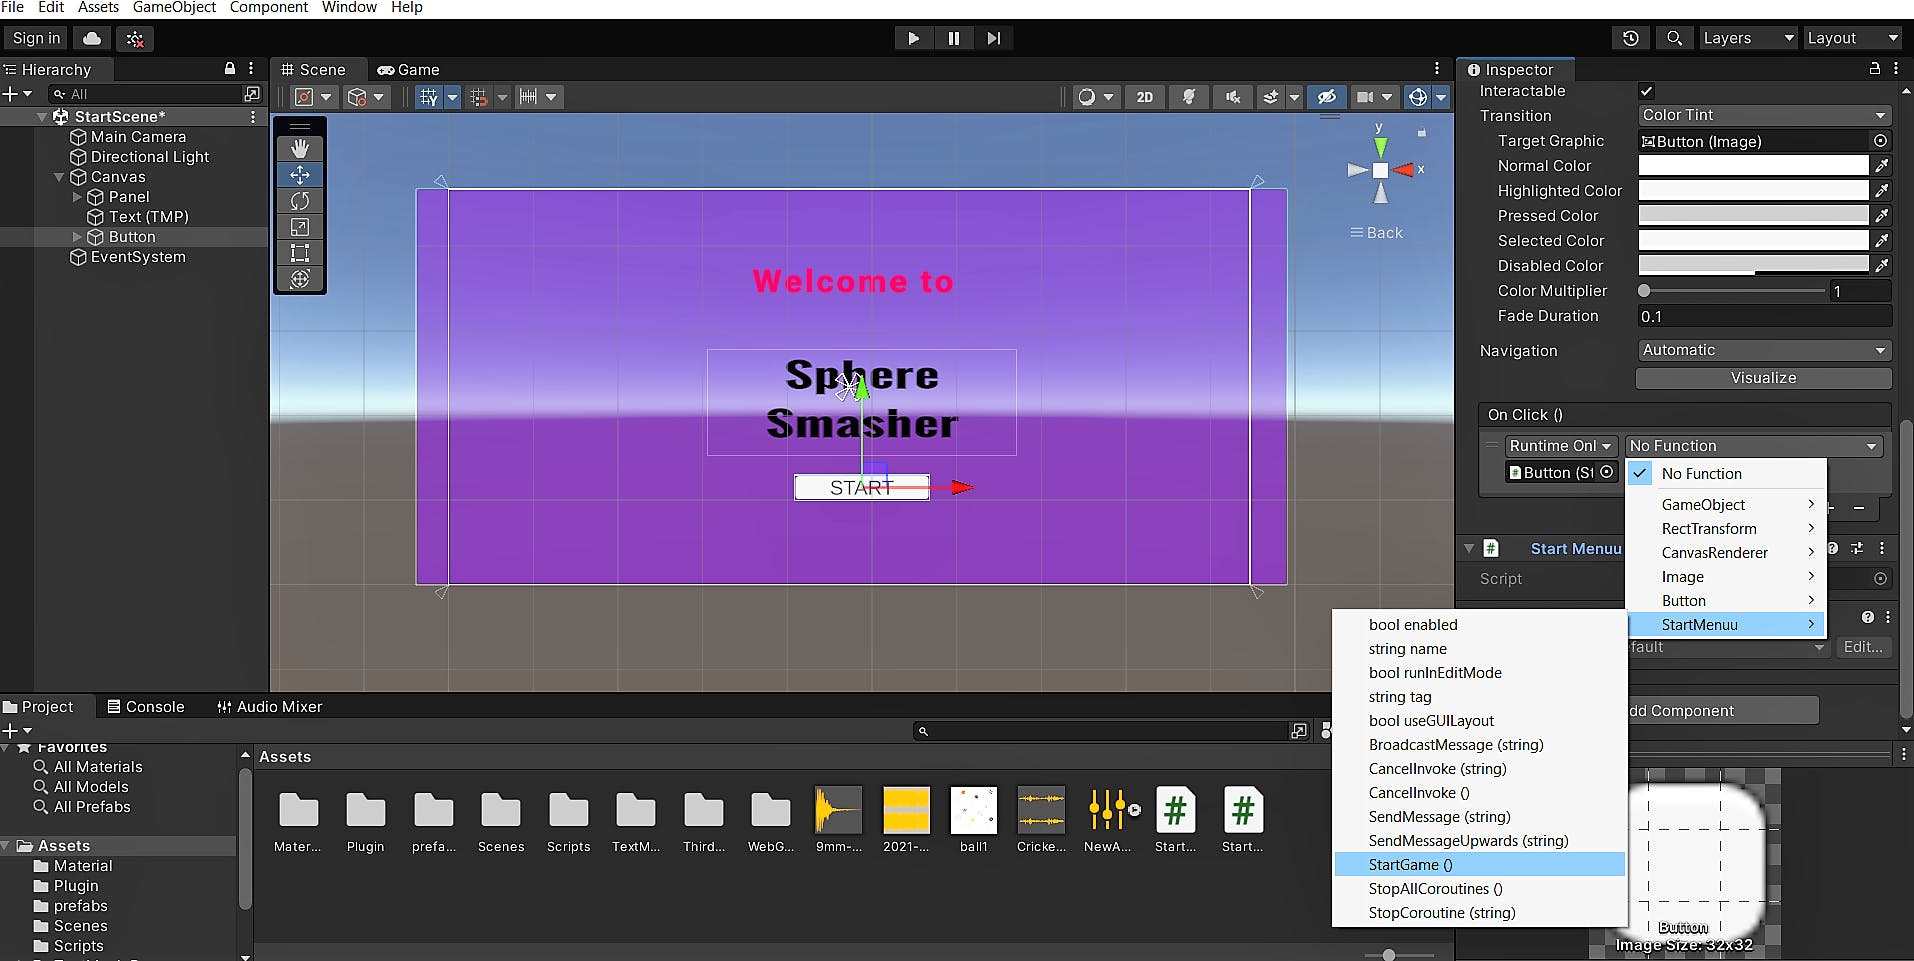
📝It's important to remember to add the start scene to the build settings and set it as the initial scene. You can see the order of the scenes 👇.

Once you have completed these steps, you should be able to run the game and click on the start button to load the gameplay scene.
Testing and Playing the Game:
Adding Audio And Visual Effects
AUDIO EFFECTS
Let's add some bullet-releasing sound effects to enhance our game. It's always exciting to hear the sound of bullets being fired, right😁?
To get started, you first need to download the audio clip that you want to use. You can search for sound effects on websites like Google or other online resources. Once you have the audio clip, you can import it into your Unity project by dragging and dropping it into the project's Assets folder.
Next, I wanted to add this audio to the bullet holder object so select the object in the scene, and add an Audio Source component to it(click on add component in the inspector view).
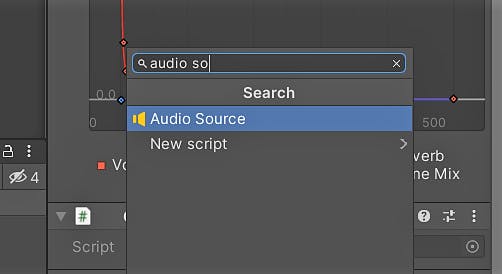
In the Audio Source component, you'll see a field called "Audio Clip". Select the audio clip you imported earlier by dragging it into this field.
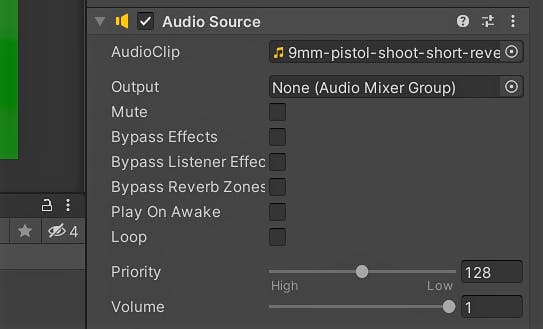
👉Disable the "Play On Awake" option in the Audio Source component because I only want the sound to play when shooting the ball. By disabling "Play On Awake", the audio clip attached to the Audio Source will not automatically play when the scene starts. Instead, you will need to trigger the audio playback in your shooting script or wherever you want the sound to be played.
After that, To trigger the sound effect when we shoot the bullets, will need to modify our shooting script. To do this, add the following code to the shooting script:
public AudioSource Bullet1Audio; // Reference to the Audio Source component
// Reference to the audio clip
void Start()
{
   Bullet1Audio = GetComponent<AudioSource>();
}

void Fire()
{// Play the audio clip when a bullet is fired
    Bullet1Audio.Play();
    // ...
}
In this code, we first define a public field for the Audio Source component (in this case, we called it "Bullet1Audio"). By calling GetComponent<AudioSource>() within the Start() method and assign it to the Bullet1Audio variable, you are retrieving the AudioSource component attached to the same game object as the script. This allows you to control the audio playback for that particular bullet object.
Finally, in the Fire() method, we play the audio clip by calling the Play() method on the Bullet1Audio component.
✔Modifying the code in the shooting script:
float bulletSpeed = 1300;
    public GameObject bullet;
    AudioSource Bullet1Audio;
    // Start is called before the first frame update
    void Start()
    {
       Bullet1Audio = GetComponent<AudioSource>();
    }
    void fire()
    {
        GameObject tempBullet = Instantiate(bullet, transform.position, transform.rotation);
        Rigidbody rb = tempBullet.GetComponent<Rigidbody>();
        rb.AddForce(rb.transform.forward * bulletSpeed);

        Destroy(tempBullet,0.5f);
      Bullet1Audio.Play();
    }
     void Update()
    {
        if(Input.GetKeyDown(KeyCode.Space))
        {
            fire();
        }
    }
}
Are you facing an issue where the icon of the AudioSource component is visible and you want to hide it in the Unity editor?
TIP: Hiding Audio Icons in Unity Scene View
To hide the icon of the AudioSource component in the Unity editor, you can go to the Gizmos menu in the top right corner of the Scene view, and uncheck the "Audio Source" option. This will hide the icon and make your scene look cleaner.
✔Adding audio for the background:
To add audio for the background, create an empty GameObject in your scene and attach an AudioSource component to it. In the AudioSource component, select the audio clip you just imported in the AudioClip field. Or you can directly use the Audio Source object provided by Unity.
Finally, in the inspector, check the "Loop" checkbox to make sure the audio clip continues to play on a loop. You can also adjust other settings like volume, pitch, and spatial blend in the AudioSource component to customize the audio effect.
👉Enable the "Play On Awake" option in the Audio Source component to make the audio play automatically when the scene starts.
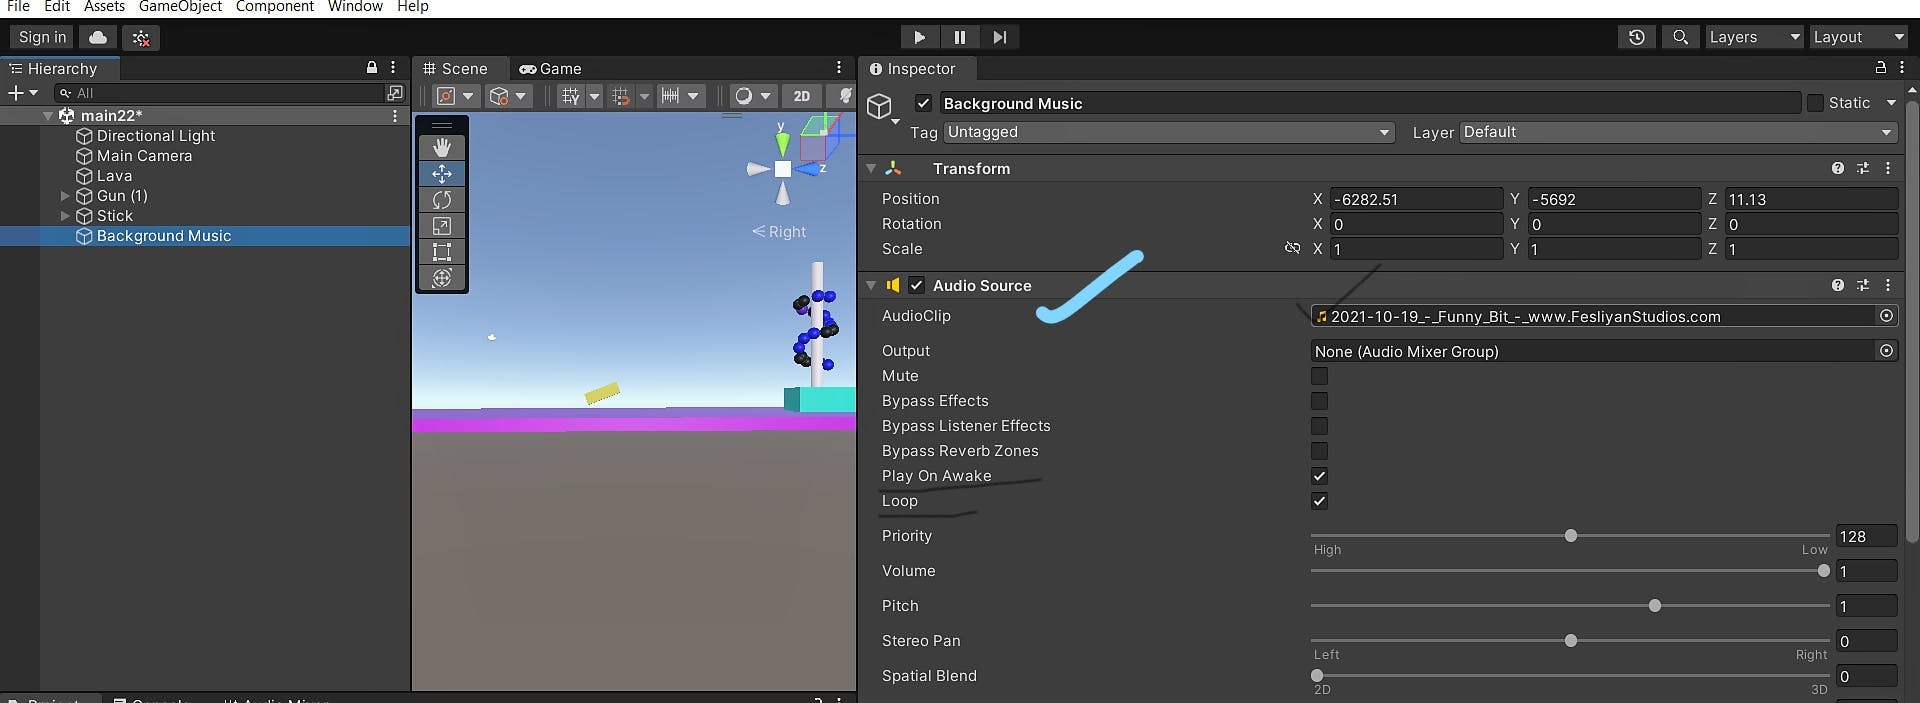
👉The code I provided earlier is only necessary when you want to trigger specific audio playback in response to certain events, like firing a bullet. If you have already added the audio clip to the background audio source and it's playing as intended, you don't need to modify your script to play that audio clip.
VISUAL EFFECTS
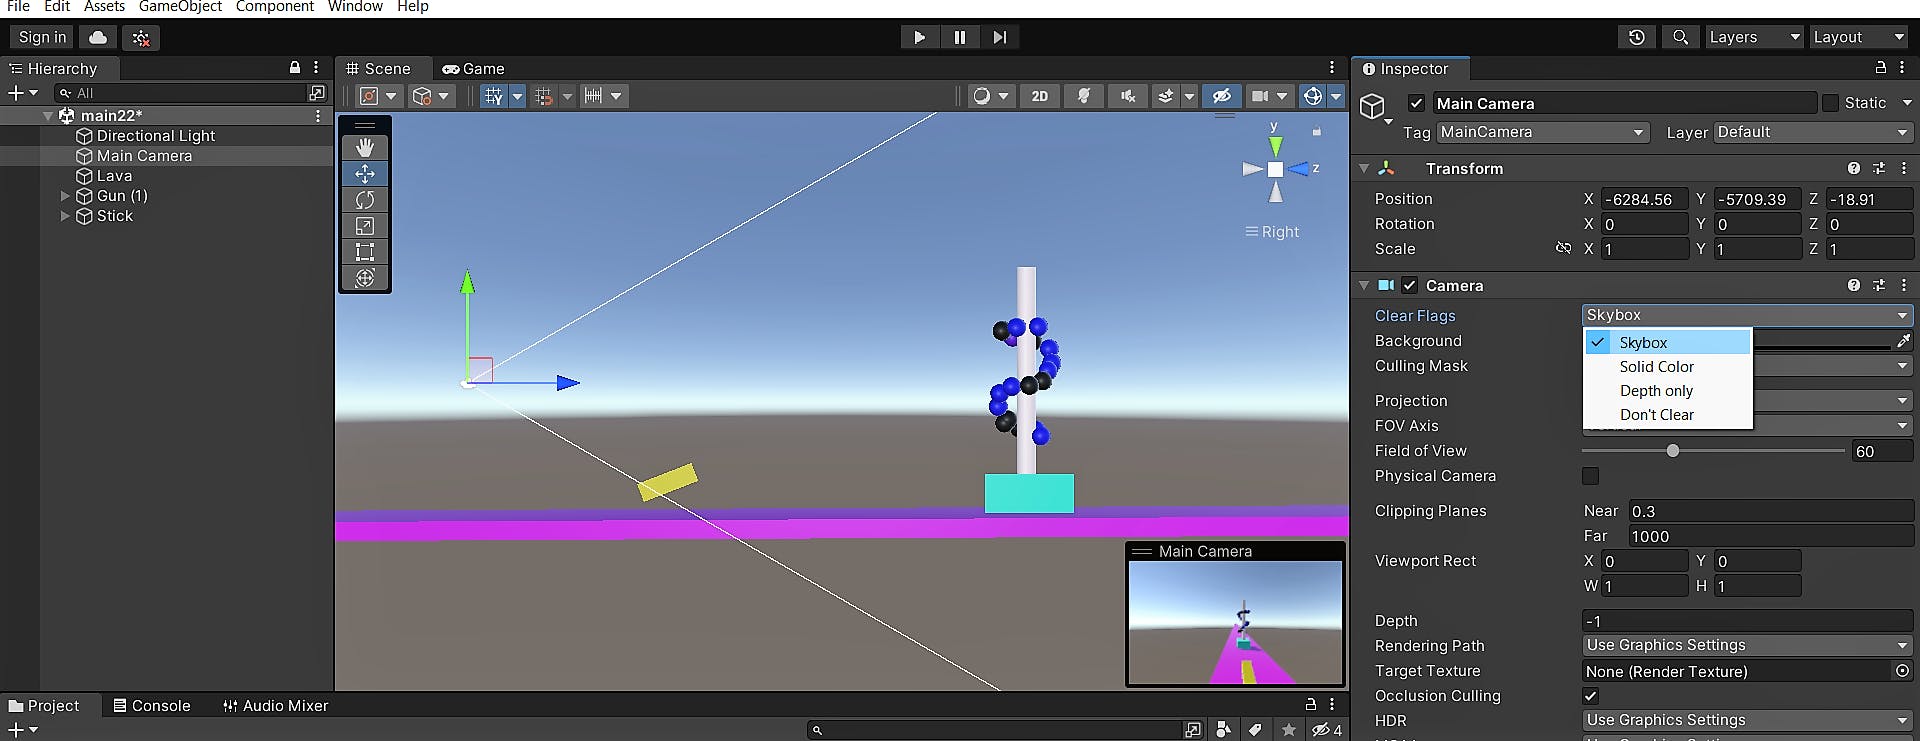
✔Customizing the Background with a Panoramic Skybox for the GamePlay Scene:
To change the background using a panoramic or procedural skybox, follow these steps. First, select the main camera object in your scene. In the inspector window, locate the "Skybox" component. If it's not present, you can add it by clicking on "Add Component" and searching for "Skybox".
Here, we need to create a new material by clicking on the"Create > Material". Give the material a name and double-click on it to open the material inspector. In the inspector, you'll see a "Shader" dropdown menu. Change this dropdown to either "Skybox > Panoramic" or "Skybox > Procedural", depending on your preference.
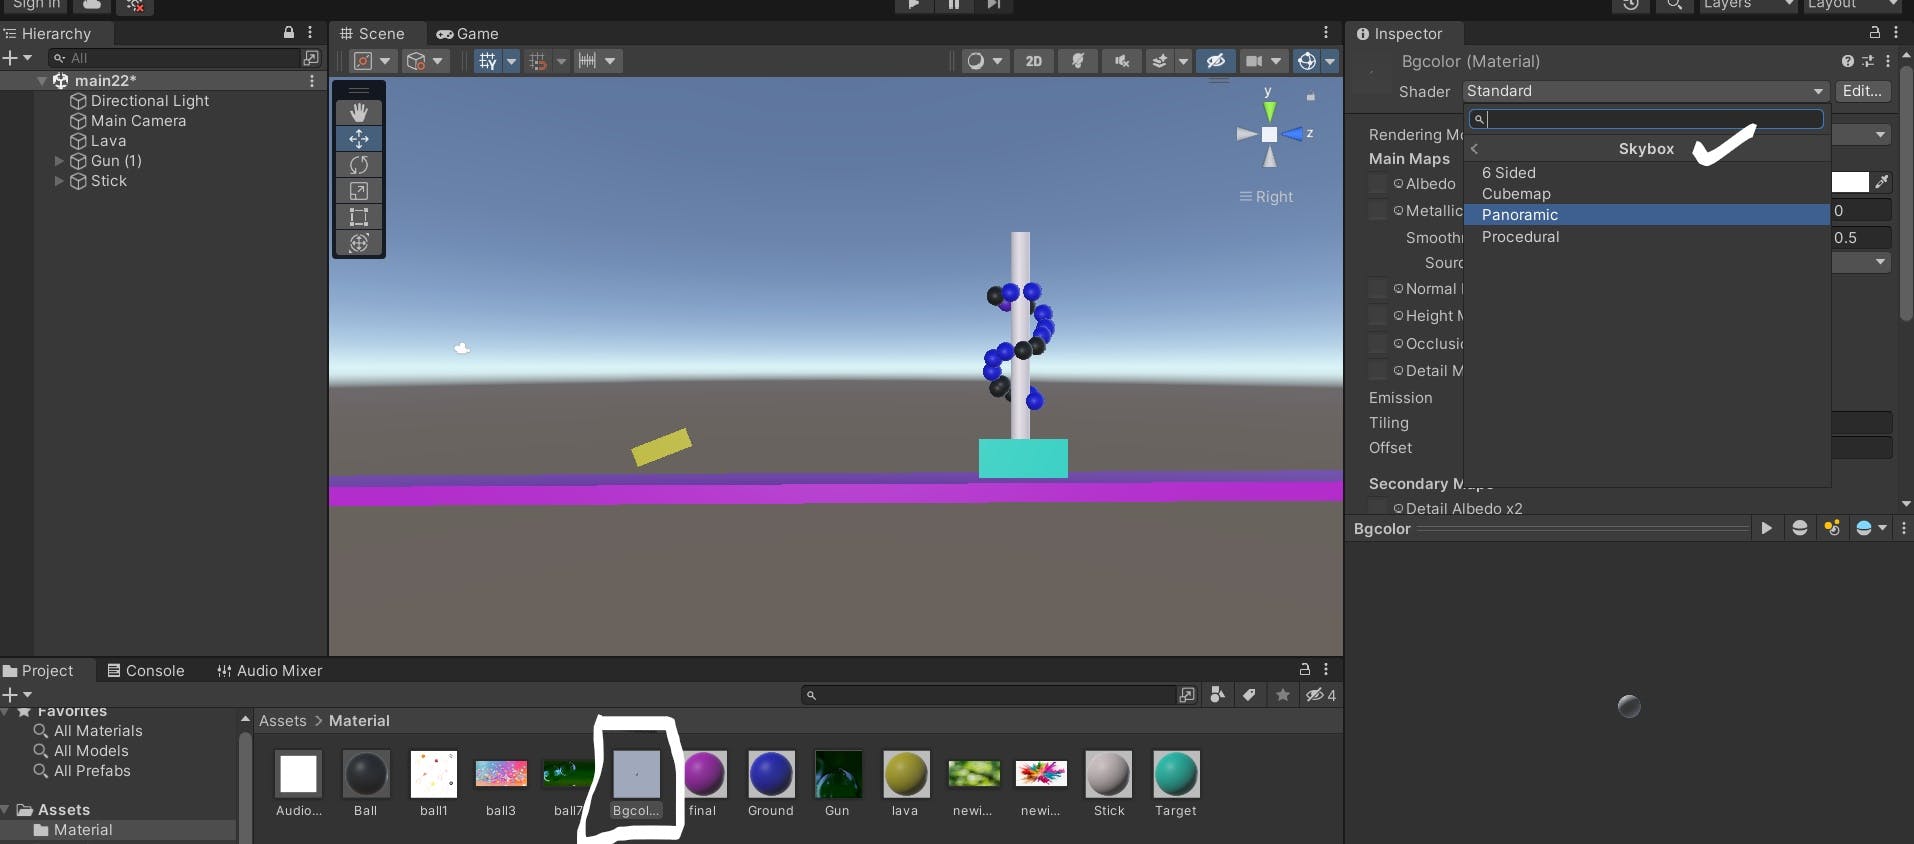
Now, set the background color by dragging and dropping the desired image into the "Texture" slot in the material inspector. This image will serve as the background for the skybox. You can either use an existing image or create a new one specifically for the background. And drag and drop the material onto the Scene View. This allows you to see the color applied in real time and make any necessary adjustments.
To enhance the visual effect, you can adjust the rotation of the skybox. Set the "Rotation" property to 360 degrees to make the background image fully wrap around the scene.
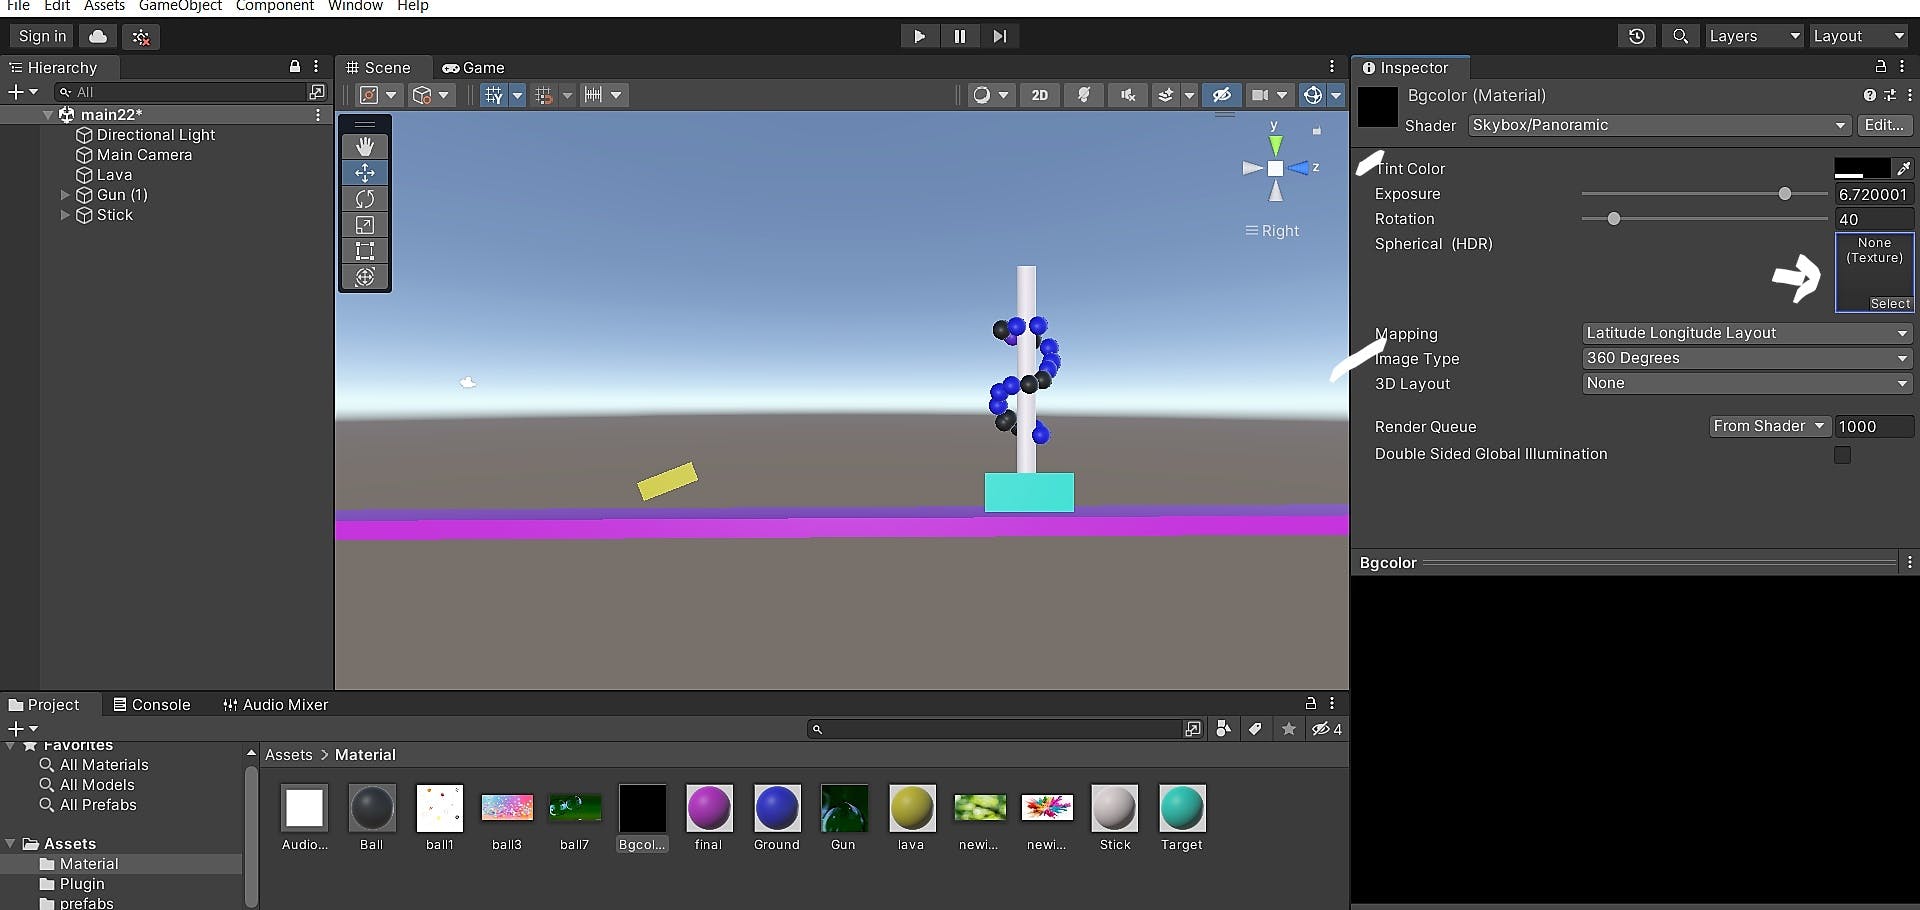
Additionally, you can manipulate the exposure and other properties in the material inspector to fine-tune the appearance of the background. Increasing the exposure can make the colors appear brighter and more vibrant.
Testing and Playing the Game:
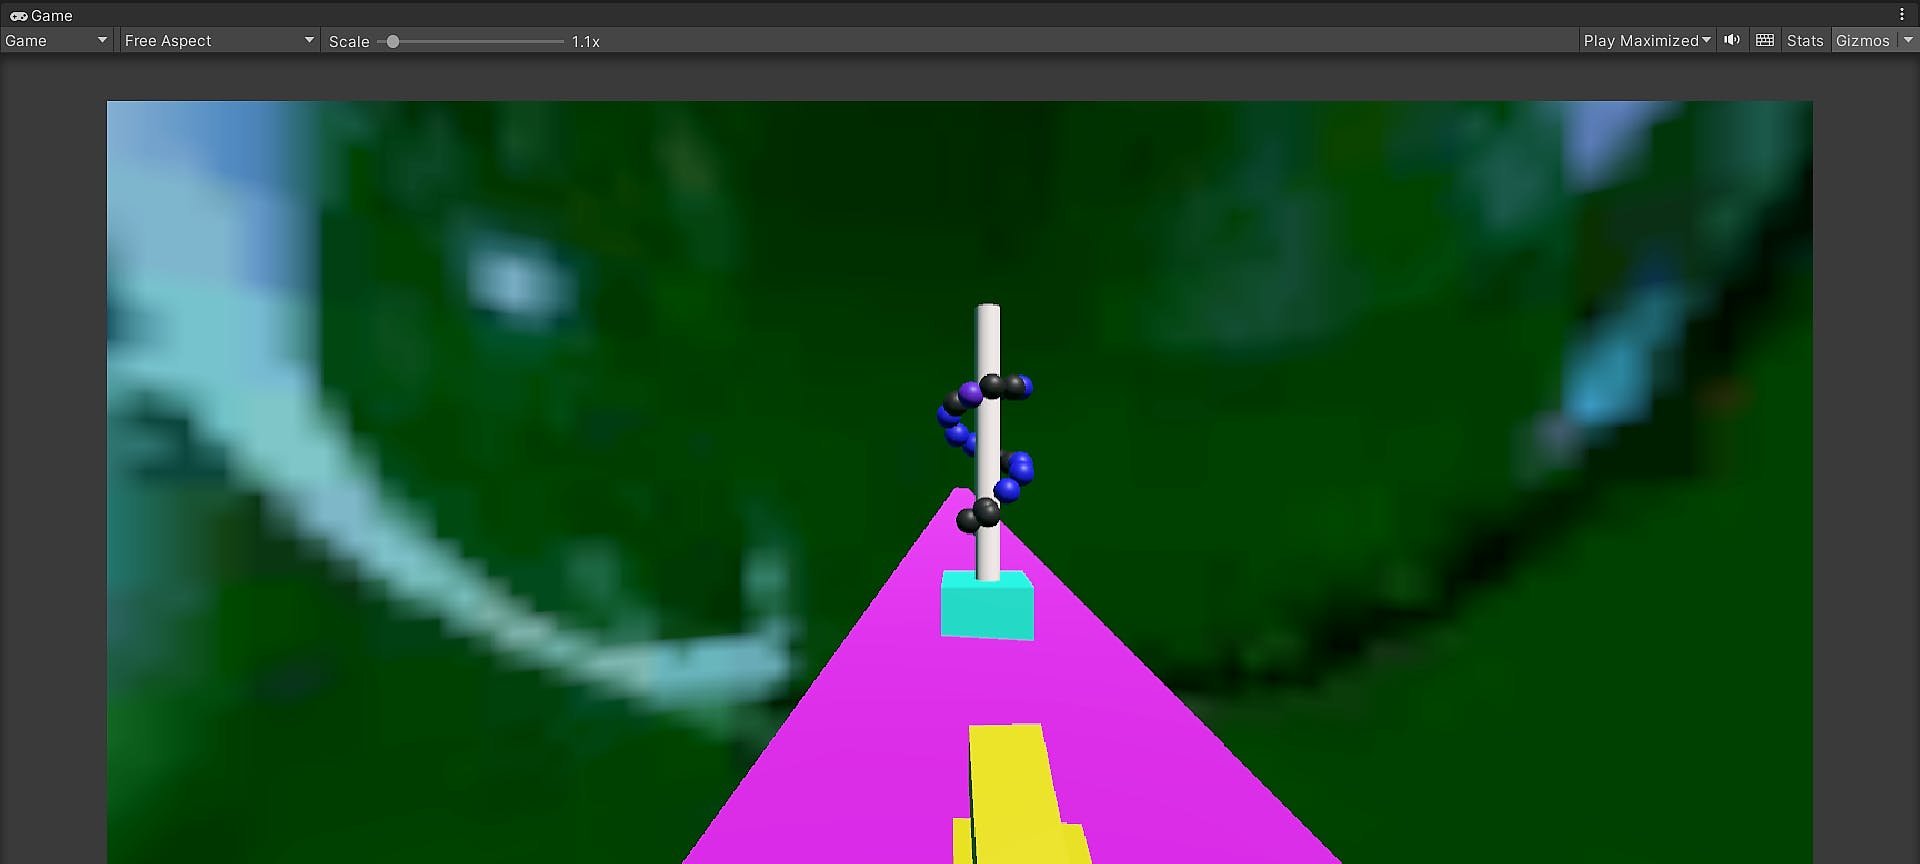
✔Customizing the Background with a Procedural Skybox for other Scene:
First, select the main camera object and add the "Skybox" component. Create a new material asset by going to "Create" > "Material" and customize its properties. Give it a name that represents the background effect you want to achieve.
Double-click on the newly created material to open the material inspector. Here, you can adjust the properties of the material to customize the background appearance. Look for the properties related to the procedural skybox effect, such as sun, sun size, atmosphere thickness, or background color. Modify these properties to achieve the desired visual effect for your background.
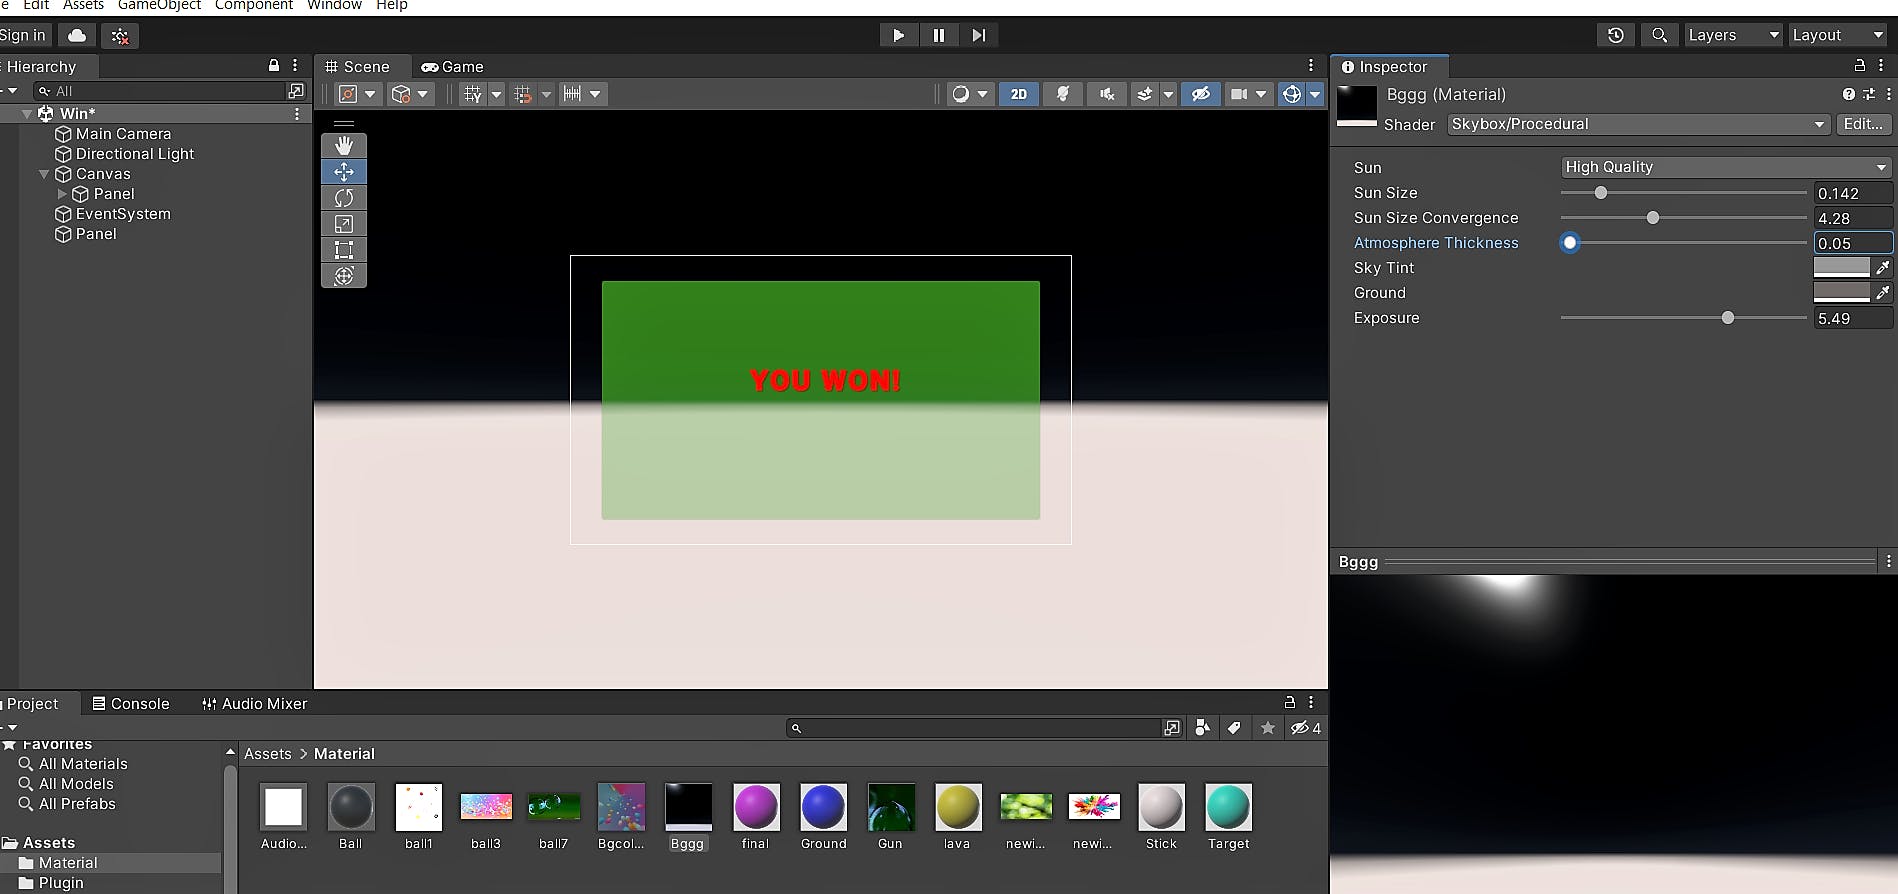
Testing and Playing the Game:
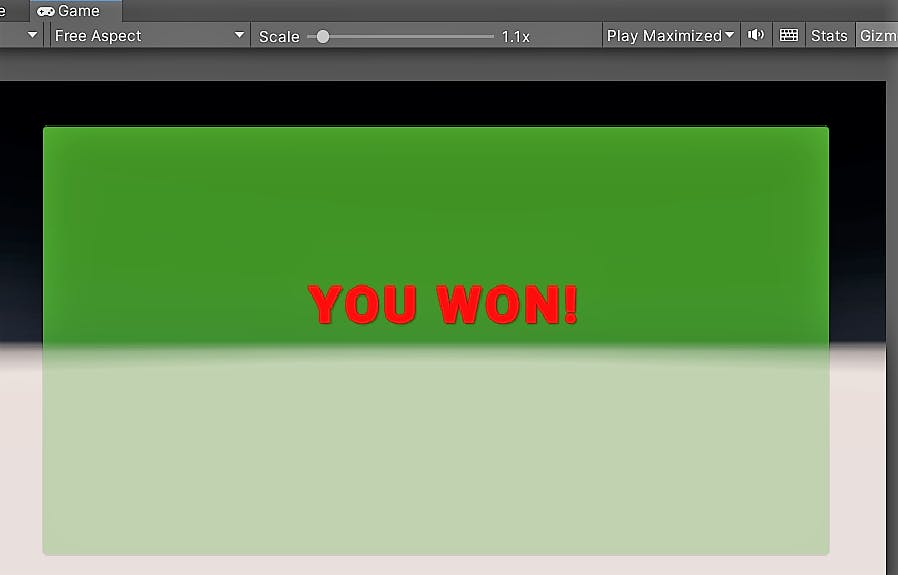
📝If you're happy with the panel's appearance and don't want to change the background color, there's no need to add a separate color. The procedural skybox is a separate option that allows you to customize the overall background, including the sky and lighting effects. If you do want to change the background color, follow the previous steps to modify the material properties.
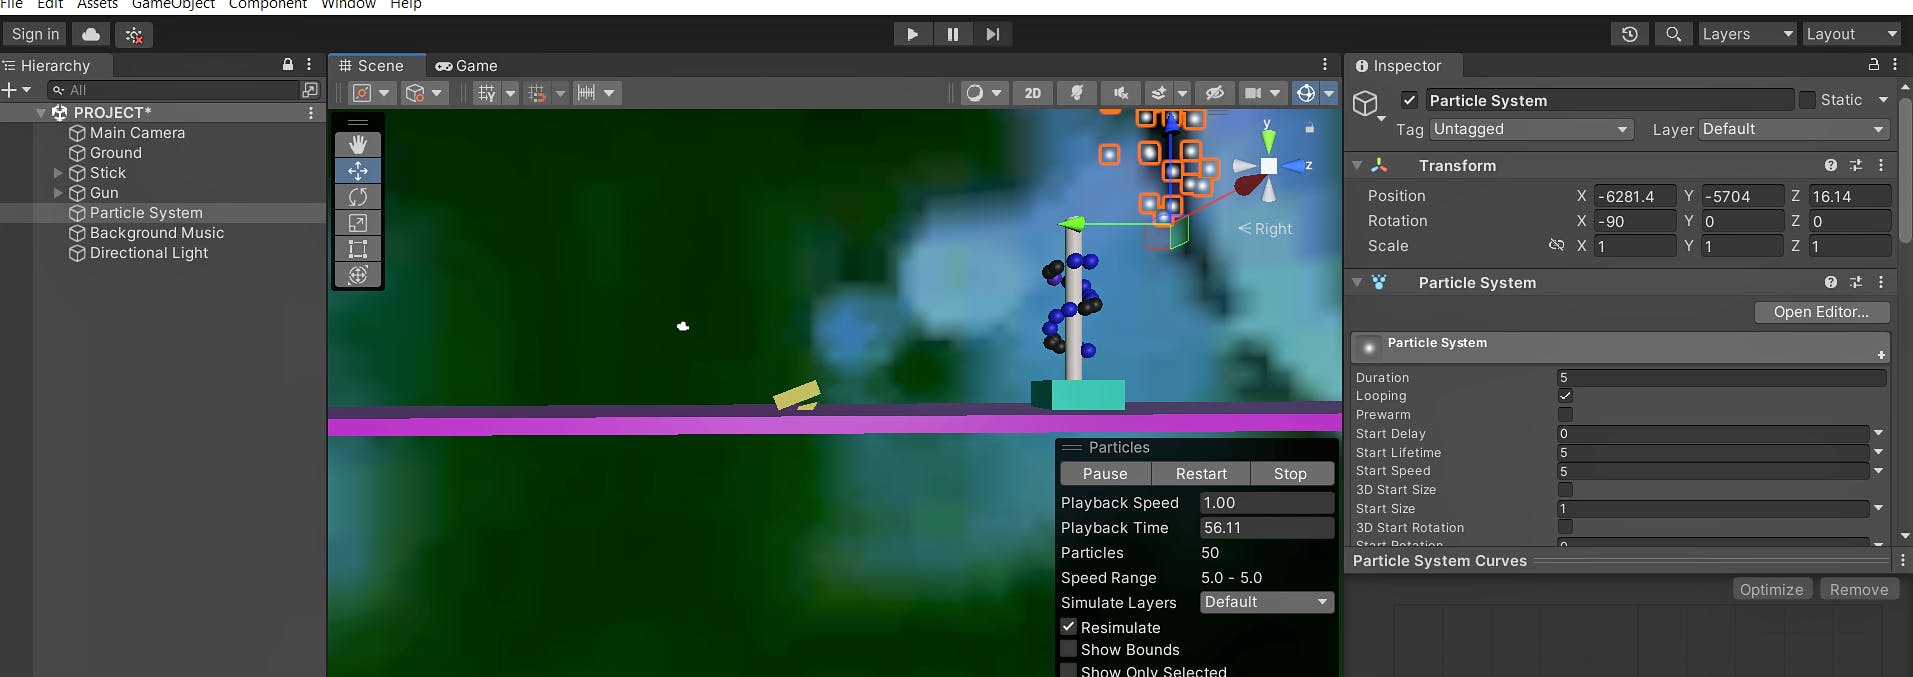
✔Adding Particle System for Visual Effects
Enhance our game by adding lighting effects and particle systems. Lighting can create atmosphere and mood, while particle systems can add realistic and dynamic elements to our game.
Particle systems allow you to generate and control particles, such as sparks, smoke, or explosions. To add a particle system, select the desired GameObject, go to "GameObject" > "Effects" > "Particle System". Customize the properties for emission rate, shape, size, color, and lifetime. Play the scene to observe and refine the particle effect.
Testing and Playing the Game:
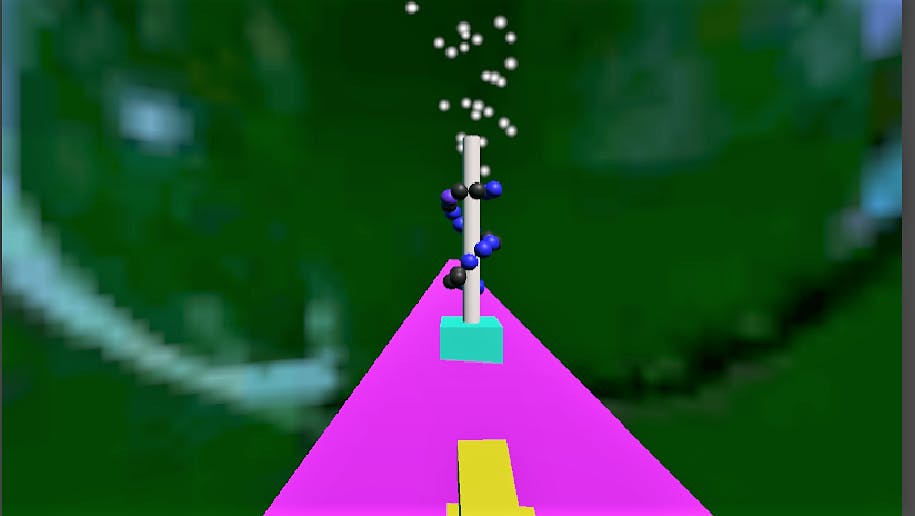
Hurray! We have completed our game🥳.
And there you have it! You've successfully learned how to use objects in Unity. From creating and manipulating GameObjects to adding Components and writing Scripts, you now have the skills to build amazing games.
Conclusion
In conclusion, we have explored the various stages of game development, from concept to design, implementation, testing, and final touches. We have covered essential aspects such as creating game mechanics, designing levels, implementing player controls, incorporating audio and visual effects, and more.
Thank you for joining this game development journey. I hope this blog has been informative and inspiring, and I wish you success in your future game development endeavors. Happy gaming!
